6. Printing Multiple Drawings on a Single Sheet
When
you have photos developed or professionally printed, you receive a
proof sheet with thumbnail images of every photo in the batch. You might
want to do something similar with Visio.
You’ve seen that you can tile one page across several sheets of paper. But how do you print several pages on one sheet of paper?
Although there is no explicit feature for doing this, there are several strategies for getting it done:
1. | Use your printer’s features to print multiple pages per sheet.
|
2. | Copy and paste each page to a new document.
|
3. | Export or copy each page as an image or metafile and then import or paste into a new document.
|
Using Printer Features
Not all printers have the same features, but many
have the option to print multiple pages on one sheet of paper. For
example, my HP LaserJet 2600 lets me print 1, 2, 4, 6, 9, or 16 pages
per sheet. To do this, I go to the Print dialog, click Properties, click
the Finishing tab, and then choose a number from the Pages Per Sheet
drop-down list.
Pasting Multiple Pages on a Single Page
You can copy each page and then paste it into another document. Although this sounds simple enough, many problems can surface:
To fit several pages onto one page, you need
to resize each page’s contents after pasting. SmartShape behavior can
actually get in the way of mass resizing, and create quite a mess.
Connectors might reroute, causing more mess.
Individual
pages can have different theme effects, theme colors, backgrounds, and
titles. Pasting all to the same page forces them to share the same
combination, which might not be what you want.
Pages might have different scales. A single page can have only one scale, so scale-related conflicts might arise.
Resizing
an entire page’s elements doesn’t resize font sizes. When you reduce
the size of a pasted drawing, the shapes shrink, but the text doesn’t.
Using an Export Format
The
most flexible way to create a proof sheet is to convert each page into a
metafile and then import each object into a blank drawing. Since
metafiles are “dumb graphics,” you can freely resize each one without
encountering the problems described previously.
Printing Multiple Pages on One Sheet of Paper Using Copy and Paste
1. | Start a new drawing from the IT Asset Management sample.
|
2. | Start a new, blank drawing.
|
3. | Tile the two drawing windows so that you can see both at the same time. Go to View, Window, Arrange All to do this.
|
4. | Go to the first page in the IT Asset Management sample. Make sure that no shapes are selected.
|
5. | Right-click
a blank area on the page and select Copy. This copies all the page’s
graphics plus any background-page details to the Clipboard.
|
6. | In the blank drawing, right-click the page and choose Paste Special. The Paste Special dialog appears.
|
7. | Choose
Picture (Enhanced Metafile) from the list and then click OK. The copied
page is pasted as a single vector-graphic object that you can freely
resize. You won’t have any of the resizing problems that you might have
found if you had pasted the data as Visio objects.
|
8. | Repeat steps 4 through 7 for each page in the IT Asset Management drawing until you have three objects in the new drawing.
|
9. | The
page shapes are likely too big for the drawing page and need to be
reduced. Press Ctrl+A to select all the shapes and then drag a corner
handle of the selection to reduce the size of all three page shapes at
the same time.
|
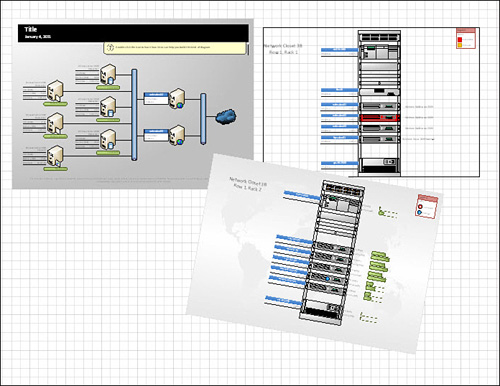
10. | Neatly rearrange the shapes on the page so that each page shape is clearly visible, as shown in Figure 7.
|
11. | Print to a printer or file as desired.
|
Another way to achieve the same result is to export
each page to a file, using the Save As dialog and choosing the file type
Enhanced Metafile (*.emf).
Although this is more labor-intensive, you may have
other uses for the exported graphics such as maintaining a time snapshot
for your drawing, or using the graphics in other documents.
|
Metafiles are a good choice for exporting and
importing pages because EMF or WMF files are vector formats. When you
export (or copy) each Visio page, Visio behavior is stripped out, and
only the pure graphical detail is preserved. When you re-import (or
paste special) the metafiles, then resize them, the graphics and text
will resize equally and print smoothly.
|
7. Printing Scaled Drawings at Reduced Size
Scaled
drawings are often designed to be printed out on large-format paper,
such as C-, D-, E-, A3-, A2-, or A1-sized sheets. These drawings can be
very detailed and are used on construction sites; the larger size makes
them easier to use in this environment.
You still might need to print them out in the office
on regular, office-sized paper. You can do this by using the Print Zoom
settings in the Page Setup dialog. The Adjust to % or Fit to X Sheets Across by Y Sheets Down settings make it a snap to print a large-format drawing page onto a small sheet of paper.
When you reduce a scaled drawing, it is important to
note that scale notations on the drawing are no longer accurate. Better
yet, use a physical scale symbol that visually shows the scale of the
drawing.
The More Shapes, Visio Extras, Annotations stencil has two scale-indicating shapes that you can use in your scaled drawings. Figure 8 shows the Drawing Scale and the Scale Symbol shapes in action.
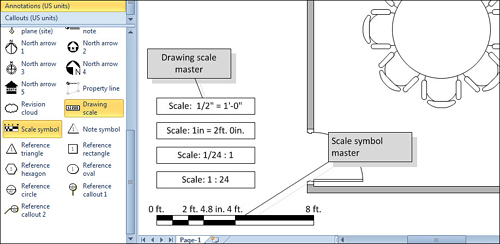
In Figure 8,
four variations of the Drawing Scale shape are shown. You can choose
the text that is displayed by right-clicking the shape. Because the
scale information is numerical, it is inaccurate if you reduce the
drawing at print time.
A better choice is the Scale Symbol. Because it
physically illustrates the drawing scale, it is still accurate in
reduced printouts.
If
you have used the Drawing Scale shape and want to indicate that the
scale information is wrong, consider using another shape from the
Annotations stencil. The Rounded Stamp and Angled Stamp masters, as
shown in Figure 9, are great for making eye-catching notes.