In the world of OneNote, the
phrase “taking notes” means a bit more than it says. Sure, you can use
OneNote to take notes in meetings or in class, but after seeing more of
its features and learning how to use them, it’s unlikely that taking
notes is all you’ll want to do with this useful program.
Typing and formatting text in OneNote works much the
same as you’re probably already used to from other Office programs like
Microsoft Word. However, unlike other programs that restrict your
editing area by well-meaning lines, rows, columns, cells, or fields, the
OneNote canvas is truly free-form and you can place content on a page
wherever you want it.
Typing Notes on a Page
To start taking notes on a page, follow these steps:
1. | In the Practice Notebook you created “Notebooks, Sections, and Pages,” create a new, blank page.
|
2. | Type a title into the dotted page title area at the top of the page.
|
3. | Click anywhere in the blank part of the page underneath the page title.
|
4. | When you see a flashing cursor, begin typing your notes (see Figure 1).

|
As you type in OneNote, a small gray frame appears
around the text you type. These frames are called note containers. They
are only visible while you type or format the text within them, or while
you move the mouse over them. Think of note containers as little
helpers that make it easier for you to line up text and objects on your
page. They don’t show up when you print a page or share a page with
someone over e-mail.
You can resize a note container by clicking the tiny
double arrows shown on the right side of the frame’s top border and then
dragging the mouse to the left or to the right to make the container
smaller or larger. This lets you quickly adjust the wrapping of text,
the way a text box would in a page layout program. For example, to make a
long, continuous paragraph of text easier to read and format, you could
make its note container narrower to mimic a column in a newspaper or
magazine.
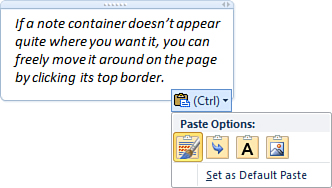
If a note container doesn’t appear quite where you
want it, you can freely move it around on the page by clicking its top
border (marked with a short row of small rivets) and then dragging the
container to the position on the page you want.
Note containers can be copied and pasted, deleted, or
dragged and merged into other note containers on the page. This kind of
flexibility makes OneNote ideal for brainstorming, ruminating over
ideas that are still changing and taking shape, and planning projects
that will change often over time (such as the outline for this book, for
example, which I created entirely in OneNote).
You can type all of your notes into a single note
container or click around the page and create several different note
containers and then line them up the way you want. It’s up to you.
|
If,
for some reason, you don’t want note containers to be displayed around
your text, you can easily turn them off. Click the File tab, and then
click Options. In the OneNote Options dialog box that opens, click the
Display category, and then deselect the Show note containers on pages
check box. Although you can’t move entire boxes of text around on the
page anymore when note containers are hidden, you can still move
individual text paragraphs. To do this, mouse over any line of text and
then click the four-headed arrow icon that appears to the left of that
paragraph. Once selected, drag the icon to a different location on the
page. You can also select multiple paragraphs and then move them all at
once by dragging the selection to the location you want. If you make a
mistake, click the Undo button on the Quick Access Toolbar (or press
Ctrl+Z on your keyboard) to go back to the way it was and then try
again.
|
Copying and Pasting Text
Aside from typing, one of the easiest ways to bring
information into OneNote is by copying text from any file, document, or
web page and pasting it on your notes pages. You probably already know
how to do this, but OneNote 2010 has a few new paste options that give
you greater control over the ways that copied information can appear in
your notebook.
To copy and paste text, follow these steps:
1. | In OneNote, on any notes page, select a line of text.
|
2. | On
the Home tab, in the Clipboard group, click Copy (or press Ctrl+C on
your keyboard) to copy your text selection. This keyboard shortcut is a
standard Windows shortcut, so if you want to copy text from another
document or program, select the text there and then press Ctrl+C before
switching to OneNote.
|
3. | In OneNote, click in a blank part of the notes page where you want to paste the copied selection of text.
|
4. | On
the Home tab, in the Clipboard group, click the small downward-facing
arrow under the large Paste button to reveal additional choices.
|
At this point, OneNote presents you with a small menu of four icons that you can click (see Figure 2).
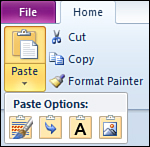
Moving the mouse over each icon displays a ToolTip
that tells you what will happen to pasted text when you click that
particular button:
Keep Source Formatting
will paste your copied text with its original formatting intact. For
example, if you copy red, bold text and paste it elsewhere on your page,
the copied text will still appear red and bold. This option is the
default paste option if you click the Paste button on the ribbon or
whenever you press Ctrl+V to paste copied text.
Merge Formatting
will paste your copied text and match the style formatting of the text
paragraph you’re pasting it into. For example, if you copy red, bold
Calibri 11 text and you paste it into an existing paragraph of black,
italic Arial 10 text, your pasted text will still appear red and bold,
but the font will be changed to Arial 10 and it will turn italic.
Keep Text Only
will paste the copied text as standard text, stripped of any
formatting. This is the easiest way to bring clean text from multiple
sources into OneNote.
Picture
will create a small, digitized image of the copied source text. You
might find this option useful when you want to preserve the exact
appearance of the source text (for example, if it was rendered on a web
page in a particular font that you don’t have installed on your
computer). Although this option creates a picture of the copied text
that you cannot edit after pasting, OneNote can include such pictures in
search results when you search your notebooks for keywords that are
shown in pasted images.
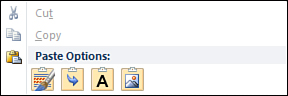
For a faster way to paste copied text in the way that
you want, right-click the page where you want the copied text to
appear, and then, on the shortcut menu (see Figure 3), click the Paste Options button you want.
If you prefer to paste text without first choosing a
paste option, that’s okay. You won’t miss out on the new paste options
in OneNote 2010. That’s because OneNote lets you adjust the formatting
of text even after it has been pasted on the page.
Near the bottom of pasted text, OneNote displays a
small button with a clipboard icon. You can click this button—or press
the Ctrl key as a simple shortcut—to open the Paste Options menu (see Figure 4). When you click the option you want, the formatting of the pasted selection is updated to your preference.
If you don’t like the result, you can click the button again to reopen the menu and make a different choice.
Changing the Default Paste Option
If you prefer a different default formatting option
for text you’ll paste into OneNote (for example, if you always want to
paste plain, unformatted text), you don’t have to override the default
setting with the Paste Options menu each time. Instead, follow these
steps to set a different default option:
1. | On any notes page, copy and then paste a line of text.
|
2. | At the bottom of the pasted text, click the Paste Options button that appears (or press Ctrl).
|
3. | Click
the icon of the paste option you want (for example, click the A icon
for Keep Text Only if you prefer to always paste copied text without
formatting).
|
4. | Now click the Paste Options button again (or press Ctrl again) and then click Set as Default Paste.
|
Once you have set a new paste
option, it is automatically applied whenever you paste text using the
Paste button on the ribbon or whenever you press Ctrl+V on your
keyboard. If you change your mind again later, you can set a different
default paste option by repeating the previous steps and choosing a new
paste option in step 3.