This section is about the
difference between recording a macro that will run successfully on a new
dataset and one that will make you cry in frustration when it fails on a
new dataset. You’ll rarely be able to record 100 percent of your macros
and have them work on different datasets, but with the tips in the
following subsections, you’ll greatly improve your chances.
The macro recorder is very literal, especially with
the default settings. For example, if you have cell A1 selected, then
begin the macro recorder and use the mouse to select your entire dataset
in range A1:B10, this is what will be recorded:
Range(“A1:B10”).Select
If the next time you run the
macro the dataset is A1:B20, your macro won’t run on all the rows. There
are two things you need to change to make the recorded macro work
properly. First, don’t use the mouse when selecting ranges. Second,
don’t use the default settings of the macro recorder.
Navigating While Recording
To get the most out of the macro recorder, you should
use the keyboard shortcuts to navigate the sheet, not the mouse. The
reason is that some of the keyboard shortcuts translate to commands
instead of specific cell selections. For example, if you record pressing
Ctrl+down-arrow to jump to the last row in a column, you will get
Selection.End(xlDown).Select
If your dataset changes in size the next time you run
the macro, the preceding line of code will be much more useful than if
you’d recorded the macro by using the mouse.
Relative References in Macro Recording
The second rule to successful macro recording is to
know when to turn relative referencing on and off. By default, it is
off, which has it uses, but you’ll often want it on.
|
You can turn Relative Referencing on and off as needed while recording a macro.
|
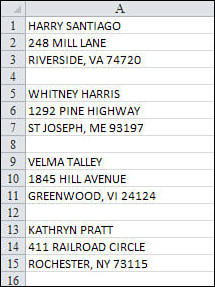
When relative referencing is off, the macro records specific cell addresses. Imagine you have a list of addresses similar to Figure 1.
Each address is exactly three rows, and a blank row separates each
address. To transpose an address to a single row, you would follow these
steps:
1. | Start in cell A1.
|
2. | Press the down-arrow key.
|
3. | Press Ctrl+X to cut the address.
|
4. | Press the up-arrow key and then the right-arrow key (to move to cell A2, remember, use the keyboard to navigate).
|
5. | Press Ctrl+V to paste the address next to the name.
|
6. | Press the left-arrow key once and the down-arrow key twice to move to the cell containing the city, state and ZIP Code.
|
7. | Press Ctrl+X to cut the city.
|
8. | Press the up-arrow key twice and the right-arrow key twice to move to the right of the street cell.
|
9. | Press Ctrl+V to paste the city.
|
10. | Press the left-arrow key twice and the down-arrow key once to move to the new blank row just beneath the name.
|
11. | Hold down the Shift key while pressing the down-arrow key twice to select the three blank cells.
|
12. | Press Ctrl+- to bring up the Delete dialog.
|
13. | Press R to select the Entire Row option and then press Enter to accept the command.
|
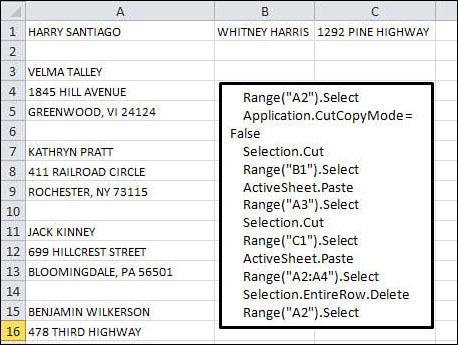
If you record these steps with relative referencing off, you will get code that is cell specific, as shown in the text box in Figure 13.5. The results of running this code repeatedly on the data from Figure 1 is shown in Figure 2. A couple of repetitions of the code overwrites the first address line, ruining the record.
If this example was your first recorded macro, you
might despair, as many before you have, at the uselessness of the
recorder. But there is a way to make it work, and that’s to turn on the
Use Relative References option found in the Code group on the Developer
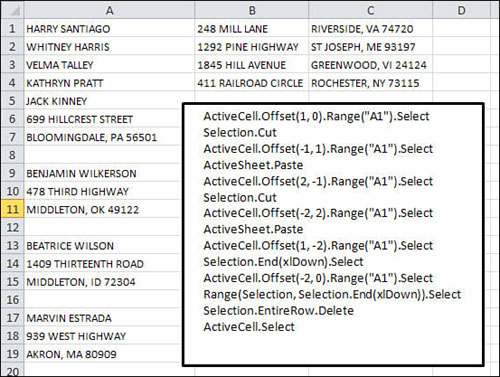
tab. Performing the same steps with relative referencing on returns the
results in Figure 3. As the active (or selected) cell moves down the column, the correct fields are cut and pasted to the proper row and column.
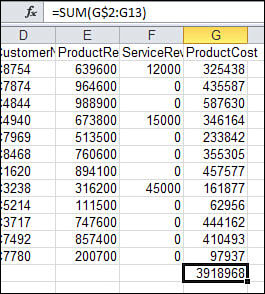
Avoid the AutoSum Button
If
you use the AutoSum button while recording a macro, Excel will record
the actual formula entered in the cell in R1C1 notation. It doesn’t
record that you wanted it to select the range above or to the left of
the formula. It’s just not that flexible. So, instead of using the
AutoSum button, manually type in the formula mixing relative and
absolute referencing.
For example, if you want to sum G2:G13, the AutoSum
function will create the formula =SUM(G2:G13), or in R1C1 notation,
=SUM(R[-12]C:R[-1]C). When viewed in R1C1 notation, you see how fixed
the formula is. Although it will work in any column that it’s placed in,
it specifically includes the cells 12 cells above (row 2) and directly
above (row 13) the formula cell. The problem is if you add more rows,
then the first cell is no longer 12 rows above—it’s more. The solution
is to type in the formula manually, fixing the row for the first
argument, as shown in Figure 4.