If you assign a shortcut key to your macro,
you can play the macro by pressing the key combination. Macros can also
be assigned to the Ribbon, the Quick Access toolbar, forms controls,
drawing objects, or you can run them from the Macros button in the Code
group on the Developer tab.
Running a Macro from the Ribbon
You can add an icon to a new group on the Ribbon to
run a macro. This is appropriate for macros stored in the Personal Macro
Workbook.
Adding a Macro Button to the Ribbon
Follow these steps to add a macro button to the Ribbon:
1. | Go to File, Options, Customize Ribbon.
|
2. | In the right list box, choose the tab name where you want to add the macro button.
|
3. | Click
the New Group button below the right list box. Excel adds a new entry
called New Group (Custom) to the end of the groups in that ribbon tab.
|
4. | To move the group to the left in the ribbon tab, click the up-arrow icon on the right side of the dialog several times.
|
5. | To rename the group, click the Rename button. Type a new name, such as Report Macros, and click OK.
|
6. | Open the upper-left drop-down and choose Macros from the list. Excel displays a list of available macros in the left list box.
|
7. | Choose a macro from the left list box.
|
8. | Click
the Add button in the center of the dialog. Excel moves the macro to
the right list box in the selected group. Excel uses a generic VBA icon
for all macros, which you can change in step 9.
|
9. | To rename or change the icon used for the macro:
- a. Select the macro in the right list box.
- b. Click the Rename button.
- c. Excel
displays a list of possible icons. Choose an icon or type a new name
for the macro in the Display Name field, such as Format Report, as shown
in Figure 1.
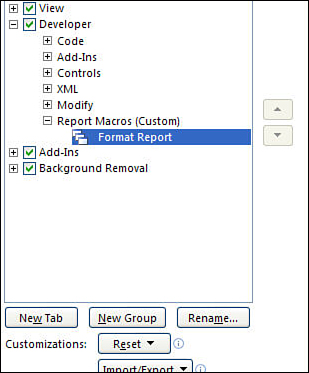
- d. Click OK to return to the Excel Options dialog.
|
10. | Click OK to close the dialog. The new button appears on the selected Ribbon tab.
|
Running a Macro from the Quick Access Toolbar
You can add a button to the Quick Access toolbar to
run your macro. If your macro is stored in the Personal Macro Workbook,
you can have the button permanently displayed in the Quick Access
toolbar. If the macro is stored in the current workbook, you can specify
that the icon should appear only when the workbook is open.
Running a Macro From the Quick Access Toolbar
Follow these steps to add a macro button to the Quick Access toolbar:
1. | Go to File, Options, Quick Access Toolbar.
|
2. | If
the macro should be available only when the current workbook is open,
open the upper-right drop-down and change For All Documents (Default) to
For FileName.xlsm. Any icons associated with the current workbook are displayed at the end of the Quick Access toolbar.
|
3. | Select Macros from the list in the upper-left drop-down. Excel displays a list of available macros in the left list box.
|
4. | Choose
a macro from the left list box and click the Add button in the center
of the dialog to move the macro to the right list box. Excel uses a
generic VBA icon for all macros, which you can change by following steps
5 and 6.
|
5. | To rename and change the icon used for the macro:
- a. Select the macro in the right list box.
- b. Click the Modify button.
- c. Excel
displays a list of possible icons. Choose an icon or type a new name
for the macro in the Display Name field, such as Format Report, as shown
in Figure 2. The name will appear as the ToolTip when you place your cursor over the button.
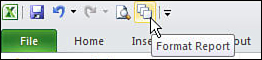
|
6. | Click OK to close the Modify Button dialog.
|
7. | Click OK to close Excel options. The new button appears on the Quick Access toolbar.
|
Running a Macro from a Form Control, Text Box, or Shape
You can create a macro specific to a workbook, store
the macro in the workbook, and attach it to a form control or any object
on the sheet to run it. Macros can be assigned to any worksheet object
such as clip art, a shape, SmartArt graphics, or a text box. To assign a
macro to any object, right-click the object and select Assign Macro.
Running a Macro from a Button on a Sheet
Follow these steps to attach a macro to a button on a sheet:
1. | In
the Controls group of the Developer tab, click the Insert button to
open its drop-down list. Excel offers 12 form controls and 12 ActiveX
controls.
|
2. | Click the Button (Form Control) icon in the upper-left corner in the drop-down.
|
3. | Move your cursor over the worksheet; the cursor changes to a plus sign.
|
4. | To draw a button, click and hold the left mouse button while drawing a box shape. Release the button when finished.
|
5. | Choose
the macro from the Assign Macro dialog and click OK. The button is
created with generic text such as Button 1. To customize the text or the
button’s appearance, refer to steps 6 and 7.
|
6. | To give the button a new caption:
- a. Right-click over the button and select Edit Text. The cursor within the button will become visible.
- b. Replace the current caption with your own text.
- c. When finished, click anywhere outside the button
|
7. | For further text and button formatting options, right-click over the button and select Format Control.
|
8. | Click the button to run the macro. |