If you have a Tablet PC running Windows XP
Tablet Edition or any edition of Windows 7, or you have a Single Touch
or Multi-Touch PC running any edition of Windows 7, you can use the
handwriting capabilities that are built in to OneNote 2010. Instead of
typing notes on your keyboard, you can handwrite them in your notebooks
by writing directly on your computer’s screen with a stylus or Tablet
pen.
If you’re running OneNote 2010 on Windows 7, you can
easily determine if your PC has Touch capabilities by clicking the Start
button on the Windows taskbar, and then right-clicking the word
Computer (look for it near the right column on the Start menu). On the
pop-up menu that appears, click Properties. In the System dialog box
that opens, look for the Pen and Touch confirmation under the System heading.
If you see “Pen and Single Touch Input Available” or “Pen and
Multi-Touch Input Available,” you can use OneNote’s handwriting
features. If you see “No Pen or Touch Input is available for this
display,” you’ll have to stick to the keyboard for now.
Handwriting features can have a number of benefits in
electronic note-taking. For starters, if you handwrite better and
faster than you type, taking notes will obviously be easier for you in
this mode. In meetings or in a classroom, typing notes on a noisy
keyboard in front of others can be distracting and even considered poor
etiquette, whereas handwriting your notes is virtually silent.
Additionally, if you frequently draw or sketch as part of your work, you
can do so right on the notes page you’re writing on, without having to
rely on predrawn shapes or imported images.
Another nice feature of digital handwriting is that
your pen strokes can be formatted much like text (for example, you can
change the thickness and color of your handwriting) and OneNote can even
convert a selection of handwriting to text whenever you want to send a
copy of your handwritten notes to colleagues or classmates in a more
legible and reusable text format.
The following step-by-step procedures assume that
you’re using OneNote on a Tablet PC. If you don’t yet have a device that
lets you enjoy OneNote’s handwriting features, feel free to skip this
section for now.
Handwriting and Drawing Notes
OneNote defaults to typed text input, but you can easily switch to Pen mode for handwriting and drawing on a page.
To use the handwriting and drawing notes features, follow these steps:
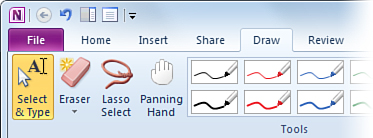
1. | On
the ribbon, click or tap the Draw tab. You’ll notice that the Select
& Type button appears orange, which means it’s currently selected
and you’re using the keyboard and mouse for input (see Figure 1).
|
2. | In
the Tools ribbon group, move the mouse over any of the color pens until
a ToolTip appears, informing you of the precise thickness and color of
each available pen.
|
3. | Click
or tap the pen that you want to use. As soon as the pen is active, note
that the Select & Type button is no longer selected, signaling you
that you’re now in Pen mode.
|
4. | Now pick up your Tablet PC pen or stylus and begin drawing or writing notes directly on your screen.
|
5. | To end Pen mode, click or tap the Select & Type button on the Draw tab again.
|
|
If you don’t have a Tablet PC, you can use the
built-in handwriting features in OneNote 2010 by purchasing an external
drawing tablet or digital pen and connecting it to your computer.
Although you can’t draw directly on your computer screen with these
devices, they do give you the same freedom from your keyboard—allowing
you to easily handwrite, draw, and sketch notes. A quick Internet search
for “PC drawing tablet” or “OneNote digital pen” should point you in
the right direction. Just make sure you check the manufacturer’s system
requirements list to ensure OneNote 2010 and Windows compatibility
before committing to a purchase.
|
Displaying Additional Pens and Highlighters
At first glance, the Draw tab on the ribbon shows you
only 10 pens of different colors and degrees of thickness and four
highlighters in as many colors. By expanding the gallery to full view,
you can reveal additional presets.
To display additional pens and highlighters, follow these steps:
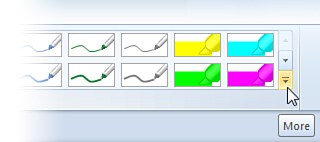
1. | On
the Draw tab, in the Tools group, click the More drop-down arrow in the
lower-right corner of the box showing the pens and highlighters (see Figure 2).
|
2. | Click or tap any of the additional pens that are displayed in the Built-in Pens section of the gallery.
|
Customizing a Pen or Highlighter
If the colors and line thickness of the pen and
highlighter presets don’t meet your needs, you can create your own
custom pens by following these steps. Although it might seem tempting to
click the big Color & Thickness button that’s shown on the Draw tab
of the ribbon, that command applies only to shapes and existing ink
strokes.
To change the color and thickness of pens and highlighters, do the following:
1. | On
the Draw tab, in the Tools group, click the More drop-down arrow in the
lower-right corner of the box showing the pens and highlighters (see Figure 5.12).
|
2. | Click or tap the More Colors and Thickness Options command that appears near the bottom of the menu.
|
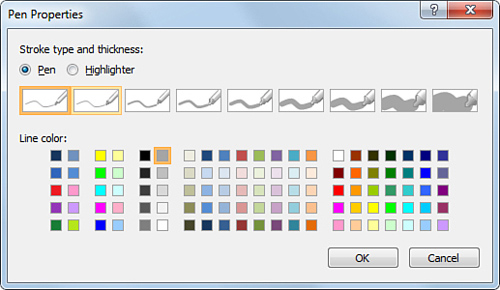
3. | In the Pen Properties dialog box that opens (see Figure 3),
click or tap a custom line thickness and color that you want your new
pen or highlighter to have. You can rest the mouse pointer over the
thickness and color swatches to display a ToolTip describing the line
thickness and color properties.
|
4. | Click
OK to create the new pen or highlighter with the properties you
selected. New pens and highlighters are automatically added to the
Favorite Pens list on the ribbon. Click the More drop-down arrow (see Figure 5.12) whenever you want to see the full list of your pens and highlighters.
|
|
You can add a handful of your favorite pens and
highlighters to the Quick Access Toolbar over the ribbon. First
customize your favorite pens the way you want, and then click the
drop-down arrow to the right of the Quick Access Toolbar Toggle any or all of the Favorite
Pen or Favorite Highlighter commands on the Quick Access Toolbar menu to
display the pens near the top of the OneNote program window. The
benefit of pinning them to the toolbar is that they’ll never disappear
from view, even when you click away from the Draw tab. If you have more
pens that you want to keep at your fingertips, consider creating a
custom ribbon group with all your pens and highlighters and then place
it on any ribbon tab you want.
|