Excel provides many built-in formulas, but
sometimes you need a custom formula not offered in the software. You can
create functions in VBA that can be used just like Excel’s built-in
functions, such as SUM, VLOOKUP, and MATCH, to name a few. After the
user-defined function (UDF) is created, a user needs to know only the
function name and its arguments.
A few things to keep in mind when you create a UDF:
UDFs can only be entered into standard
modules. Sheet and ThisWorkbook modules are a special type of module; if
you enter the function there, Excel won’t recognize that you are
creating a UDF.
A variable is a
word used to hold the place of a value, similar to an argument.
Variables cannot have any spaces or unusual characters, such as the
back-slash (\) or hyphen
(-). Make sure any variables you create are unique. For example, if
your function is called BMI, you cannot have a variable with the same
name.
A variable type describes the
variable as string, integer, long, and so on. This tells the program how
to treat the variable—for example, integer and long—though both numbers
have different limitations. The type also tells the program how much
memory to put aside to hold the value.
A
simple UDF formula is not that different from a formula you write down
on a sheet of paper. For example, if asked how to calculate the final
cost of a store item, you would explain that it’s the sale price *(1 +
tax rate). Similarly, in a FinalCost UDF, you might enter FinalCost =
SalePrice* (1+ TaxRate).
A UDF can only
calculate or look up and return information. It cannot insert or delete
rows or color cells. The UDF has the same limitations as built-in
functions.
Structure of a UDF
Like a normal function, a UDF consists of the
function name followed by arguments in parentheses. To help you
understand this, follow these steps to build a custom function to add
two values in the current workbook. It is a function called ADD that
will total two numbers in different cells. The function has two
arguments:
Add(Number1,Number2)
Number1 is the first number to add; Number2 is the
second number to add. After the UDF has been created, it can be used on a
worksheet.
1. | Open the VBE by going to Developer, Code, Visual Basic.
|
2. | Find the current workbook in the Project Explorer window.
|
3. | Right-click over the current workbook and select Insert, Module. A new module will be added to the Modules folder.
|
4. | Double-click the new module to open it in the Code pane.
|
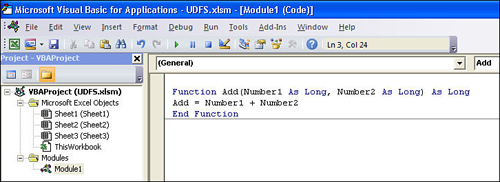
5. | Type the following function into the module’s Code pane, as shown in Figure 1.
|
Function Add(Number1 As Long, Number2 As Long) As Long
Add = Number1 + Number2
End Function
Let’s break this down:
Function name: ADD.
Arguments are placed in parentheses after the name of the function. This example has two arguments: Number1 and Number2.
As Long defines the variable type as a whole number between -2,147,483,648 to 2,147,483,647. Other variable types include
As Integer if you were using a whole number between -32,768 and 32,767.
As Double if you were using decimal values.
As String if you were using text.
ADD =Number1 + Number2: The result of the calculation is returned to the function, ADD
Not all the variable types in the function have to be
the same. You could have a string argument that returns an integer—for
example, FunctionName(argument1 as String) as Long.
|
When computers were slower and every bit of memory
mattered, the difference between Integer and Long was crucial. But with
today’s computers, in most cases memory doesn’t matter and Long is
becoming preferred over Integer because it doesn’t limit the user as
much.
|
How to Use a UDF
After the function is created in the code, follow these steps to use it on a sheet:
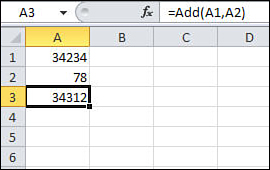
1. | Type any numbers into cells A1 and A2.
|
2. | Select cell A3.
|
3. | Press Shift+F3 to open the Paste Function dialog box (or from the Formulas tab, choose Insert Function).
|
4. | Select the User Defined category.
|
5. | Select the ADD function and click OK.
|
6. | Place your cursor in the first argument box and select cell A1.
|
7. | Place your cursor in the second argument box and select cell A2.
|
8. | Click OK. The function will return the calculated value, as shown in Figure 2.
|
Sharing UDFs
Where you store a UDF affects how you can share it:
Personal.xlsb—
If the UDF is just for your use and won’t be used in a workbook opened
on another computer, you can store the UDF in the Personal Workbook.
Workbook— If the UDF needs to be distributed to many people, you can store it in the workbook in which it is being used.
Template—
If several workbooks need to be created using the UDF, and the
workbooks are distributed to many people, you can store it in a
template.
Add-in— If
the workbook is to be shared among a select group of people, you can
distribute it via an add-in.
Using Select Case to Replace Nested IF
A really useful application of a UDF is with a Select
Case statement. A Select Case statement is similar to a nested IF
statement, but much easier to read. Also, since the new 64 nested IF
statements allowed in 2010 are not compatible in legacy versions of
Excel, using a UDF with Select Case statements ensures compatibility.
The statement begins with Select Case and then the
variable you want to evaluate. Next, follow the Case statements, which
are the possible values of the variable, each including the action you
want to take when the variable meets the Case value. You can also
include a Case Else, as a catch-all for any variable that doesn’t fall
within the predefined cases. The statement ends with End Select.
Within the Case statements, you have the option of
using comparison operators with the word Is, such as Case Is <5 if
the variable is less than 5. You also have To, used to signify a range,
such as Case 1 to 5.
Example: Calculate Commission
Imagine you have the following formula on a sheet.
For the different type and dollar of hardware, there’s a different
commission percentage to use in the commission calculation. It’s rather
difficult to read and also to modify.
=IF(C2="Printer",IF(D2<100,ROUND(D2*0.05,2),ROUND(D2*0.1,2)),IF(C2="Scanner",
IF(D2<125,ROUND(D2*0.05,2),ROUND(D2*0.15,2)),IF(C2="Service
Plan",IF(D2<2,ROUND(D2*0.1,2),ROUND(D2*0.2,2)),ROUND(D2*0.01,2))))
Instead take the same logic, make it a Select Case
Statement, and see the commission percentage breakdown for each hardware
item. You can easily make changes, including adding a new Case
statement. And because in the original formula the commission
calculation for each hardware type is the same (price*commission
percentage), that formula doesn’t need to be repeated in each Case
statement. Use the Select Case statements to set the commission
percentage and have a single formula at the end to do the calculation.
You can also provide more flexibility in case users enter a different hardware description, for example “Printers” instead of just “Printer.”
|
In the code below, there is text following an
apostrophe (’). For example: ’If Hardware is Printer or Printers, do the
following.
Any text following an apostrophe is called a comment
and not treated as code. Use comments to leave yourself notes about what
the line of code is for. Comments do not have to be after the
corresponding line of code. They can be anywhere within the Sub or
Function, except directly inline before code - because then you are also
turning the code into a comment.
|
Function Commission(Hardware As String, HDRevenue As Long) As Double
Select Case Hardware 'Hardware is the variable to be evaluated
    Case "Printer", "Printers" 'If Hardware is Printer or Printers, do the
following
         If HDRevenue < 100 Then 'If Hardware is less than 100
             ComPer = 0.05 'then ComPer is 5%
         Else 'else, ComPer is 10%
             ComPer = 0.1
         End If
     Case "Scanner", "Scanners"
         If HDRevenue < 125 Then
             ComPer = 0.05
         Else
             ComPer = 0.15
         End If
     Case "Service Plan", "Service Plans"
         If HDRevenue < 2 Then
             ComPer = 0.1
         Else
             ComPer = 0.2
         End If
     Case Else
             ComPer = 0.01
End Select
'Once a value is assigned to ComPer, do the calculation and return it to
'the function
        Commission = Round(HDRevenue * ComPer, 2)
End Function
Example: Calculate BMI
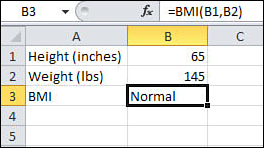
This
example takes the user input, calculates the BMI (body mass index),
then compares that calculated value to various ranges to return a BMI
descriptive, as shown in Figure 3.
When creating a UDF, think of the formula in the same way you would
write it down, because this is very similar to how you will enter it in
the UDF. The formula for calculating BMI is as follows:
BMI=(weight in pounds*703)/height in inches(squared)
The table for returning the BMI descriptive is as follows:
Below 18.5 = underweight
18.5-24.9 = normal
25-29.9 = overweight
30 & above = obese
The code for calculating the BMI then returning the descriptive is the following:
Function BMI(Height As Long, Weight As Long) As String
'Do the initial BMI calculation to get the numerical value
calcBMI = (Weight * 703) / (Height ^ 2)
Select Case calcBMI 'evaluate the calculated BMI to get a string value
    Case Is < 18.5 'if the calcBMI is less than 18.5
        BMI = "Underweight"
    Case 18.5 To 24.9 'if the calcBMI is a value between 18.5 and 24.9
        BMI = "Normal"
    Case 25 To 29.9
        BMI = "Overweight"
    Case Is > 30 'if the calcBMI is greater than 30
        BMI = "Obese"
End Select
End Function