The Screen Clipper and Launcher is a tiny program
that loads itself when your computer starts up and stays in memory until
you turn your computer off again. Keeping it enabled lets you:
Launch the full OneNote 2010 program with a keyboard shortcut instead of hunting down and double-clicking its program icon.
Create
so-called “side notes,” which are an electronic version of the yellow
sticky notes that might be plastered all over your computer monitor
right now.
Use a hotkey to bypass the user interface for creating instant screen clippings.
Record new audio clips in your notes without first having to start OneNote.
This small but useful program is often overlooked for
two main reasons. For one, it’s placed in the Windows Startup folder on
your computer when OneNote 2010 is first installed (see Figure 1).
Over the past few years, many computer users have gotten in the habit
of clearing the contents of their Startup folder in an effort to save
every last bit of available memory. I can understand this quite well. It
seems that just about every other program that you install these days
leaves a little icon near the clock display on the right side of the
Windows taskbar. Most of these icons take up both space and memory
without any real benefit. Up until the most recent versions of Windows,
which hide these icons after a time, it wasn’t uncommon for a typical
computer user to see a cluttered row of some 10–20 icons on the Windows
taskbar.

Personally, I’m all for disabling any unnecessary
apps and useless add-ins to help keep your computer running smoothly.
However, I do recommend keeping the OneNote Screen Clipper and Launcher
available, especially if you come to appreciate the functionality that
it provides.
Another
reason why the OneNote Screen Clipper and Launcher is often overlooked
even when it’s running is due to a design change in the way taskbar
icons are displayed in the most recent versions of Windows, including
Windows 7 and Windows Vista. To eliminate the clutter of icons that can
accumulate over time as you install more and more programs, Windows
eventually begins to hide the icons that install themselves in the
notification area on the Windows taskbar.
Although I personally love this feature in Windows 7,
it means that I must manually unhide any icons of the programs that
actually offer some functionality by staying in the background, such as
the OneNote Screen Clipper and Launcher.
Before you can enjoy the benefits of keeping the
OneNote Screen Clipper and Launcher running in the background, take a
moment to check whether it is loading properly on your computer and
learn how to unhide its icon in the Windows taskbar notification area.
Turning the Screen Clipper and Launcher On or Off
To check whether the OneNote Screen Clipper and Launcher is loading on startup, follow these steps:
1. | Click the Windows Start button, click All Programs, and then click the Startup folder.
|
2. | Look for a purple OneNote icon labeled OneNote 2010 Screen Clipper and Launcher (see Figure 1).
|
If the icon is there, it means that the OneNote
Screen Clipper and Launcher program is loaded automatically each time
you start Windows.
If you (or someone else who uses your computer)
disabled the startup program for some reason, you can reenable it by
following these steps:
1. | In OneNote, click the File tab and then click Options.
|
2. | In the Options dialog box that opens, click Display in the left column.
|
3. | On the right side, select the check box that’s labeled Place OneNote Icon in the Notification Area of the Taskbar.
|
4. | Click OK to save changes.
|
|
On
rare occasions, it’s possible that the check box in the OneNote Options
dialog box is properly shown as selected, but the OneNote Screen
Clipper and Launcher isn’t actually loading. This can happen if the
program was manually terminated in the Windows Task Manager, either by
you or someone else using your computer. In this case, you can easily
restore the correct setting by following steps 1–4 in the previous
procedure twice in a row—first deselecting the check box and clicking OK
and then reselecting the check box and clicking OK.
|
If the Screen Clipper and Launcher icon was shown in
your Startup folder and if the display check box in the OneNote Options
dialog box is selected, but you can’t see a small OneNote icon near the
right side of your Windows taskbar, it means Windows has hidden it from
view to avoid taskbar clutter.
Keeping the Screen Clipper and Launcher Permanently Displayed
If you’re running any edition of Windows 7, you can
easily turn on and off the icons of any programs that are running in the
background—including the OneNote Screen Clipper and Launcher.
Here’s how:
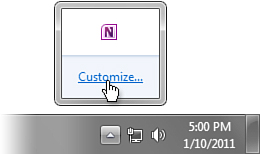
1. | On
the Windows 7 taskbar, click the small, upward-facing arrow near the
clock display in the lower-right corner of your screen. In the little
pop-up menu that appears, you’ll see a small version of the OneNote
icon, plus any other icons of programs hidden from view.
|
2. | Click Customize (see Figure 2).
|
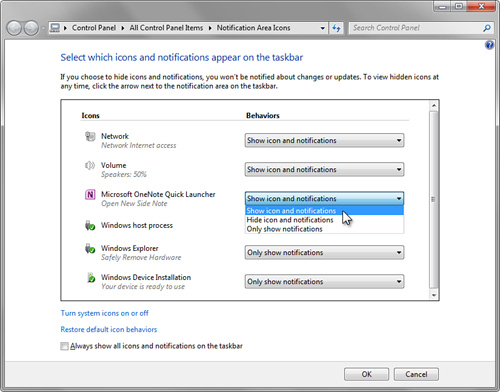
3. | In
the Notification Area Icons dialog box that opens, scroll through the
list and find the OneNote icon labeled as Microsoft OneNote Quick
Launcher (merely an alternate, shorter name for the OneNote 2010 Screen
Clipper and Launcher).
|
4. | Click the drop-down menu next to the OneNote icon and then select Show icon and notifications (see Figure 3). The OneNote icon will now appear in the notification area. It is no longer hidden.
|
5. | Click OK to save your changes.
|
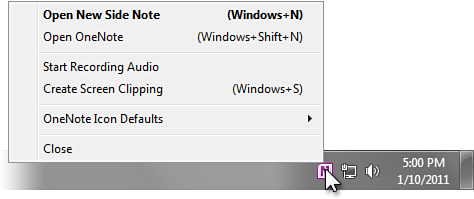
After you’ve followed these steps, the icon remains
visible, and its functionality can be accessed by right-clicking it or
by using the keyboard shortcuts shown on the right-click menu (see Figure 4).
|
If you’re using Windows Vista, you can control the
display of your notification icons in a similar way. Right-click the
clock display in the lower-right corner of the taskbar and then click
Customize Notification Icons. In the Customize Notification Icons dialog
box that opens, find the OneNote icon and then change its listed
behavior from Hide to Show. Click OK to save your changes.
It’s possible that Windows Vista may forget your
display preferences for notification icons again after some time or
after you install a new program on your computer. If that happens, set
your display preference for the OneNote icon again. This issue is
specific to Windows Vista only.
Happily, all editions of Windows 7 properly honor your icon display preferences after you’ve set them.
|