Visio is a multiple-document interface (MDI)
application, which means you can have several documents open at once,
and all the documents are contained within Visio’s main window. Contrast
this with, for example, Microsoft Word, in which each document has an
entirely separate window.
Visio basically has three levels of windowing:
Task panes are generally owned by drawing windows.
They can be anchored or docked to sides and corners of drawing windows,
or they can freely float in space. You’ve seen task pane windows
already, but the complete list includes the following:
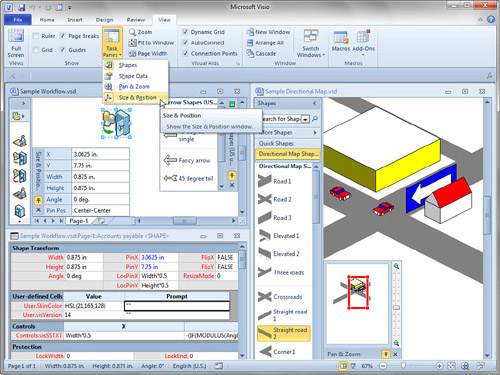
Figure 1
shows a rather busy sampling of Visio windows. You see two different
drawing windows. The workflow drawing on the left has a collapsed Shapes
window, a stencil anchored to the top-right corner, the Size &
Position task pane anchored to the lower-left, and a separate ShapeSheet
window for the selected shape at the bottom. The directional map window
on the right shows the Pan & Zoom window in the lower-left corner,
in addition to an expanded Shapes window.

You can show other task panes by going to the View
tab and then clicking the Task Panes drop-down button in the Show group .
Managing Windows
Because of Visio’s different window-within-window levels, there are a few points to consider when managing windows.
Minimizing and Maximizing Drawing Windows
Because drawing windows are inside Visio’s
application window, they have their own set of minimize and maximize
buttons. These buttons can jump around, depending on whether or not your
window is maximized.
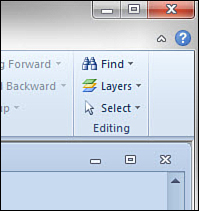
In Figure 2,
the drawing window is not maximized, so it has its own frame that you
can tug on. Its minimize, maximize, and close controls are in the
upper-right corner of the window, as you would expect.

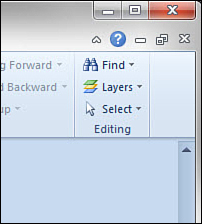
In Figure 3,
the drawing window is maximized. Notice how its window controls have
jumped up to the top of the application window. They’re above the Ribbon
just under the Visio application window controls. If you aren’t used to
seeing this behavior, it can be a bit of a surprise!

Switching Between Windows
If your drawing windows are maximized, you don’t see
any of the other windows’ frames. If they aren’t maximized, they can
still be hidden behind one another, and minimized windows can be easy to
overlook.
There are several ways to navigate between windows:
- Pressing Ctrl+Tab cycles through the windows.
- The
Switch Windows button in the lower-right corner shows a pop-up list of
open windows. This is the last button in the status bar, just to the
right of the magnifying glass icon. Click on it, and you can choose from
windows that are open in Visio. It is helpful for discovering windows you didn’t think were open!
- In the Window group on the View tab, the Switch Windows button provides a drop-down list of available windows.
The View tab’s Window group also contains controls
for arranging and cascading all open windows. These come in handy when
you have many windows open, start to lose track of them and need to tidy
things up.
You can open new windows using the New Window button.
This lets you look at different pages within a drawing or even compare
different locations on the same page.
Positioning Task Panes
Task pane windows behave a bit differently, however.
They can float in space or be docked or anchored to sides of a drawing
window. When panes are docked, you will see a pin control. Clicking the
pin activates auto-hide, which can save you space by collapsing the pane
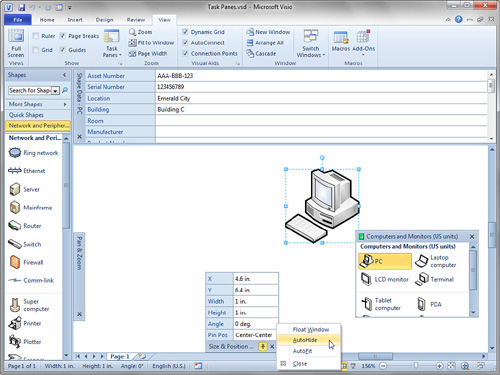
after a few moments of inactivity. Figure 4 shows task panes in their various states.

In Figure 4,
the Shape Data window is docked to the top of the window and spans the
entire drawing area. The Pan & Zoom window is anchored to the left
side and autohidden. Simply drag a pane near the edge of the drawing
window, and you see a snapping behavior that either anchors to the edge
or docks to the full side of the window.
You can set a task pane to autohide by unclicking the
pin icon, or by right-clicking and unchecking the AutoHide menu item,
as the figure shows with the Size & Position pane. When you mouse
over a collapsed pane, it expands so that you can access its controls.
Finally,
the Computers & Monitors stencil is freely floating in space. You
can even drag task panes so that they float outside the Visio
application window.
Using Full-Screen View
One last window option is full-screen view. With
Visio’s full-screen view, you see only the current page, maximized to
fill your screen. No Ribbons, no scrollbars—just clean, pure Visio
content.
To get to full-screen view, simply press F5 or use
the Ribbon and go to View, Views, Full Screen. Press F5 again or press
Esc to return to the normal Visio environment. You can also right-click
anywhere and choose Close from the context menu.
Full-screen view is largely static, meaning you can’t
interact with the Visio drawing very much. You can’t select shapes nor
edit them, but hyperlinks do work, and you can page through a document.
When you’re in full-screen view, clicking
the screen advances to the next page. Right-clicking gives you more
navigation control so that you can go forward, backward, or jump to any
page within a document.