Themes allow you to change the look of a
single page or all pages in your document at the click of a mouse. Using
themes is much easier than formatting individual shapes, and themes
help you maintain consistency in your diagram.
Some might view themes as eye-candy, but I think that
themes offer more than “just a pretty face.” If you are printing drafts
of a diagram to a black-and-white printer, a simple, low-color theme
saves toner. If, however, you want to use your drawing in a presentation
or publish it to the Web, black-and-white will bore your audience.
Choosing a vibrant theme can spice up your drawing and keep your viewers
interested. Themes are great for matching corporate style guidelines,
and Visio’s themes match up with PowerPoint’s, letting you seamlessly
use Visio graphics in your presentations.
Using the Theme Gallery Control
The Design tab has a Themes group that contains a gallery of
themes. Each theme shows a preview of the theme’s colors, fill effects,
fonts, corner-rounding, and arrowhead treatments. You can scroll the
theme gallery or drop it down to see more themes.
Remember that themes have Live Preview enabled, so
you can “look without buying.” If you hover your mouse cursor over a
theme, the drawing changes to show you how it will look with this theme.
If you like the look, click the theme to apply it to your diagram. If not, move your mouse cursor away and your diagram reverts to the way it was.
Changing Themes for Pages and Diagrams
1. | Create a new workflow diagram (located in the Flowchart template group).
|
2. | Drop
some of the snazzy workflow shapes onto the page. Add some text to the
shape and make sure that a few of the shapes are connected.
|
3. | Add a background and a title using the Backgrounds and the Borders & Titles controls on the Design tab.
|
4. | Add
a new page or two to the document using the Insert Page tab. The new
pages should have the same background as the first page.
|
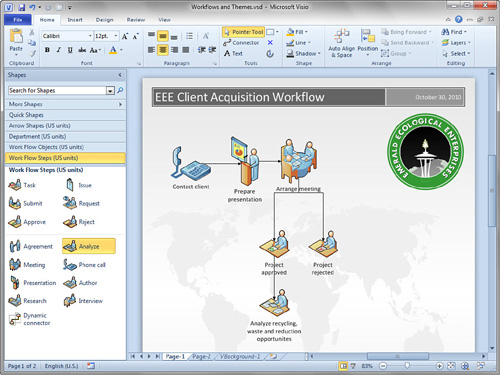
5. | Copy shapes from the first page and paste them onto the new pages. You should have something similar to that shown in Figure 1.
|
6. | On
the Design tab, hover over various themes in the theme gallery. Notice
how Live Preview gives you a peek at what the theme will look like in
your diagram.
|
7. | Apply various themes by clicking items in the theme gallery. Notice how the colors and styles on the background page change too.
|
8. | Notice that the stencils in the Shapes window also update to reflect the current theme.
|
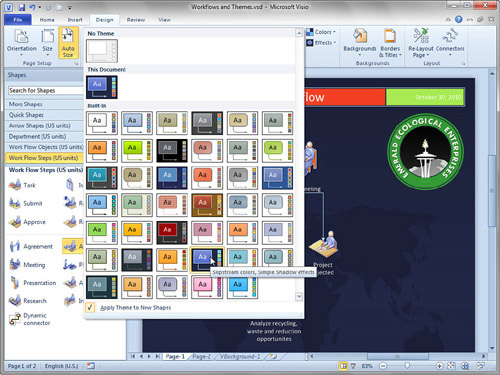
9. | Click the drop-down button for the theme gallery to reveal more themes, as shown in Figure 2. Notice that the theme’s name appears when you pause the mouse cursor over an item.
|
10. | There
are three areas in the drop-down separated by shaded bars: No Theme,
This Document, and Built-in. You can click No Theme at any time to bring
your drawing back to its original, “unthemed” state.
|
11. | Visit
the other pages in your document by clicking the page tabs at the
bottom. Notice that the other pages have the theme that you chose.
|
Setting Themes, Theme Colors, and Theme Effects
To
the right of the theme gallery are two small drop-down controls labeled
Theme Colors and Theme Effects. Themes are actually combinations of
color sets and graphical effects. Effects include fonts, fills, lines,
arrowheads, and shadows.
This separation is great if, for example, you like
the colors of a particular theme, but would rather have different
graphical effects. Instead of looking for a different theme altogether,
just drop down the Effects list and look for different combinations of
line, fill, text and shadow while leaving the colors untouched.
Notice that each item in these drop-downs has a name
below the icon. These make it easier to match the style of your Visio
diagram to that of a PowerPoint presentation.
Visio Theme Colors match up reasonably well with
those in PowerPoint, but the names of effects do not. The reason is
probably that PowerPoint’s effects change the layout and look of the
slide in addition to graphical styles. So PowerPoint’s notion of an
“effect” is quite a bit different from Visio’s.
Applying Themes to Pages versus Documents
Themes can be applied to all the pages in a document
or to just one page at a time. If you right-click an item in the theme
gallery, you see two choices: Apply to All Pages and Apply to Current
Page.
These settings are sticky; whichever setting you
choose becomes the default. For example, if you right-click a theme and
then choose Apply to All Pages, your entire document gets the theme you
clicked. The next time you click a theme, every page will change to the
new theme as well! There is one tricky gotcha involved here. Themes
can’t be independently applied to pages that share the same background.
Take the foreground pages for the document in Figures 2.23 and 2.24.
These pages share the same background. If you change the theme for one
page, the other page’s theme changes too. It doesn’t matter which Apply
setting you use.
Of course, if your document has multiple pages that
use different backgrounds or no background at all, you can freely apply
different themes to different pages.
Themes that you use in a document show up in a short
list that helps you to remember which ones you’ve already used. Notice
the This Document area of the themes gallery (refer to Figure 2.24).
If you hover over one of these items, the ToolTip tells you which pages
the theme is used on, plus the theme’s name. For example, you might see
“Aspect colors, Simple Shadow effects: Used by page(s) 3–4.” Very
useful information if you have a complex document with many pages.
Preventing Theming
Sometimes,
you don’t want shapes to react to themes. A simple example of this is a
Stop Sign shape. It should always be red with white text, and doesn’t
need rounded corners, transparency, or soft shadows.
You have already seen a shape that ignores themes for good reason. Take another look at Figures 2.23 and 2.24
and notice the Emerald Ecological Enterprises company logo in the
upper-right corner. Regardless of the theme applied, its colors and
effects remain unchanged. This is good, because we wouldn’t want the
corporate folks to come down on us for mangling company branding
You can easily prevent a shape from reacting to
themes. Right-click it, click Format, and then uncheck Allow Themes.
This works best if you choose this setting while your drawing still has
No Theme applied. If your shape has already been inadvertently themed,
click Remove Theme in the same submenu.
Another way to make theme-proof shapes is to format them with Standard Colors, instead of Theme Colors, which we discuss next.
Setting Color Palettes and Themes
When you format the color of a shape’s line, fill, or text, Visio presents a color palette with several sections. In Figure 3, you can see that the drop-down palette has Theme Colors, Standard Colors, and Recent Colors sections.
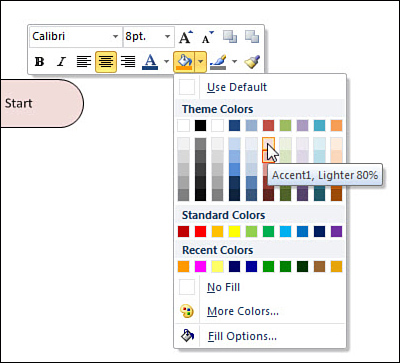
You’ve probably noticed that theme colors change with the theme. Because of this, they have names. In Figure 3,
you can see the ToolTip under the mouse: “Accent 1, Lighter 80%.” This
indicates that you are applying an “80% shade” of the “Accent 1” color
to the shape.
If you explore the columns of colors in the color
palette, you see that they are named White, Black, Background, Line,
Fill, Accent1, Accent2, Accent3, Accent 4, and Accent 5. Because colors
can float with themes, it helps to think about the name of the color and
what you are applying it to. Instead of thinking, “Oh, let’s make this
shape’s outline mauve!” you might instead think, “Hey, let’s apply the
theme’s Line color to the outline of this shape!”
If you don’t want your colors to float with
the theme, use a color from the Standard Colors or Recent Colors region.
This approach makes sense for things like a stop sign, where you’d want
white text and a red fill, no matter the theme. You can also click on
More Colors to access a full-spectrum color palette and a wider range of
standard colors.