IT tutorials
 
Office
 

Microsoft OneNore 2010 : Inserting Pictures and Screen Clippings (part 1) - Inserting a Picture from a File, Inserting Pictures into Notes

- Free product key for windows 10
- Free Product Key for Microsoft office 365
- Product Key Free : Microsoft Office 2019 – Serial Number
6/8/2013 7:34:30 PM

Admit it, one of the things that made your old paper notebook so appealing was the ability to gather a bunch of handouts, note scraps, scribbles, doodles, and printouts, toss them into your notebook, and then take it all with you. Sure, it was messy and unorganized, but at least you had that cozy feeling of having everything with you—even if it was going to be a time-consuming affair to leaf through it all and find anything again.

OneNote 2010 does it one better. It matches the ability of a paper binder to keep everything together and take it all with you, but it also lets you easily find everything again. With OneNote, you’ll also never have to worry about one of the scraps of paper falling out of your notebook.

First things first, though: Take a closer look at the many ways in which you can collect and import all kinds of information into your OneNote notebook.

1. Inserting a Picture from a File

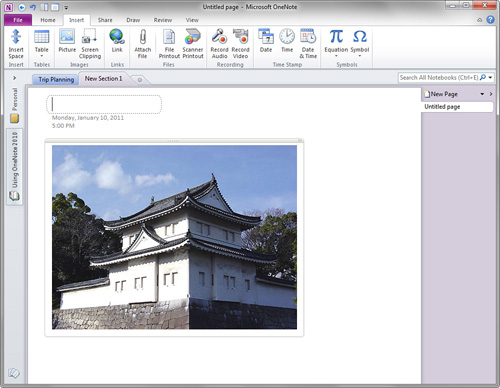
Pictures can be placed inside of a notes container or as free-floating objects on any page in OneNote (see Figure 1).

Figure 1. A digital image file, as it appears after being inserted onto a notes page.

A picture can be any image file that your computer supports, such as a photo that you’ve taken with your digital camera, a stock photograph that you’ve purchased on a website, a piece of clip art that you’ve downloaded, or a screenshot that you’ve captured with your computer.

2. Inserting Pictures into Notes

Although you can simply copy an image from somewhere on your computer and then paste it into OneNote, properly inserting the actual picture file may produce higher-quality results, especially with pictures that contain text or other kinds of information.

To insert a picture into your notes, follow these steps:

1.
Open or create the page in your notebook where you want to insert a picture.

2.
Click the place on the page where OneNote should place the imported picture. A blinking cursor will confirm where the picture will be placed.

3.
On the Insert tab, in the Images group, click Picture.

4.
In the Insert Picture dialog box that opens, navigate to the folder on your computer where the picture file is stored.

5.
Click to select the picture you want to insert and then click Insert.

OneNote 2010 lets you import a large variety of image file types, including the following:

  • Joint Photographic Expert Group (.jpg, .jpg, .jpe, .jfif)

  • Portable Network Graphics (.png)

  • Graphics Interchange Format (.gif)

  • Tagged Image File Format (.tif, .tiff)

  • Encapsulated PostScript (.eps)

  • Windows Bitmap (.bmp, .dib, .rle)

  • Windows Metafile (.wmf)

  • Windows Enhanced Metafile (.emf)

  • Compressed Windows Enhanced Metafile (.wmz)

  • Macintosh PICT (.pct, .pict)

  • Compressed Macintosh PICT (.pcz)

  • Computer Graphics Metafile (.cgm)

  • WordPerfect Graphics (.wpg)

To import a picture from a web page, use the same steps as given previously, except in step 4, type or paste the full URL of the image at its web location into the File name box and then click Open.

 
Others
 
- Microsoft OneNore 2010 : Collecting and Researching Information - Meet the OneNote Screen Clipper and Launcher
- Microsoft Outlook 2010 : Using RSS Feeds in Outlook (part 3) - Managing Messages
- Microsoft Outlook 2010 : Using RSS Feeds in Outlook (part 2) - Managing Folders
- Microsoft Outlook 2010 : Using RSS Feeds in Outlook (part 1) - Adding RSS Feeds, Viewing RSS Feeds
- Microsoft Access 2010 : Customizing Fields - Indexing Field Values, Validating Data Entry
- Microsoft Access 2010 : Customizing Fields - Assigning Required Fields and Requiring Data Entry, Setting Default Values
- Microsoft Access 2010 : Customizing Fields - Formatting Field Contents, Creating Input Masks
- Microsoft Visio 2010 : Working Around the Diagram - Using Visio Windows
- Microsoft Visio 2010 : Working Around the Diagram - Using Themes to Change the Look of Pages and Documents
- Microsoft Project 2010 : Working with Resources (part 2) - Grouping Resources, Filtering Resources
 
 
Top 10
 
- Microsoft Visio 2013 : Adding Structure to Your Diagrams - Finding containers and lists in Visio (part 2) - Wireframes,Legends
- Microsoft Visio 2013 : Adding Structure to Your Diagrams - Finding containers and lists in Visio (part 1) - Swimlanes
- Microsoft Visio 2013 : Adding Structure to Your Diagrams - Formatting and sizing lists
- Microsoft Visio 2013 : Adding Structure to Your Diagrams - Adding shapes to lists
- Microsoft Visio 2013 : Adding Structure to Your Diagrams - Sizing containers
- Microsoft Access 2010 : Control Properties and Why to Use Them (part 3) - The Other Properties of a Control
- Microsoft Access 2010 : Control Properties and Why to Use Them (part 2) - The Data Properties of a Control
- Microsoft Access 2010 : Control Properties and Why to Use Them (part 1) - The Format Properties of a Control
- Microsoft Access 2010 : Form Properties and Why Should You Use Them - Working with the Properties Window
- Microsoft Visio 2013 : Using the Organization Chart Wizard with new data
Technology FAQ
- Is possible to just to use a wireless router to extend wireless access to wireless access points?
- Ruby - Insert Struct to MySql
- how to find my Symantec pcAnywhere serial number
- About direct X / Open GL issue
- How to determine eclipse version?
- What SAN cert Exchange 2010 for UM, OA?
- How do I populate a SQL Express table from Excel file?
- code for express check out with Paypal.
- Problem with Templated User Control
- ShellExecute SW_HIDE
programming4us programming4us