3. Inserting a Picture from a Scanner
If you have a scanner, it’s easy to import pictures
that you don’t already have in a digital format. This is not only a
convenient way of importing old photographs, but for scanning business
cards, receipts, sketches, napkin scribbles, and diagrams as well.
To import pictures that you don’t already have in digital format, follow these steps:
1. | Open or create the page in your notebook where you want to insert the scanned picture.
|
2. | Click
the place on the page where OneNote should place the imported picture. A
blinking cursor will confirm where the picture will be placed.
|
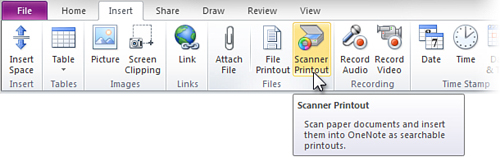
3. | On the Insert tab, in the Files group, click Scanner Printout (see Figure 2).
|
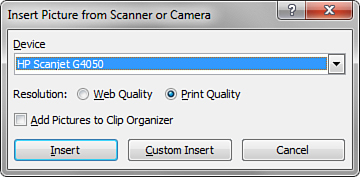
4. | In
the Insert Picture from Scanner or Camera dialog box, make sure the
make and model of the scanner you’re using is selected as the active
device (see Figure 3).
|
5. | Choose
from the available resolution settings by clicking either Web Quality
(if you’re only going to be looking at the scanned image on your screen)
or Print Quality (if you plan to print the notes containing the scanned
image).
|
6. | Click Insert.
|
Depending on the make and model of your own scanner,
you might see a slightly different user interface after you click the
Scanner Printout button, but the results should be the same. As long as
your scanner is properly configured and you can successfully scan images
with it in other Windows programs, it should work perfectly fine in
OneNote, too.
If you’re having trouble scanning, please refer to
the documentation that came with your scanner and make sure you download
the latest drivers for it from the manufacturer’s website.
|
If you want to save an image that you’ve scanned into
OneNote to your hard drive, either for archiving purposes or to use it
in other programs, you can do so by right-clicking the scanned image in
OneNote and then clicking the Save As command on the shortcut menu.
Note that this is not necessary if you want
to keep all of your scans in OneNote. Inserted and scanned images that
appear on your notes pages in OneNote have already been saved
automatically as part of your notebook.
|
4. Inserting a Screen Clipping on the Current Page
OneNote includes a super-easy way to take a picture of anything on your computer screen and place it into your notes.
Although you can already do this for the whole screen
by pressing the PrtScn (print screen) key on your keyboard and then
pasting the result where you want it, OneNote lets you first draw a
selection over the specific part of your screen that you want to
capture. A so-called “screen clipping” then is placed into your notes.
To create a screen clipping, do the following:
1. | On
your computer screen, bring into view whatever it is that you want to
capture. For example, open a particular page on a website in your
browser.
|
2. | In
OneNote, navigate to the page where you want to insert the screen
clipping and then click on the page where you want it to appear.
|
3. | On the Insert tab, in the Images group, click Screen Clipping.
|
4. | OneNote
hides itself and brings back into view what you had on your screen
before. The screen dims and the cursor changes to a crosshair symbol,
prompting you to select the part of the screen you want to capture.
|
Move the mouse to the upper-left corner of the area
you want to capture, click and hold the left mouse button, and then drag
a rectangular selection over the screen until everything you want to
include in the screen clipping is selected (see Figure 4).

|
|
5. | When
your selection is complete, release the mouse button. OneNote restores
itself and places your screen clipping on the current page where you had
activated the cursor.
|
|
After a screen clipping is inserted into your notes,
the image is still available on the Windows Clipboard, which means you
can paste it anywhere else you might want to keep it—such as a Microsoft
Word document or a Microsoft PowerPoint presentation. You don’t need to
paste it elsewhere, of course; you can always copy it from your OneNote
page again later.
|
If you make a mistake and grab too much (or too
little) of the screen, delete the screen clipping and simply take
another. You can remove screen clippings that you no longer want by
clicking the image and then pressing the Delete key to delete it.
Screen clippings are ideal for quickly capturing and
importing all kinds of information that you just want to capture and
don’t need to edit again. For example, if you’re doing research for a
trip and you want to compare the cost of airfare between several
airlines, you could take screen clippings of the fare tables and compare
them side by side in OneNote. As such information is sure to change
quickly at the source, your screen clippings can provide a lasting
record of such information.
Screen clippings are also great for taking
screenshots of software for which you’re providing training materials.
If you’re a blogger, you can use screen clippings to create
illustrations for your blog posts. If you use OneNote to maintain
information related to your hobbies, such as gardening or keeping an
inventory of a recipe or movie collection, you can clip photos of your
flowers, recipes, or DVDs and import them into your notes to make them
more visually interesting. In school, you can quickly
grab your class schedules, lab info, study group agendas, and just
about anything else that appears on your school’s website or digital
handouts.