5. Inserting a Screen Clipping with Quick Filing
If you plan to import a whole bunch of information as
screen clippings and you don’t want to always first go to the place in
your notes where the images should be placed, you can use an alternate
way of inserting them.
Instead of placing each screen clipping image at the
location of your cursor on the page, OneNote will prompt you with its
quick filing dialog box, in which you can select the specific page to
which the current screen clipping will be sent.
To insert a screen clipping using the quick filing dialog box, follow these steps:
1. | On
your computer screen, bring into view whatever it is that you want to
capture. For example, open a particular page on a website in your
browser.
|
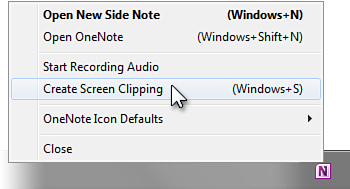
2. | At
the far right of the Windows taskbar, right-click the small OneNote
icon in the notification area, and then click Create Screen
Clipping (see Figure 5). For the same result, you can also hold down the Windows key on your keyboard and then press S.
|
3. | The
screen dims and the cursor changes to a crosshair symbol, prompting you
to select the part of the screen you want to capture. Move the mouse to
the upper-left corner of the area you want to capture, click and hold
the left mouse button, and then drag a rectangular selection over the
screen until everything you want to include in the screen clipping is
selected.
|
4. | When
your selection is complete, release the mouse button. Unlike what
happened with the Insert Screen Clipping command in the previous
procedure, OneNote now displays the Select Location in OneNote dialog
box, which is also known as the quick filing feature.
|
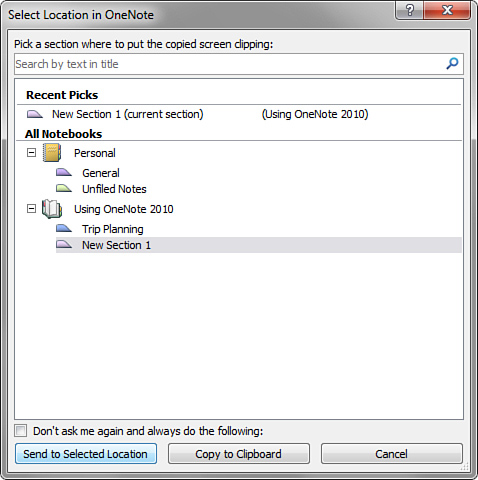
5. | In
the list, click the notebook section where you want the screen clipping
to appear, and then click Send to Selected Location (see Figure 6).
|
This method is easier for collecting multiple screen
clippings because you don’t have to first decide where on a specific
page in a specific notebook you want each screen clipping to go. Another
benefit of using this method is that you can do it anytime you see
something on your screen that you want to capture, without first
switching over to OneNote.
Using
the quick filing method, OneNote will automatically create a fresh, new
page for each screen clipping you take and place it in the section that
you’ve selected. You can later consolidate or discard specific screen
clippings, after you’ve had time to review them all and move the ones
you want to keep to specific sections in your notebooks.
|
If you don’t want to use the quick filing feature for
screen clippings, you can copy a screen clipping to the Windows
Clipboard. In step 5 of the previous procedure, try using the Copy to
Clipboard button at the bottom of the Select Location in OneNote dialog
box after you’ve taken a screen clipping. After you’ve clicked this
button, press the Ctrl+V (Paste) keyboard shortcut to manually paste the
screen clipping wherever you want it—on a page in OneNote, into a Word
document or an e-mail message, or wherever else you want it.
Whether you quick file your screen clippings or copy
and paste them, either of these methods makes collecting information
with multiple screenshots much faster than clicking the Screen Clipping
command on the Insert tab of the ribbon each and every time.
|