IT tutorials
 
Office
 

Microsoft OneNore 2010 : Inserting Pictures and Screen Clippings (part 4) - Collecting All Future Screen Clippings in One Place

- Free product key for windows 10
- Free Product Key for Microsoft office 365
- Product Key Free : Microsoft Office 2019 – Serial Number
6/8/2013 7:37:56 PM

6. Collecting All Future Screen Clippings in One Place

If you want to make the process of collecting multiple screen clippings a complete no-brainer, consider creating a special section in your main notebook that you’ll use as the automatic target destination for all of your future screen clippings.

To collect multiple screen clippings in one place, follow these steps:

1.
In your notebook, create a new section and name it “My Screen Clippings” (or a similarly meaningful description).

2.
Bring into view what you want to capture, right-click the small OneNote icon in the notification area (or hold down the Windows key and press S), and then click Create Screen Clipping.

3.
When the screen dims, drag a selection with the mouse to create your screen clipping.
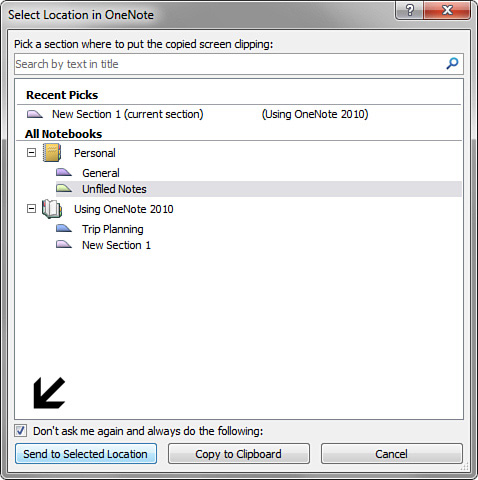
4.
In the Select Location in OneNote dialog box, find the “My Screen Clipping” section you created in step 1 and click it once to select it.

5.
Just underneath the list of notebooks and sections, select the check box labeled Don’t Ask Me Again and Always Do the Following (see Figure 7).

Figure 7. Selecting the check box at the bottom of the quick filing dialog box will send all future screen clippings that you’ll capture to the notebook section that you select here. It’s a convenient way to have OneNote automatically gather all screen clippings in one place.


6.
Click Send to Selected Location.

OneNote creates a new page for your screen clipping in this section. In addition, because you checked the box that told it to stop asking for a destination the next time, all of your future screen clippings that you initiate from the OneNote icon in the Windows taskbar notification area or with the Windows key + S keyboard shortcut will be sent to this location automatically without you having to make a decision or selection each time you take a screen clipping.

This is the fastest way to take a bunch of screen clippings for collecting information and research and then review the “My Screen Clippings” section in your notebook later, where you can consolidate, delete, or move screen clippings to where you ultimately want them.

If you later decide you want the quick filing feature to prompt you again about where you want each screen clipping to be saved, you can restore the appearance of the Select Location in OneNote dialog box. Click the File tab and then click Options. In the OneNote Options dialog box that opens, click the Send to OneNote category in the list on the left, and then change the Screen clippings option to Always ask where to send. Click OK to save your preference.

This procedure will restore the quick filing dialog box after each screen clipping that you initiate with the OneNote icon in the Windows taskbar notification area or with the Windows key + S keyboard shortcut.

 
Others
 
- Microsoft OneNore 2010 : Inserting Pictures and Screen Clippings (part 3) - Inserting a Screen Clipping with Quick Filing
- Microsoft OneNore 2010 : Inserting Pictures and Screen Clippings (part 2) - Inserting a Picture from a Scanner, Inserting a Screen Clipping on the Current Page
- Microsoft OneNore 2010 : Inserting Pictures and Screen Clippings (part 1) - Inserting a Picture from a File, Inserting Pictures into Notes
- Microsoft OneNore 2010 : Collecting and Researching Information - Meet the OneNote Screen Clipper and Launcher
- Microsoft Outlook 2010 : Using RSS Feeds in Outlook (part 3) - Managing Messages
- Microsoft Outlook 2010 : Using RSS Feeds in Outlook (part 2) - Managing Folders
- Microsoft Outlook 2010 : Using RSS Feeds in Outlook (part 1) - Adding RSS Feeds, Viewing RSS Feeds
- Microsoft Access 2010 : Customizing Fields - Indexing Field Values, Validating Data Entry
- Microsoft Access 2010 : Customizing Fields - Assigning Required Fields and Requiring Data Entry, Setting Default Values
- Microsoft Access 2010 : Customizing Fields - Formatting Field Contents, Creating Input Masks
 
 
Top 10
 
- Microsoft Visio 2013 : Adding Structure to Your Diagrams - Finding containers and lists in Visio (part 2) - Wireframes,Legends
- Microsoft Visio 2013 : Adding Structure to Your Diagrams - Finding containers and lists in Visio (part 1) - Swimlanes
- Microsoft Visio 2013 : Adding Structure to Your Diagrams - Formatting and sizing lists
- Microsoft Visio 2013 : Adding Structure to Your Diagrams - Adding shapes to lists
- Microsoft Visio 2013 : Adding Structure to Your Diagrams - Sizing containers
- Microsoft Access 2010 : Control Properties and Why to Use Them (part 3) - The Other Properties of a Control
- Microsoft Access 2010 : Control Properties and Why to Use Them (part 2) - The Data Properties of a Control
- Microsoft Access 2010 : Control Properties and Why to Use Them (part 1) - The Format Properties of a Control
- Microsoft Access 2010 : Form Properties and Why Should You Use Them - Working with the Properties Window
- Microsoft Visio 2013 : Using the Organization Chart Wizard with new data
Technology FAQ
- Is possible to just to use a wireless router to extend wireless access to wireless access points?
- Ruby - Insert Struct to MySql
- how to find my Symantec pcAnywhere serial number
- About direct X / Open GL issue
- How to determine eclipse version?
- What SAN cert Exchange 2010 for UM, OA?
- How do I populate a SQL Express table from Excel file?
- code for express check out with Paypal.
- Problem with Templated User Control
- ShellExecute SW_HIDE
programming4us programming4us