In OneNote 2010, you can use
page templates to dramatically change the appearance of pages. Templates
can add decorative designs and photorealistic backgrounds to your notes
pages or let you create useful and functional documents like simple
forms, calendars, and interactive checklists.
Templates offer a convenient way to give all of the
pages in your notebook a consistent look. You can choose to apply
templates to only specific pages that you create, or you can have
OneNote create all new pages with a particular template already applied.
In addition, you can customize any existing template design or create
your own from scratch.
Applying a Template to a New Page
The first thing to know about templates in OneNote is
that you can apply templates only to new pages. This isn’t some
terrible oversight by the developers but a legitimate trade-off for the
freedom that the unique OneNote canvas provides. Unlike other programs
that constrain their pages with lines, grids, or cells of some kind,
OneNote’s canvas is as free-form as a sheet of paper. As a result,
applying a template that potentially contains several objects in
specific locations on the page is very likely to cause collisions with
objects that are already present on that page. Computers can do many
things, but their artificial intelligence isn’t yet so advanced that
they can effectively guess how you would prefer to untangle such a mess
if it were to happen. But don’t worry—I’ll show you a simple workaround
later that lets you bring your existing notes and your favorite page
template together after all.
To browse through OneNote’s built-in templates and apply a template to a new page, follow these steps:
1. | Open the section in which you want to apply the template.
|
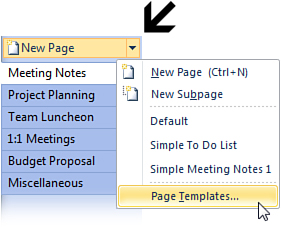
2. | Located
over the page tabs in the right margin, click the small drop-down arrow
next to the New Page button, and then click Page Templates (see Figure 1).
|
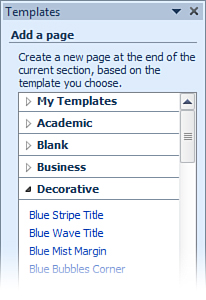
3. | In the Templates task pane that opens, click a category to view the templates it contains (see Figure 2).
|
4. | To
browse through the list of available templates, click any of their
names in the expanded category list. As long as the current page is
still free of notes, OneNote will reuse the same page to apply the
template you select so you can see what it looks like.
|
5. | When
you’ve found a template that you like and it has been applied to the
page, click the X in the upper-right corner of the Templates task pane
to close it.
|
6. | If the page wasn’t created where you wanted it, click and drag its page tab to move it to the position that you want.
|
After a template is applied to a page, you can start
to add notes to it. Templates that don’t just provide a decorative
background but also include some page content don’t have to be used “as
is;” you can easily delete any parts of the template placed on the page.
You can also modify the formatting of any of the template content to
something that you like better. For example, if you like the template
that you’ve applied, but you prefer a different font for the text it
uses, feel free to simply change it.
Applying a Template to an Existing Page
As I mentioned in the previous section, it’s
technically not possible to apply a template to an existing page that
already contains notes. However, in most situations, you can use the
following simple workaround to achieve the same result.
To apply a template to an existing page, follow these steps:
1. | Click the small drop-down arrow next to the New Page button over the page tabs and then click Page Templates.
|
2. | In the Templates task pane, find the template you want and then apply it to a new page.
|
3. | On the page, delete any template page content that you don’t want to keep.
|
4. | In your notebook, navigate to the page of notes that you want to use with the template you applied to the new page.
|
5. | Click
anywhere on the page and then press Ctrl+A three times in a row. Ctrl+A
is the keyboard shortcut for the Select All command, which works
incrementally in OneNote. Depending on the contents of your page and the
location of your cursor, you might need to press Ctrl+A up to three
times in a row to select everything on the page.
|
6. | On the Home tab, in the Clipboard group, click Copy.
|
7. | Navigate back to the new page to which you applied the template.
|
8. | Click anywhere on the page and then press Ctrl+V. This is the keyboard shortcut for the Paste command.
|
The
success of this workaround depends on the complexity of your existing
notes page. You might need to clean up the new page a little after
pasting your notes onto it to make sure that all of your note containers
and objects are where you want them. You might also want to copy and
paste the page title and date and time stamp of the original page.
If copying and pasting all of the page contents at
once proves to be a bit too errorprone for your particular page, try
selecting and copying individual note containers and then pasting them
one by one instead.
Again, this is merely a suggested workaround to the
technical limitation, so it’s probably best to keep your expectations
reasonably low. Remember that the Undo command (Ctrl+Z) on the Quick
Access Toolbar can quickly put things back to the way they were.
Automatically Applying a Template to All New Pages
If you’re working on a notebook that will have lots
of pages whose content is related, you might want to consider formatting
those pages with a consistent template applied. Even just a subtle
visual page background can give the pages you create within a section a
common feel to them, reminding you where you are in your notebook.
Later, when you learn to share notebooks with others, this can also be
useful to signal people you work with that they’re in the right place.
Going through the steps to apply a template can get
tedious if you’re working with a lot of pages. Thankfully, OneNote lets
you specify a particular template to be used for all new pages that are
created in the current section.
To automatically apply a template to all new pages, follow these steps:
1. | If
you closed the Templates task pane, you can open it again by clicking
the small drop-down arrow next to the New Page button over the page
tabs, and then clicking Page Templates.
|
2. | In the Templates task pane, look for the heading Choose default template, which is located near the bottom of the task pane.
|
3. | In the drop-down list, find and select the name of the template you want to be applied to all new pages in the current section.
|
4. | Click the X in the upper-right corner of the Templates task pane to close it.
|
|
The
default template that you choose in the Templates task pane is only
applied to pages in the current section. If you switch to a different
notebook section and create a new page there, it will use the default
blank page unless you also take the time to specify a new default
template for that particular notebook section.
|
Customizing an Existing Page Template
If you don’t want to take the time to design a
brand-new page template from scratch, you can start with a template that
you already have, modify its contents and appearance, and then save it
as a new template that you can then apply to new pages.
To customize an existing page template, follow these steps:
1. | Click the small drop-down arrow next to the New Page button over the page tabs and then click Page Templates.
|
2. | In the Templates task pane, find the template you want and then apply it to a new page.
|
3. | Change
any of the page content that you want to modify. For example, you could
change the character and color formatting of text, remove any objects
you don’t want to keep, insert objects you want to add, or move things
around on the page where you want them.
|
4. | When
the templates page is to your liking, go back to the Templates task
pane and look for the heading Create new template, which is located near
the bottom of the task pane.
|
5. | Click Save current page as a template.
|
6. | In
the Save As Template dialog box, give the template a new, unique name.
If you want to automatically apply this template to new pages in this
section, click the check box underneath the Template Name field, and
then click Save.
|
7. | OneNote
creates a new category called My Templates, which appears at the top of
the list of categories in the Templates task pane. This shortcut makes
it easy to find and apply your custom templates again.
|
Creating Your Own Page Template
This method is very similar to customizing an
existing template, except that you start with a blank page and then add
your own elements. You may want to wait to follow along with this
example until you know OneNote a little better.
To create your own page template, follow these steps:
1. | Click the small drop-down arrow next to the New Page button over the page tabs and then click Page Templates.
|
2. | In
the Templates task pane, expand the Blank category and then click
Default. This creates a new, blank page in the current section that you
can use as the basis of the new template you’re creating.
|
3. | On
the blank page that OneNote created, create and arrange content that
you want the template to contain. Take care to not include too much
placeholder text or obtrusive sample content as you’ll just have to
remove or replace it again when the template is applied to new pages in
the future. Simple templates are often best.
|
4. | When
the page is to your liking, go back to the Templates task pane and look
for the heading Create new template, which is located near the bottom
of the task pane.
|
5. | Click Save current page as a template.
|
6. | In
the Save As Template dialog box, give the template a unique name. If
you want to also automatically apply this template to new pages in this
section, click the check box underneath the Template Name field and then
click Save. OneNote creates a new category called My Templates, which
appears at the top of the list of categories in the Templates task pane.
This shortcut makes it easy to find and apply your custom templates
again.
|
|
If
you want to share your custom template with someone else, first apply
the template to a new page. Switch to that new page, click the File tab
on the ribbon, and then click Save As. Under Step 1, select Page. Under
Step 2, select OneNote 2010 Section. Click Save As, type a filename, and
then click Save. You can send the saved file in e-mail or copy it to a
file share or USB thumb drive. Recipients can double-click this file on
their computer to open it in OneNote, where they can add it to their own
list of templates.
|
Downloading Additional Page Templates
You’re not limited to the built-in templates that
OneNote 2010 provides. You can download hundreds of free templates from
the Microsoft Office website.
To download additional page templates, follow these steps:
1. | Click the small drop-down arrow next to the New Page button over the page tabs and then click Page Templates.
|
2. | In the Templates task pane, immediately underneath the list of template categories, click the Templates on Office.com link.
|
3. | On
the web page that opens in your browser, look in the left column called
All Templates and then scroll down and click the My Programs link.
|
4. | In the Microsoft Office 2010 column, click OneNote 2010 and then click Save.
|
5. | In the Search box at the top of the web page, enter a keyword (for example, Calendar)
and then press Enter. The search results are now filtered for OneNote
2010, and you can download any of the templates you find.
|
Websites are frequently
changed. If the previous steps don’t exactly match what you’re seeing on
the live website, go to Office.com and then use the site navigation to
go to the Templates site and then filter your results for OneNote 2010.
In the search results, you may see many templates marked as “OneNote
2007” and “OneNote 2003.” These are all safe to use with OneNote 2010,
as this version specification indicates the lowest version of OneNote
that the template can be used with. Because OneNote 2010 is the newest
version of the program, you’re not limited to which templates you can
download from the site.