Print Preview
For your sample drawing, Print Preview looks pretty
much as it does in the drawing window. Because all three pages are
landscape oriented, on standard office page sizes, this is expected.
Print Preview’s usefulness is more apparent when you
have drawings that are tiled across several sheets of paper, have odd
page sizes, or have multiple pages with mixed orientations.
Exploring Print Preview
1. | Continue using the file Ch09 Printing IT Assets.vsd that you created earlier.
|
2. | Go to File, Print Preview.
|
3. | Note that Print Preview has a Print button, which is the same as the one you see in the Backstage area.
|
4. | Print
Preview also has a Page Setup button, that
lets you configure many different page settings. This is the same Page
Setup that you access by right-clicking page tabs or access from the
Design tab.
|
5. | Say
you want to blow up a drawing to make a poster, but you don’t have a
large-format printer. You can magnify the printed size of the current
page, and tile it across several sheets of printer paper. You don’t have
to alter the drawing at all!
- a. Click Page Setup and find the Print Zoom section of the Print Setup tab.
- b. Set
the page to Fit to 3 Sheets Across by 3 Sheets Down. Note how the
preview area on the right gives you an idea of how the page will print.
- c. Click
OK to return to the Print Preview window. Notice the dashed lines
dividing the page into nine sections. These are page tiles and indicate
that this drawing will print across nine sheets of paper. Each page tile
represents one piece of printer paper. After you print, you can trim
the pages and tape them together.
|
6. | Experiment with the Whole Page and Single Tile buttons.
In Whole Page view, notice the red rectangles that appear around page
tiles when you move the mouse cursor. When you see a red rectangle,
clicking zooms in to show just a page tile up close. Clicking a second
time zooms out again. You can check individual page tiles to see whether
important information falls near the edge of the tile and might get
lost when you cut and paste the sheets together.
|
7. | Experiment
with the Next Tile and Previous Tile buttons. They cycle through all
the page tiles for your document and show you what will come out of the
printer.
The
IT Asset Management document has 3 pages plus one background page.
Because of the modified Fit To settings for the first page, it now
prints on 11 sheets. The background page doesn’t print, and Next Tile
stops short of the background page.
Note also that Fit to 3 × 3 affected only the first page in the
document. The other two pages will still print on one sheet of paper
each.
|
8. | Click the big, red Close Print Preview button to return to the normal Visio environment.
|
9. | Go to page 2 of the document—Row 1, Rack 1.
|
10. | Change
the orientation of the drawing to Portrait. On the Design tab, click
the Orientation button and choose Portrait. The drawing page becomes
vertically oriented and some of the shapes fall outside the page border.
You can reposition the shapes so that they are on the paper and
centered if you like.
|
11. | Return
to Print Preview. As you flip through the page tiles, see how page 2 is
now oriented to landscape? The Orientation button handles the rotation
of both the Visio page and printer paper.
If you change a page’s orientation using the Page Setup dialog, you need
to make changes on the Print Setup and Page Setup tabs; otherwise, the
printer and page settings won’t agree.
|
I always start with Print Preview because I like to
resize drawings to odd page sizes. If you anticipate creating complex
documents that have multiple pages with different sizes, scales, or
orientations, you should always start with Print Preview before you
print.
You can speed up the process by adding Print Preview to the Quick Access Toolbar.
Adding Print Preview to the Quick Access Toolbar
1. | Click the Customize Quick Access Toolbar drop-down arrow in the top-left corner of Visio’s main window.
|
2. | Select Print Preview from the list. You should now see the Print Preview icon—a sheet of paper with a magnifying glass.
|
Now you don’t have to go to File, Print every time you want to print or check how your document will print.
The
only remaining reason to go to the Backstage area is for Quick Print
(which isn’t very quick if you have to go the Backstage area). If you
use Quick Print frequently, you can add it to the Quick Access Toolbar
too. It is one of the standard items in the drop-down list; located
immediately above Print Preview.
Experimenting with Printing Without Wasting Trees
Whether you are learning the ins and outs of Visio’s
complex printing features or configuring a complicated document for
output, wouldn’t it be great to test printing without wasting paper?
You’ve just seen how easily a 3-page document can
turn into 11 pages of output. Clearly, Visio’s print options are
numerous, and the potential to mess up print jobs for complex documents
is there.
Luckily, in addition to Print Preview, you have
another way to protect the forests. You can print to a file instead of
to an actual printer. When you print to a file, you create a PDF or XPS
(Microsoft XML Paper Specification) file. This file contains a
sheet-by-sheet picture of your print job, which you can view in the
appropriate viewer, and decide whether or not to print.
Testing Print Settings by Printing to File
1. | Continue using the file Ch09 Printing IT Assets.vsd that you created earlier.
|
2. | Go
to File, Print and then click Print. Alternatively, if you added Print
Preview to the Quick Access Toolbar, click it and then click Print on
the Ribbon.
|
3. | Choose
a PDF or XPS printer instead of a physical printer. In the Name
drop-down of the Print dialog, choose Microsoft XPS Document Writer, as
shown in Figure 6.
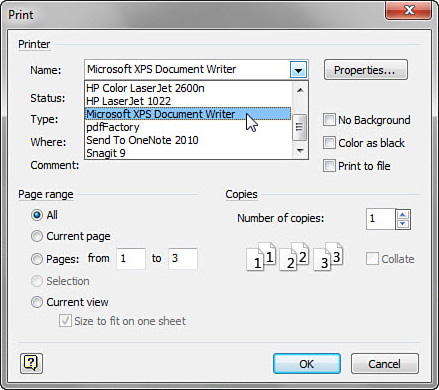
Note that Office 2010 and Visio 2010 install the Microsoft XPS Document
Writer and XPS Viewer by default. You might not have these utilities if
your IT department has decided not to install them.
|
4. | Click
OK. You are prompted to choose a location and name for the XPS file
that is about to be created. Choose an easy-to-remember location, such
as your desktop; enter a name; and then click Save. A new XPS file is
created.
|
5. | Using
Explorer, browse to the location of the saved XPS file and then
double-click the file. It opens in the XPS Viewer, and you can examine
each sheet of paper that your print settings create.
|
You can use this XPS file to check that your Visio
document will print as expected then print from Visio, or you can print
directly from the XPS Viewer itself.
Printing to files is a great way to learn how to
print with Visio because you are able to double-check complex jobs. You
can also create print jobs when you are working away from your printer.
If you like working like this, consider making the
Microsoft XPS Document Writer your system’s default printer so that you
don’t have to choose it in the Print dialog every time. Be aware that
setting the default printer affects all your applications, not just
Visio, so you might not want to do it. However, the change is easy to do
and easy to undo, so it’s worth exploring.
Setting the Default Printer (Windows 7)
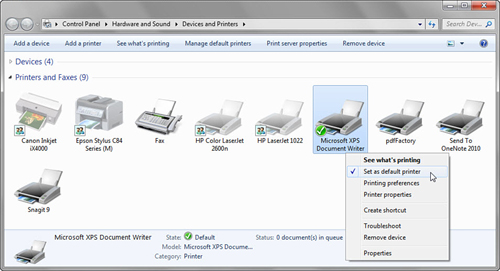
1. | Click the Windows Start button in the lower-left corner of your screen.
|
2. | Select Devices and Printers in the menu. The Devices and Printers window appears.
|
3. | Expand the Printers and Faxes area and locate the Microsoft XPS Document Writer item.
|
4. | Right click the icon and select Set as Default Printer, as shown in Figure 7.
|
The XPS Document Writer is now your default printer.
If you choose Quick Print now, the XPS Document Writer is used, so you
won’t burn any paper without a chance to stop. When you click Print, the
XPS Writer is already selected in the printer list, saving you that
step each time.
To restore your normal
default printer, just follow the steps in the last exercise, except
right-click on the physical printer to set it as default.