If you've ever asked a
teenager to do a chore, you know the importance of clearly specifying
the work to perform and the results you expect. Otherwise, the dishes in
the dishwasher might be placed in the cupboards—before they've been
washed. Providing project team members with clear guidance is equally
important, but the task names in Project are too short to get into
detail. For that reason, separate documents that describe work
packages are a great way to tell team members how to do their
assignments completely and correctly.
Ideally,
a work package document describes the work to perform, how to know when
it's done, and how to tell whether it's done right. A work package for
baking a loaf of bread might include the steps for mixing, kneading,
forming, and baking the bread. The document could specify that the bread
is done when tapping it delivers a hollow thump. Similarly, the work
package might state that a successful loaf is an attractive brown color,
twice as tall as the unbaked dough, and full of evenly sized holes.
1. Building Work Package Documents in Word
Even small projects require dozens of work package documents. You can speed up your work by creating
a Word template for work packages that's as basic or as fancy as your
knowledge of Word. That way, you can open the template and have a
document all labeled and ready for you to fill in. For example, you
might set up a basic work package template with the following
information:
WBS number. The WBS number that Project assigned to the task in your project schedule.
Work package name. The task name from the project schedule.
Description of work.
You can use paragraphs or bullet points and provide as much detail as
you need to ensure success. If you know an experienced resource is going
to do the work, the document can be brief. For trainees, on the other
hand, you can provide detailed checklists of steps or the name of the
person who can mentor the assigned resource.
Result.
Describe the final state when the work is done as well as how to verify
that the work was done correctly. In a work package for setting up a
computer, for example, you might include the list of programs that
should launch when the installation is complete.
Reference materials.
Projects use many types of documents to specify deliverables:
requirements, specifications, blueprints, and so on. If other detailed
documentation exists, list where to find those documents, like the
folder on the network drive or the project notebook.
1.1. Making a Word template
Creating
a Word template is no harder than creating a Word document. However,
finding and using a template takes some setup. Here's how to create a
Word template and save it for reuse:
Create a Word document with the labels you want to include.
If you want to get fancy, you can insert a logo, add instructions to help others fill in work packages, and so on.
In Word 2010, on the File tab, click Save. In Word 2007, choose Office button→ Save.
The Save As dialog box appears.
Navigate to the folder you use for your custom templates.
For example, create a folder called Templates in the My Documents folder.
In
Word 2010, in the "File name" box, type the name of the template. In
the "Save as type" box, choose Word Template, and then click Save.
In Word 2007, in the navigation bar on the left side of the dialog box, click Trusted Templates before you click Save.
To set up faster access to your template, on the File tab, click Options.
Telling
Word where to find your custom templates makes it easier to locate and
open this template later. That way, you can see these templates right in
the New Document dialog box every time you start a new project, as
described in the next section.
Tip:
If
you don't specify a folder for templates, then you can always use
Windows Explorer to navigate to the folder that contains your template
files. When you double-click a Word template file, Word launches and
creates a new document based on that template.
In
the Word Options dialog box, click Advanced. Then scroll to the General
section at the bottom of the dialog box and select File Locations.
You want to tell Word where to find your templates.
Select
"User templates" or "Workgroup templates", and then click Modify. In
the Modify Location dialog box, navigate to your template folder, and
then click OK.
Choose the folder you created in step 3.
Click OK again to close the Options dialog box.
Tip:
The box on Setting File Locations in Word 2003 explains how to find the File Locations feature in Word 2003.
1.2. Opening a Word template
In
Word 2010, on the File tab, click New. (In Word 2007, choose Office
button→New.) Under the Available Templates heading, click "My
templates". The New dialog box appears showing the templates in your
user templates folder. Select the template you want, and then click OK.
To
use a template in Word 2003, choose File→New. In the New Document task
pane, under the Templates heading, click "On my computer". The Templates
dialog box appears open to the General tab, which displays the
templates in your User templates or Workgroup template folders
(whichever you chose in the previous steps). Select the template, and
then click OK.
If
you're still using Word 2003—and plenty of folks are—you'll find File
Locations in a different spot than in Word 2010. To specify where you
store your custom templates, do the following: Choose Tools→Options, and then click the File Locations tab. Select "User templates" or "Workgroup templates", and then click Modify. Navigate to and select the folder you created in step 3 on Section 4.5.1.2, exactly as for Word 2010.
|
2. Linking Work Packages to the Project Schedule
After you create work
package documents (as described in the previous section) that spell out
the details of tasks, you're likely to refer to those documents as you
work on your Project schedule. There's no need to open them by hand or
try to remember where they are. Instead, you can insert a hyperlink from
a task in the Project schedule to the corresponding work package document. With a hyperlink in place, opening the work package document is a quick click in Project.
To create a hyperlink in a Project task, do the following:
In Project, right-click the task you want to link to a work package document, and then choose Hyperlink from the shortcut menu.
The Insert Hyperlink dialog box appears.
In the "Link to" bar, click Existing File Or Web Page.
Navigate
to the folder that contains the work package document, and then
double-click the name of the work package file. The "Look in" box shows
the folder while the Address box displays the filename.
Click OK.
In the Indicators column, a hyperlink icon appears, as shown in Figure 1.
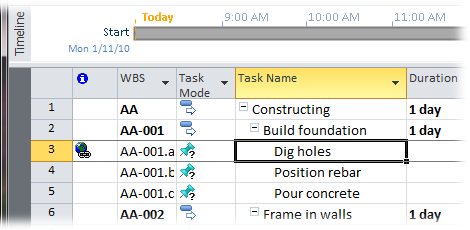
To
access a hyperlinked file, simply right-click the hyperlink icon in the
Indicator cell and then choose Hyperlink→Open Hyperlink.
The program associated with the file launches, and the file opens.