Creating an e-mail message
is a relatively simple process. The only information that is absolutely
required is the recipient's e-mail address; however, you will usually
provide information in the following fields:
To Enter the e-mail address of the primary message recipient(s) in this field.
This is the only field that is absolutely required to send a message.
Subject Enter a brief description of the message contents or purpose in this field.
The
subject is not required, but it is important to provide information in
this field, both so that you and the recipient can identify the message
and so that the message isn't blocked as suspected junk mail by a
recipient's e-mail program. Outlook will warn you if you try to send a
message with no subject.
Message body Enter your message to the recipient in this field, which is a large text box.
You can include many types of information including formatted text, hyperlinks, and graphics in the message body.
1. Addressing Messages
Addressing an e-mail message is as simple as inserting the intended recipient's e-mail address into
an address box in the message header of a message composition window.
You can enter e-mail recipients into any of three address boxes:
To This address box is for
primary message recipients. Usually, these are the people you want to
respond to the message. Each message must have at least one address in
the To box.
Cc This address box is for "courtesy
copy" recipients. These are usually people you want to keep informed
about the subject of the e-mail message but from whom you don't require a
response.
Bcc
This address box is for "blind courtesy copy" recipients. These are
people you want to keep informed but whom you want to keep hidden from
other message recipients. Bcc recipients are not visible to any other
message recipients and therefore aren't included in message responses
unless specifically added to one of the address boxes in the response
message.
Tip:
The Bcc address box is not
displayed by default. You can display it in the message header by
clicking the Bcc button, located in the Show Fields group on the Options
tab of the message composition window.
You can insert an e-mail address into an address box in the following ways:
Tip:
Responding to a
received message automatically fills in one or more of the address boxes
in the new message window.
If your e-mail account
is part of an Exchange network, you can send messages to another person
on the same network by typing only his or her e-mail alias—for example,
joan; the at
symbol (@) and domain name aren't required. If you type only the name of
a person whose e-mail address is in your address book, Outlook
associates the name with the corresponding e-mail address, a process
called validating, before sending the message.
Note:
Keyboard Shortcut Press Ctrl+K to force Outlook to validate addresses.
If you type only a name and
Outlook cannot find that person's e-mail address in your address book,
when you send the message, Outlook prompts you to select an address book
entry or provide a full e-mail address.
Depending on how you enter a
message recipient's name or e-mail address into an address box, Outlook
either validates the name or address immediately (if you chose it from a
list of known names) or validates it when you send the message. The
validation process (also known as resolving) for each name or address has one of two results:
If Outlook
successfully resolves the name or address, an underline appears below
it. If the name or address matches one stored in an address book,
Outlook replaces your original entry with the content of the Display As
field in the contact record, and then underlines it.
If Outlook is unable to resolve the name or address, the Check Names dialog box opens, asking you to provide additional information.
The
Check Names dialog box might display No Suggestions, names that match
the entry, or contact options saved in the contact record for the
entered name.
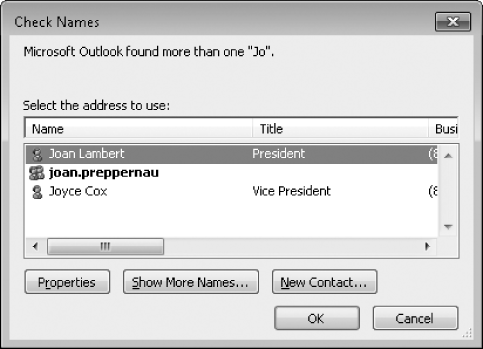
In the Check Names dialog box, you can do one of the following:
Select from the suggested options.
Click Properties to learn more about the selected option.
Click Show More Names to display your address book.
Click New Contact to create a new contact record in your default address book, directly from the dialog box.
2. Troubleshooting Message Addressing
Outlook 2010 includes many
features intended to simplify the process of addressing messages to
recipients. As with any tool, these features can sometimes be more
difficult to use than you'd like.
2.1. Troubleshooting the AutoComplete Address List
As you type a name or an e-mail
address into the To, Cc, or Bcc box, Outlook displays matching addresses
in a list below the box. You can insert a name or address from the list
into the address box by clicking it or by pressing the arrow keys to
select it and then pressing Tab or Enter.
From time to time, you might find that the address list contains incorrect e-mail
addresses—for example, if you have previously sent a message to an
incorrect e-mail address, or if a person changes his or her e-mail
address. If you don't remove the incorrect address from the list, it can
be easy to mistakenly accept Outlook's suggestion and send your message
to the wrong address.
To clean up the AutoComplete Address list:
In the list, point to the name or address you want to remove.
Click the Delete button (the X) that appears to the right of the name or address.
2.2. Troubleshooting Multiple Recipients
By default, Outlook
requires that you separate multiple e-mail addresses with semicolons. If
you separate multiple addresses with another character such as a space
or comma, or by pressing Enter, Outlook treats the addresses as one
address and displays an error message when you attempt to send the
message.
You can instruct Outlook to accept commas as address separators, in addition to semicolons. To do this, follow these steps:
In the Outlook program window or any item window, display the Backstage view, and then click Options.
In the left pane of the Outlook Options dialog box, click Mail.
On the Mail page, scroll to the Send Messages section.
Select the Commas Can Be Used To Separate Multiple Message Recipients check box, and then click OK.
2.3. Troubleshooting the Address Book
By default, Outlook first searches your Global Address List (the corporate directory
provided with an Exchange account, if you're working with one), then
searches the contact records stored in the Contacts module of your
default account and then searches the Suggested Contacts list. If an
e-mail address isn't located in one of those locations, Outlook may
search other address books such as those containing contact records
stored with secondary e-mail accounts or custom address books that you
create.
If you have multiple
address books, particularly multiple address books associated with
multiple accounts, Outlook does not, by default, search all of the
address books and therefore might not locate an e-mail address you have
saved.
To change the order in which Outlook searches the address books, or to add address books to the search list, follow these steps:
On the Home tab of the Outlook program window, in the Find group, click Address Book.
In the Address Book window, on the Tools menu, click Options.
The Addressing dialog box opens.
From the Addressing dialog box, you can designate the order in which Outlook searches for contacts in existing address books.
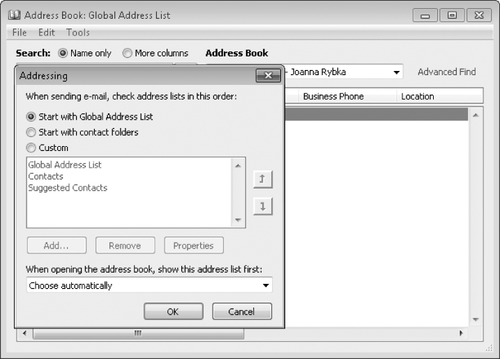
In the Addressing dialog box, click Custom. Then do any of the following:
To
search additional address books, click Add. Then in the Add Address
List dialog box, click the address list you want to add, click Add, and
click Close.
To change the order in which Outlook searches the address books in the list, click an address book and then click the Move Up or Move Down button.
If
you're uncertain which address book is represented by a list entry,
click the address book and then click Properties to display the account
name and folder name of the address book.
In the Addressing dialog box, click OK, and then close the Address Book window.
3. Entering Content
As long as you have an Internet connection, you can send e-mail
messages to people within your organization and around the world by
using Outlook, regardless of the type of e-mail account you have.
Outlook can send and receive e-mail messages in three message formats:
Hypertext Markup Language (HTML)
Supports paragraph styles (including numbered and bulleted lists),
character styles (such as fonts, sizes, colors, weight), and backgrounds
(such as colors and pictures). Most (but not all) e-mail programs
support the HTML format—those that don't display HTML messages as Plain Text.
Rich Text Format (RTF)
Supports more paragraph formatting options than HTML, including borders
and shading, but is compatible only with Outlook and Microsoft Exchange
Server. Outlook converts RTF messages to HTML when sending them outside of an Exchange network.
Plain Text Does not support the formatting features available in HTML and RTF messages but is supported by all e-mail programs.
E-mail message content isn't
limited to simple text. You can create almost any type of content in an
e-mail message that you can in a Word document. Because Outlook 2010 and
Word 2010 share similar commands, you might already be familiar with
processes for creating content such as lists and tables.
You can personalize your
messages by using an individual font style or color and by inserting
your contact information in the form of an e-mail signature or business
card. (You can apply other formatting, such as themes and page
backgrounds, but these won't always appear to e-mail recipients as you
intend them to, and they can make your communications appear less
professional.)
You can format the text of your
message to make it more readable by including headings, lists, or
tables, and you can represent information graphically by including
charts, pictures, clip art, and other types of graphics. You can attach
files to your message and link to other information, such as files or
Web pages.
Tip:
You can also personalize
a message by having Outlook add a predefined e-mail signature. You can
specify different signatures for new messages and for replies and
forwarded messages. For example, you might want to include your full
name and contact information in the signature that appears in new
messages, but only your first name in the signature that appears in
replies and forwarded messages.