In addition to customizing the slide master
(including working with its preset placeholder boxes, as you just
learned), you can fully customize the individual layout masters.
A layout master takes some
of its settings from the slide master with which it is associated. For
example, by default it takes its background, fonts, theme colors, and
preset placeholder positioning from the slide master. But the layout
master also can be individually customized; you can override the slide
master's choices for background, colors, and fonts, and you can create,
modify, and delete various types of content placeholders.
1. Understanding Content Placeholders
You can insert seven basic
types of content on a PowerPoint slide: Text, Picture, Chart, Table,
Diagram, Media (video or sound), and Clip Art. A placeholder on a slide
master or layout master can specify one of these types of content that
it will accept, or you can designate it as a Content placeholder, such
that it will accept any of the seven types. Most of the layouts that
PowerPoint generates automatically for its themes use the Content
placeholder type because it offers the most flexibility. By making all
placeholders Content placeholders rather than a specific type,
PowerPoint can get by with fewer separate layout masters because users
will choose the desired layout based on the positioning of the
placeholders, not their types.
A Content placeholder appears as a
text placeholder with a small palette of icons in the center, one for
each of the content types. Each content placeholder can hold only one
type of content at a time, so as soon as the user types some text into
the content placeholder or clicks one of the icons in the palette and
inserts some content, the placeholder becomes locked into that one type
of content until the content is deleted from it.
NOTE
If a slide has a
placeholder that contains some content (any type), selecting the
placeholder and pressing Delete removes the content. To remove the
placeholder itself from the layout, select the empty placeholder and
press Delete. If you then want to restore the placeholder, reapply the
slide layout to the slide.
You can move and resize a
placeholder on a layout master as you would any other object. Drag a
selection handle on the frame to resize it, or drag the border of the
frame (not on a selection handle) to move it.
2. Adding a Custom Placeholder
You can add a custom placeholder to an individual layout master. This makes it easy to build your own custom layouts.
To add a custom placeholder, follow these steps:
In Slide Master view, select the layout master to affect.
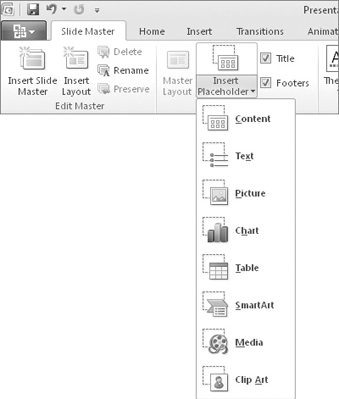
On the Slide Master tab, click the bottom part of the Insert Placeholder button to open its menu.
Click Content to insert a generic placeholder, or click one of the specific content types. See Figure 1. The mouse pointer becomes a cross-hair.
Drag
on the slide to draw the placeholder box of the size and position
desired. A blue box appears showing where the placeholder box will go.
When you release the mouse button, the new placeholder appears on the
slide.
3. Deleting and Restoring a Custom Placeholder
To delete a custom
placeholder, select it and press the Delete key, just as you learned to
do earlier with the preset placeholders.
The difference between
custom and preset placeholders is not in the deleting, but rather in the
restoring. You can immediately undo a deletion with Ctrl+Z, but you
cannot otherwise restore a deleted custom placeholder from a layout
master. PowerPoint retains no memory of the content placeholders on
individual layouts. Therefore, you must recreate any content
placeholders that you have accidentally deleted.
4. Overriding the Slide Master Formatting for a Layout
You can apply formatting to a
layout in almost exactly the same ways as you apply formatting to a
regular slide or to a slide master. Only a few things are off-limits:
You cannot
apply a different theme to individual layouts under a common slide
master. To use a different theme for some slides, you have to create a
whole new slide master.
You
cannot apply a different font, color, or effect theme, because these
are related to the main theme and the slide master. If you need
different fonts or colors on a certain layout, specify fixed font
formatting for the text placeholders in that layout, or specify fixed
color choices for objects.
You cannot
delete a background graphic that is inherited from the slide master; if
you want it only on certain layouts, delete it from the slide master,
and then paste it individually onto each layout desired, or select Hide
Background Graphics from the Slide Master tab and then deselect Hide
Background Graphics from certain layouts.
You cannot change the slide orientation (portrait or landscape) or the slide size.
So what can you do to an individual layout, then? Plenty. You can do the following:
Apply a different background.
Reposition, resize, or delete preset placeholders inherited from the slide master.
Apply fixed formatting to text placeholders, including different fonts, sizes, colors, attributes, indents, and alignment.
Apply formatting using theme colors and theme fonts
Apply fixed formatting to any placeholder box, including different fill and border styles and colors.
Create
manual text boxes and type any text you like into them. You might do
this to include copyright notice on certain slide layouts, for example.
Insert pictures or clip art that should repeat on each slide that uses a certain layout.
5. Creating a New Layout
In addition to modifying
the existing layouts, you can create your own brand-new layouts,
defining the exact placeholders you want. To create a new layout, follow
these steps:
From Slide Master view, click the slide master with which to associate the new layout.
Click
Insert Layout. A new layout appears. Each new layout you create starts
with preset placeholders inherited from the slide master for Title,
Footer, Date, and Slide Number.
(Optional) Delete any of the preset placeholders that you don't want.
Insert new placeholders as needed.
(Optional) Name the layout.
NOTE
The new layout is part of
the slide master, but not part of the theme. The theme is applied to
the slide master, but at this point their relationship ends; and changes
that you make to the slide master do not affect the existing theme. To
save your custom layout(s), you have two choices: You can save the
presentation as a template, or you can save the theme as a separate
file.
6. Renaming a Layout
Layout names can help you determine the purpose of a layout if it is not obvious from viewing its thumbnail image.
To change the name of a layout, or to assign a name to a new layout you've created, follow these steps:
In Slide Master view, right-click the layout and choose Rename Layout. The Rename Layout dialog box opens.
Type a new name for the layout, replacing the existing name.
7. Duplicating and Deleting Layouts
You might want to copy a layout
to get a head start on creating a new one. To copy a layout,
right-click the layout in Slide Master view and choose Duplicate Layout.
A copy of the layout appears below the original.
If you are never going to
use a certain layout, you might as well delete it; every layout you can
delete makes the file a little bit smaller. To delete a layout,
right-click the layout in Slide Master view and choose Delete Layout.
NOTE
You might have a couple
of layouts at the bottom of the list that employ vertical text. These
are for users of Asian languages. They show up in the New Slide and
Layout galleries on the home tab if you have certain Asian languages
enabled on your system. Don't delete them if you will sometimes need to
create Asian-language slides.
8. Copying Layouts Between Slide Masters
When you create
additional slide masters in the presentation, any custom layouts you've
created for the existing slide masters do not carry over. You must
manually copy them to the new slide master.
To copy a layout from one slide master to another, follow these steps:
In Slide Master view, select the layout to be copied.
Select the slide master under which you want to place the copy.
You can also copy
layouts between slide masters in different presentations. To do so, open
both presentation files, and then perform the previous steps. The only
difference is that after step 2, you must switch to the other
presentation's Slide Master view.