You can modify a header or footer in lots of
different ways; your only real restriction is the amount of space you
have to work in. Generally, a header or footer can (and should) hold
only one or two lines, although you can make them bigger. You can edit
and format header or footer text just like normal body text, add and
delete field codes, and make other changes.
Getting In and Out of Header and Footer View
Before you can edit a header or footer, you have to get into Header and Footer view. Here’s how:
1. | Switch
to Print Layout view, if you are in a different view. Headers and
footers aren’t visible in any of Word’s other standard working views.
|
2. | To
switch to Header and Footer view, double-click in either the header or
footer area of any page. The Design tab appears on the ribbon, the
header and footer become available for editing, and the document body is
grayed out.
|
3. | When
you’re finished working in Header and Footer view, click the Close
Header And Footer button on the Design tab. (Alternatively, you can
double-click anywhere on the page between the header and footer areas.)
|
Moving Between Headers and Footers
If your document includes
both a header and a footer, you can jump from one to the other when you
work in Header and Footer view. Here’s how:
1. | In
Header and Footer view, click in the header area. On the Design tab,
the Go to Footer button becomes active and the Go to Header button is
grayed out.
|
2. | To
jump down to the footer, click the Go to Footer button. The insertion
point moves to the footer, the Go to Header button becomes active, and
the Go to Footer button is grayed out.
|
3. | To return to the header, click Go to Header.
|
You
can use these two buttons to move from header to footer and back as
often as you need, as long as you’re in Header and Footer view.
Editing Text
Word enables you to select,
edit, format, delete, and cut, copy, and paste header or footer text
just as you do in the body of a document. You can set and clear tabs,
too, which is helpful for positioning the parts of a header or footer.
Even when a header or
footer contains placeholders, it still contains one or two blank
paragraphs you can use to insert your own text, field codes, or other
objects. Here’s how:
1. | On the Home tab, click the Show/Hide ¶ button, if necessary, to make hidden characters visible.
|
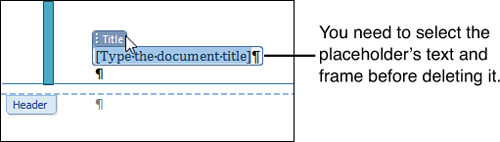
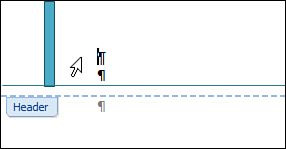
2. | To remove a placeholder, select it (see Figure 1) and press Del. The placeholder vanishes, and the underlying paragraph marks should be visible, as shown in Figure 2.
Depending on how the header or footer is set up, the paragraph mark may
be at the left margin or located elsewhere. (For example, it may have
one or more tabs in front of it, pushing the paragraph mark to the
right.)
|
3. | Select and delete any other unwanted placeholders, text, or tabs in the header or footer area.
|
4. | Set and clear tab stops as needed, to align your text in the header or footer area.
|
5. | Place the insertion point on the paragraph mark and enter your text and tabs.
|
6. | Format the text using the tools on the Ribbon and the Font and Paragraph dialog boxes.
|
Inserting and Deleting Field Codes
Field codes can display all
sorts of information—more than you could ever stuff into a header or a
footer (or both). If you skim through Word’s vast array of field codes,
you may find that you wouldn’t be interested in using many of them in a
header or footer. That’s fine, because field codes have a zillion
different purposes, such as performing mathematical functions, inserting
bar codes, and so on. But they’re worth a look, especially the codes
that insert a date or time stamp. Here’s how to insert a date (or date
and time) field code into a header or footer:
1. | Click
in the header or footer and place the insertion point where you want
the field code to appear. You may need to insert tabs or do some other
kind of aligning to get the insertion point in the right place.
|
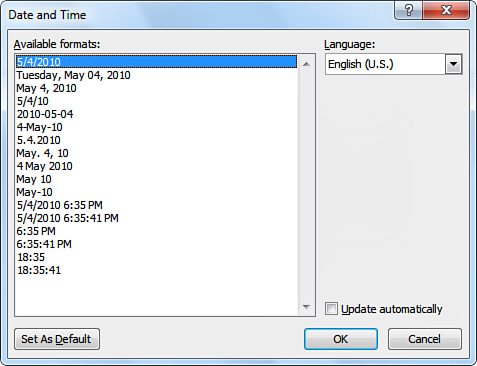
2. | On the Design tab, click the Date & Time button. The Date and Time dialog box opens, as shown in Figure 3.
|
3. | In the Available Formats section, click the date (or date and time) format you like.
|
4. | If
you want the date (or date and time) to be updated automatically
whenever the document is opened or printed, click the Update
Automatically check box to place a check in it. Leave this check box
cleared if you don’t want the information to be updated.
|
5. | If
you like the format you selected in step 3, click the Set as Default
button; then click Yes when the confirmation message box appears.
|
6. | Click OK. Word inserts the current date (or date and time) at the insertion point’s location.
|
|
If
you select the Update Automatically option, Word inserts an actual
field code in the header or footer. You can manually update the field’s
value (the date and/or time it displays) by clicking the field and then
clicking the Update tag that appears next to it. Otherwise, you can
manually update all the fields in a document by pressing F9.
|
To delete a field code, select it and press Del.
If you want to see all of Word’s
available fields, click the Quick Parts button (on either the Design
tab or the Insert tab); then click Field. The Field dialog box opens,
giving you access to dozens of unique fields. Many fields require you to
select or set parameters of some type.
Changing the Position of a Header or Footer
You can move a header or footer up or down to bring it closer to or farther from the edge of the page. Here’s how:
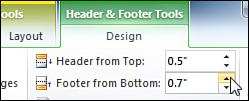
- To reposition
the header, use the Header from Top spin control to increase or decrease
the amount of space between the header and the top of the page.
- To
reposition the footer, use the Footer from Bottom spin control to
increase or decrease the amount of space between the header and the top
of the page.
Figure 4
shows these two controls, which reside on the Design tab. In either
case, you can click the spin control’s up or down arrow to change the
value. Alternatively, you can select the value in the spinner box and
type a new value in its place.
You can insert graphics into a
header or footer, such as pictures, rules and borders, clip art, and
other types of images. Graphics work the same in a header or footer as
they do in the body of a document—but, again, you have a lot less space
to work in.