When you sit down to plan the scope of a new
project, it is important to ask yourself exactly what your objectives
are, and to take your time and be thorough. Planning a project can be
daunting, especially to the novice project planner, but taking the time
to plan and organize your project at its beginning provides for much
smoother and more efficient execution during later project stages.
Project 2010 will aid tremendously in the process of planning,
creating, and maintaining a schedule that is appropriate for the
project you will manage.
There is no such thing as perfect project planning.
It is inevitable that situations will arise during your project that
require modifying your plan. The best defense is a comprehensive,
realistic project schedule that anticipates setbacks and provides the
foundation for your success as a project manager.
Tip
You should enter all known
information about the project at the beginning. The more information
you know about any aspect of the project, the more consistent and
organized your project will be. |
How you configure Microsoft Project 2010 affects how
you schedule and manage your project. These settings can vary from
project to project, and you should make them work for your benefit. You
can change many of these settings after you have entered tasks and
resources into the project, but by addressing these issues up front,
you can make Microsoft Project work for you, and avoid working against
Microsoft Project.
Microsoft Project is an excellent tool to help you
manage the three main areas of information of any project schedule
(scope, schedule, and cost), but before you enter any tasks, you should
ask yourself the following questions:
What makes up my entire project? What is the agreed-upon work scope and what should be considered out of scope?
What
expectations have already been set for start and completion dates? Do I
have any set constraints on the schedule of this project? If so, the
scope of the project must be very tightly managed.
How
much is the project going to cost? Do I have any set constraints on the
budget of this project? Again, if expectations have been set, the
project scope must be closely managed.
These questions will help you establish the correct parameters for creating the schedule.
Understanding the Project Information Dialog Box
You can define, view, and edit some key information
about your project using the Project Information dialog box. To view
the Project Information dialog box, click the Project tab, Project
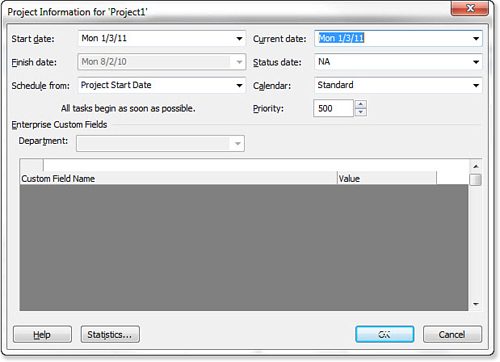
Information. The Project Information dialog box will appear (see Figure 1).

The Project Information dialog box is used for
entering basic information about a project. It includes project start
and finish dates, as well as the base calendar to use for scheduling.
The following sections describe the settings in the Project Information
dialog box in greater detail.
You can also view Summary Project Information by
selecting the File tab, Info. Underneath the thumbnail view of your
project, Project Information is summarized in the right-hand pane.
Note
The Project Information dialog
box in Project Professional also includes additional, enterprise fields
that are not part of the Project Standard. These fields include
Priority and any project-level enterprise custom fields. Note that the
Priority field also exists in Project Standard, but the only place
where you can specify it is if you display the zero-level project
summary task in the Gantt Chart view. |
Start Date, Finish Date, and Schedule From
One of the key decisions to make in the Project
Information dialog box is whether you are going to schedule your
project from the start date or from the finish date. By default,
Project uses the start date. This is the preferred method of scheduling
because it provides the most flexibility in determining when work must
begin. Tasks within the schedule are set to begin as soon as possible
so there are no artificial time delays in the plan. The finish date
will also be as soon as possible, based on the relationships
established between tasks. Most project managers use this default
option if they can because it is intuitive and the logic is easy to
follow.
Often project managers are given a target end date,
and consequently, might be tempted to set the Schedule From option to
“Project Finish Date.” If tasks’ task mode is set to Auto Scheduled,
and as always there is too much work and too little time, the project
start date will be calculated into the past. Deciphering how to pull
the start date forward to a current date is much more problematic
because all of the tasks are starting as late as possible. This method
is time-consuming and difficult to manage, so be aware of the
consequences if you choose to use it.
In Figure 2,
the project is scheduled to begin on Monday, January 3rd, 2011. You can
change the start date by typing the date in the Start Date field, or by
clicking the drop-down arrow and choosing the date from the calendar.
When you enter a start date, Project schedules the first auto-scheduled
task to begin on that date, and calculates the project’s schedule based
on that date and the sequence of auto-scheduled tasks that follow.
Note
You cannot choose both a start
date and a finish date for your project. If you schedule from the start
date, Project automatically calculates the finish date based on the
duration of the project’s tasks. If you schedule from a finish date,
Project schedules the project’s final task to finish on that date, and
its start date is determined by the duration of the tasks. |
Click the drop-down arrow in the Schedule From field
and choose Project Finish Date to schedule your project from the finish
date. You can enter the date in the Finish date field by typing it in
or choosing from the calendar with the drop-down arrow. Project
schedules the final task to finish on the finish date, and schedules
the task before it to finish in time for the final task to start, and
so on, until the first task is scheduled and the project now has a
defined start date.
If you choose Project Start Date in the Schedule
From field, Project allows you to enter only the start date. If you
choose Project Finish Date, you can enter only the finish date. You can
change this setting as often as you like, but be aware that the logic
at the task level does not automatically change, so the logic for the
task constraint type will remain as it was.
Tip
Although Project provides the
ability to schedule the project from a finish date, it is not
recommended. Most common practice is to schedule the project from the
start date, which is also easier to manage because if the schedule
slips, it is more natural to perform actions that bring it back to the
planned finish. If you do decide to schedule the project from the
finish date and the project slips, Project will push the start date
further into the past. Unless you are experienced with Project and
project management concepts, it will be difficult for you to manage the
situation and figure out the appropriate actions to repair the
schedule. It is also a lot more natural for most people to schedule
forward instead of backward. |
Current Date and Status
Project uses the Current Date and Status Date fields
to perform several date-related calculations. The Current Date is
supplied automatically from your computer’s internal clock. When
viewing the Gantt Chart, the dashed date line represents the current
date, defined by this field. Because it can lead to unnecessary
confusion, it is not recommended that you change the Current Date
field, unless your computer’s internal clock is incorrect. If you leave
the Status Date box as NA, Project uses the Current Date as the Status
Date.
You can use the Current Date as a point of reference
when tracking progress. However, if you want to track progress using a
date other than the Current Date, you enter that date in the Status
Date field. The status date is what Project uses for calculating Earned
Value and other tracking purposes.
For example, it is typical that project managers
will track a week’s progress after the end of that week. If on Monday a
project manager wanted to track the progress from the previous week,
then he or she would enter the previous Friday’s date (or whatever date
the workweek ended on) in the Status Date box. That information is then
processed back to the project schedule and to the project manager, and
he or she would use a status date that reflects the latest information.
To change the Current Date field or enter a Status
Date setting, select the box and either type in the date or choose it
from the calendar via the drop-down arrow.
Calendar
Project uses base calendars to define the default
working and nonworking days for scheduling both manually and
auto-scheduled tasks. In the Project Information dialog box, click the
Calendar drop-down field to view all available base calendars,
including the ones you have defined yourself. Out-of-the-box Project
contains three base calendars:
24 Hour— Continuous time from midnight to midnight, 24 hours a day.
Night Shift— Used for overnight work that begins at the start of one night and finishes the following morning.
Standard— The standard workweek in the United States: 40 hours, 5 days, 8:00 a.m. to 5:00 p.m., with an hour lunch break.
The default base calendar is the Standard calendar.
This calendar assumes five days of work each week (Monday through
Friday), from 8:00 a.m. to 12:00 p.m., an hour for lunch, and then 1:00
p.m. to 5:00 p.m. This Standard calendar does not designate set
holidays; you have to do that yourself. To define the base calendar
best suited for your project, you can edit the Standard calendar, use
one of the other built-in base calendars, or create your own base
calendar.
Statistics
Next to the Help button is the Statistics button.
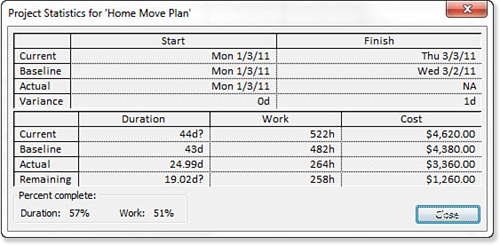
Click this button to view the Project Statistics dialog box. This box
contains brief summary information about the project. You can also view
it by clicking File tab, Info, Project Information, Project Statistics.
Figure 2 shows the Project Statistics dialog box.

Data in the Project Statistics dialog box cannot be modified. It is simply a quick reference to view or print.
The top pane shows project Start and Finish dates in
relation to current projections, the baselined planning assumptions,
actual progress recorded, and the variance between the baseline and the
current projections (you can identify the baseline used for this
comparison by selecting the File tab, Options, Advanced, Baseline for
Earned Value Calculation).
The bottom pane shows project Duration, Work, and
Cost in relation to current projections, baselined planning
assumptions, actual progress recorded, and remaining amounts. The
remainders are calculated by comparing the actual progress to current
projections.
Finally, in the bottom-left corner, the entire project duration and project work are shown in terms of percent complete.
The Project Statistics dialog box in Figure 2
displays statistics mid-way through the project’s duration; out of the
scheduled 43 days, 24.99 days have been completed, or 51% overall. The
Project Statistics box also includes Start and Finish variance values
that enable you to easily see how many days the Start or the Finish
dates vary from those that you planned.
Click Close to exit the Project Statistics dialog box.
Priority
The Priority field allows you to set the priority of
the project. Although it is visible within the Project Information
dialog box only if you are using Project Professional, you can still
set it within Project Standard.
The Priority field is helpful when you are sharing a
group of resources with other projects. When you use the leveling
feature in Microsoft Project, if a resource is assigned to work on
tasks from different projects at the same time, the project with the
higher priority level is what the resource will be leveled to work on
first.
All projects have the same priority level until you
change it. The priority starts at a mid-point, 500. 1000 is the highest
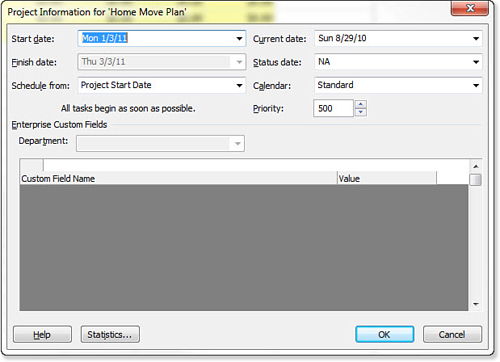
priority, and 0 is the lowest. See Figure 3 for an illustration of the Project Information dialog box in Project Professional, which contains the Priority field.

Unsurprisingly, there are at least three ways to set the project priority:
1. | From the Project Information dialog box, which you can reach through either the File tab or the Project tab.
|
2. | By
exposing the project summary task (File tab, Options, Advanced, Show
Project Summary Task), selecting the task row, selecting the Task tab,
and clicking the Information control.
Tip The Priority field is not as
useful within Project Standard as it is within Project Professional
because you cannot easily compare the project to other projects you
have created within the system. One of the ways to compare the project
priorities is to create a master project or combine projects into one
Project view using the Window command, such as when you want to review
project priorities within a program. |
|
3. | By
exposing the project summary task, adding the Priority column by
right-clicking on one of the columns in the view, selecting Insert
Column, and then selecting Priority from the drop-down list.
|
Custom Fields
In Project Professional, the Custom Fields Table
appears in the Project Information dialog box. The custom fields shown
in the Project Information dialog box are Enterprise Custom Fields set
within the server environment and do not exist in Project Standard.