IT tutorials
 
Office
 

Microsoft Project 2010 : Setting Up Project for Your Use - Setting the Task Mode

- Free product key for windows 10
- Free Product Key for Microsoft office 365
- Product Key Free : Microsoft Office 2019 – Serial Number
10/28/2014 9:34:31 PM

The Task Mode in Microsoft Project 2010 is an important new feature that, for the first time, enables project or resource managers to employ the Project scheduling engine selectively. Manually scheduled tasks will not move in response to changes in other tasks. Auto-scheduled tasks employ the Project scheduling algorithms experienced Project users are familiar with.

Setting the Task Mode

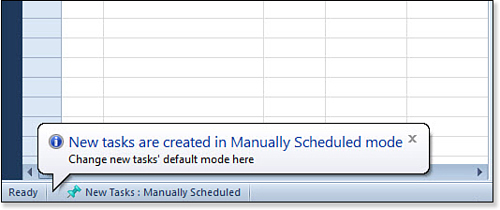
By default, the bottom-left corner of the project window should display a control for a new task’s task mode. It should say New Tasks: Manually Scheduled (see Figure 1). This means that start dates, end dates, work, and so on all need to be entered and maintained manually by the user. If this control is not visible, right-click the status bar at the bottom of the screen. The Customize Status Bar window should appear. Check the New Tasks control to make it visible.

Figure 1. The task mode for new tasks can also be changed by selecting the Task tab and clicking the Mode control.

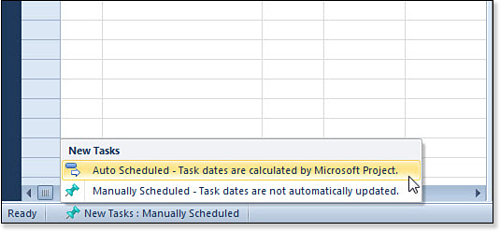
Selecting the New Tasks control opens the new task window (see Figure 2). From here, you can select either Auto Scheduled or Manually Scheduled. Remember, the choices on this control impact only new tasks.

Figure 2. New Tasks can be either Manually or Auto Scheduled.

You can change the task mode for existing tasks using one of two ways:

  • Right-click any column header and select Insert Column. Select Task Mode. You can use the task mode column to change a single or many tasks’ task mode.

  • Double-click on the task row header. The Task Information window will appear. You can set Schedule Mode to either Manually Scheduled or Auto Scheduled.

Understanding the Task Mode

The addition of manually scheduled Task Mode makes it easier to record estimated task start and end dates, as well as durations, because Project no longer automatically calculates them. Experienced Project users will find this to be disconcerting at first. The fundamental Project equation of Duration × Units = Work no longer applies. Task dependencies are recorded but not honored.

The Manually Scheduled mode is intended for use during project planning. Auto Scheduled mode is intended for use during execution. In practical terms, users might find that they want a mix of manually scheduled and auto-scheduled tasks at any one time.

For instance, when faced with a series of tasks that must happen in sequence, managers will find auto scheduling very useful. If Task A is not completed this week, Task B simply must be rescheduled, and why bother doing it by hand if Project will do it for you?

It is possible, however, that within the same project, some tasks represent likely resource usage. These are tasks (sometimes called Level of Effort or LOE tasks) that represent time a resource will spend on the project, without any pre-defined output. These kinds of task should probably remain in manually scheduled mode throughout the project.

 
Others
 
- Microsoft OneNore 2010 : Distributing Your Notes - Transferring a Notebook to Another Computer
- Microsoft OneNore 2010 : Distributing Your Notes - Saving Pages, Sections, and Notebooks in Alternative File Formats
- Microsoft OneNore 2010 : Distributing Your Notes - Printing a Section
- Microsoft Access 2010 : Enhancing the Queries That You Build - Building Queries Based on Multiple Tables - AutoLookup in Multitable Queries
- Microsoft Access 2010 : Enhancing the Queries That You Build - Building Queries Based on Multiple Tables - Pitfalls of Multitable Queries
- Microsoft Access 2010 : Relating the Information in Your Database - Establishing Referential Integrity
- Microsoft Project 2010 : Project on the Internet (part 5) - Integrating Project and Outlook - Routing a Project file to several recipients
- Microsoft Project 2010 : Project on the Internet (part 4) - Integrating Project and Outlook - Sending Project Information to Others
- Microsoft Project 2010 : Project on the Internet (part 3) - Integrating Project and Outlook - Importing Tasks from Outlook, Copying Tasks from an Email
- Microsoft Project 2010 : Project on the Internet (part 2) - Hyperlinking to Information - Creating a Hyperlink to a Location in the Project File
 
 
Top 10
 
- Microsoft Visio 2013 : Adding Structure to Your Diagrams - Finding containers and lists in Visio (part 2) - Wireframes,Legends
- Microsoft Visio 2013 : Adding Structure to Your Diagrams - Finding containers and lists in Visio (part 1) - Swimlanes
- Microsoft Visio 2013 : Adding Structure to Your Diagrams - Formatting and sizing lists
- Microsoft Visio 2013 : Adding Structure to Your Diagrams - Adding shapes to lists
- Microsoft Visio 2013 : Adding Structure to Your Diagrams - Sizing containers
- Microsoft Access 2010 : Control Properties and Why to Use Them (part 3) - The Other Properties of a Control
- Microsoft Access 2010 : Control Properties and Why to Use Them (part 2) - The Data Properties of a Control
- Microsoft Access 2010 : Control Properties and Why to Use Them (part 1) - The Format Properties of a Control
- Microsoft Access 2010 : Form Properties and Why Should You Use Them - Working with the Properties Window
- Microsoft Visio 2013 : Using the Organization Chart Wizard with new data
Technology FAQ
- Is possible to just to use a wireless router to extend wireless access to wireless access points?
- Ruby - Insert Struct to MySql
- how to find my Symantec pcAnywhere serial number
- About direct X / Open GL issue
- How to determine eclipse version?
- What SAN cert Exchange 2010 for UM, OA?
- How do I populate a SQL Express table from Excel file?
- code for express check out with Paypal.
- Problem with Templated User Control
- ShellExecute SW_HIDE
programming4us programming4us