If you have created a drawing that other people will
use as a starting point for creating their own drawings, you may want to
save your drawing as a Visio template.
The advantage of sharing a template over sharing a drawing is that your
document is not modified when someone uses it. Just like the templates
that are packaged with Visio, whenever a user selects your template,
Visio creates a new drawing. The new drawing inherits all of the
attributes of your original document, including specific stencils,
foreground and background pages, and even preset shapes on one or more
pages.
In this exercise, you will add
a background page to a drawing, add several objects to the background
page, and save the Visio diagram as a template.
Note:
Click the File tab, and then click New. In the Template Categories
section, click Maps And Floor Plans, and then double-click the Office
Layout thumbnail to create a new drawing.
Blank Page

On the Insert tab, in the Pages group, click the Blank Page arrow (not the button) to display the submenu.
Click Background Page, and then in the Page Setup dialog box, click OK.
In the Stencil window, click More Shapes, point to Visio Extras, and then click Title Blocks.
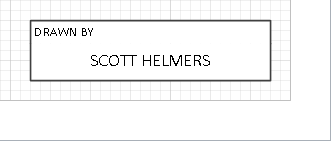
Drag a Drawn by shape into the lower-right corner of the background page.
Tip:
The Drawn By shape automatically displays the contents of the Author field from the Visio document’s properties.
Add a text box to the upper-left corner of the page, type Trey Research, and apply the following attributes to the text box: 30 pt., Bold, Align left.
You’ve created a background page and can now apply it to the foreground page in your document.
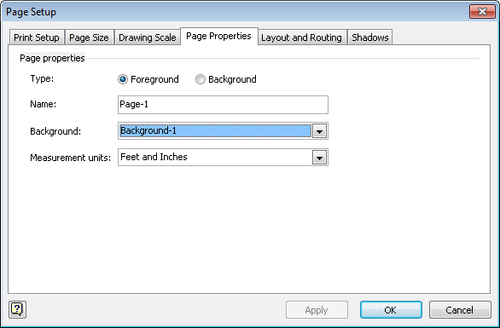
Right-click on the page name tab for Page-1, and then click Page Setup.
Click the Background arrow, and then click Background-1.
In the Stencil window, click the heading for Walls, Doors and Windows to activate that stencil.
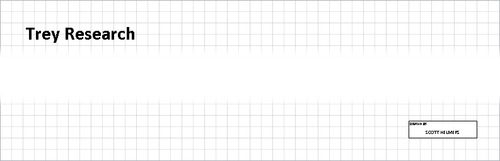
Your drawing page now displays the company name and a Drawn by information block from the background page.
Save

On the Home tab, click the Save button.
In the Save As dialog box, navigate to the folder in which you’d like to save the template, and in the File name field, type Trey Research Office Layout.
In the Save as type list, click Template.
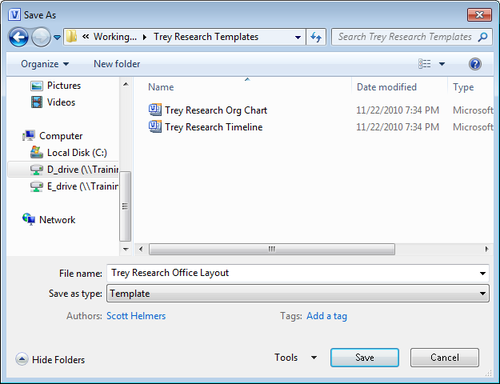
Click Save.
You
have created a template that can be used by other people to create
office floor plans for Trey Research. Each drawing will automatically
show the name of the author of the document.
Note:
Close the template file.
You
can store custom templates in any location that you like. You might
store them on your own system if you’re the only person who will use
them, or you might place them on a server so you can share them with
others.
Regardless of their
location, you need to tell Visio where you’ve put your templates in
order for them to show up on the New page in the Backstage view.
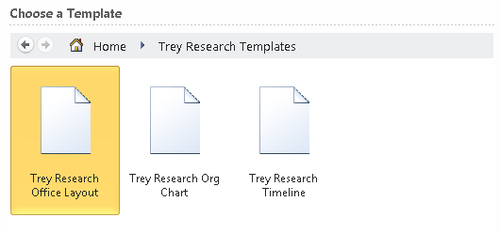
You will probably find it helpful to organize your templates by placing
them in a folder. The following example uses a folder called Trey Research Templates.
To inform Visio of the location for your template folder:
On
the Home tab, click Options, and then click Advanced. Scroll to the
bottom of the Advanced settings, and click the File Locations button.
In the Templates field of the File Locations dialog box, enter the path to the folder that contains the Trey Research Templates folder.
Warning:
Important
Be sure to note the wording in the preceding sentence: “enter the path to the folder that contains the Trey Research Templates folder.” In other words, do notabove
your folder. This ensures that your folder name appears in the Template
Categories panel along with the Visio-supplied template folders. For
example, in the following graphic, the Trey Research Templates folder is
located within the Working Files folder, so Trey Research Templates is not included in the path. include your template folder name in the template path. Stop one folder
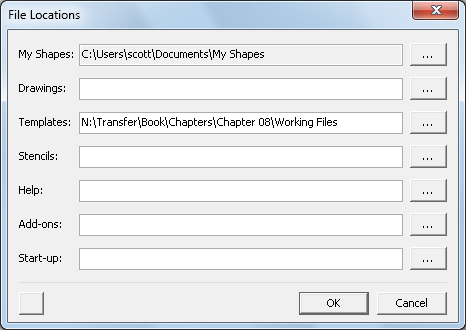
After
entering the template path, click OK twice. The next time you start
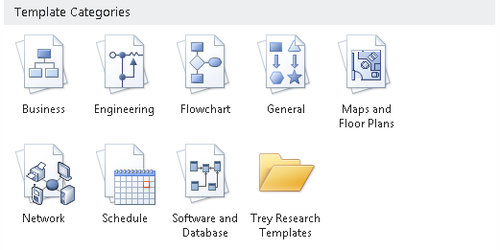
Visio, the Template Categories section of the New page on the Home tab
should look something like the following graphic.
Note:
If the Trey Research Templates folder doesn’t appear as shown, see the important note following Step 2 in this sidebar.
Double-click Trey Research Templates to display the templates in that folder.