1. Copying Formatting
IF YOU SPEND
several minutes setting up just the right text and paragraph
formatting, and you know you’ll need the same formatting several more
times in your document, you don’t want to have to remember all your
settings and repeat them over and over again. Instead, you can copy
formatting from one area to others by using the Format Painter tool.
Follow these easy steps to copy formatting:
Select
some of the text containing the formatting you want to use elsewhere.
Your selection could include just a few characters or an entire
paragraph.
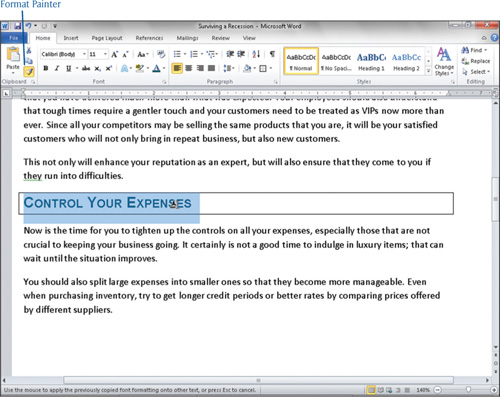
Choose Home > Clipboard > Format Painter. Your mouse pointer changes to the shape of a paintbrush.
Press and hold the mouse button and drag over the text you want formatted.
Release the mouse button. Notice, as shown in Figure 1, how the next heading takes on the formatting attributes of the first heading.
Tip
To keep the Format Painter
function active for repeated use, double-click the Format Painter
button. When you finish using the Format Painter function, click the
Format Painter button again, which turns it off.
2. Working with Lists
YOU CAN USE BULLETS
or numbers to call attention to lists in your documents. Traditionally,
you use bullets when the list items do not follow any particular order
(such as a list of options), and you use numbers when you want the items
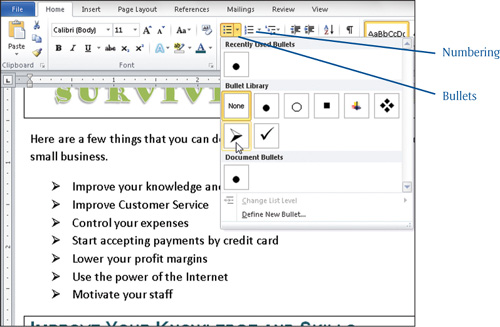
to follow each other in numerical order . Select the text for which you want to add bullets or numbers.
Then choose Home > Paragraph and click either the Bullets button or
the Numbering button. Both items have a drop-down arrow from which you
can select a bullet or number style (see Figure 2). You can preview the options with Live Preview by hovering your mouse over any option before selecting.
|
If you choose bullets and then decide you want
numbering, or vice versa, select the text, and then choose the other
option. If you decide you don’t want a bulleted or numbered list, select
the text and click the Bullets or Numbering button again, which removes
the selected option.
|
If
you have not already typed your list, Word monitors your keystrokes
and, depending on what you type, automatically converts a list to a
bulleted or numbered list. If you type a 1 followed by a period and then
either a space or tab, Word automatically converts the item to a
numbered list. If you type an asterisk (*) followed by a space or a tab,
Word automatically changes the asterisk into a bullet. When you finish
typing and press the Enter key, Word creates the next numbered item or
adds another bullet.
Tip
Other features Word monitors and automatically
changes include changing fractions to fractional characters like 1/2 to ½
or applying ordinals, such as changing 1st to 1st.
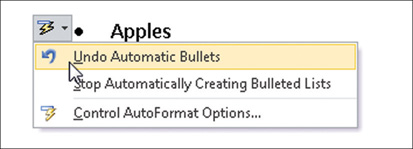
When Word formats the entry as a list, you see an AutoCorrect Options button next to the bullet or number (see Figure 3).
If you don’t want Word to change the list formatting, click the
AutoCorrect Options button and choose Undo Automatic Numbering or Undo
Automatic Bullets.
To permanently turn off the
automatic numbering or bullet formatting, choose File tab > Word
Options. In the Proofing section, click AutoCorrect Options. Click the
AutoFormat As You Type tab and turn off Automatic Bulleted Lists and
Automatic Numbering.