2. Configuring the Hub Transport Role
For the Hub Transport role, we'll configure accepted domains, which are domains for which Exchange is responsible:
On the left, navigate to Microsoft Exchange – On-Premises (server) => Organization Configuration => Hub Transport.
Click the Accepted Domains tab in the center pane.
In the Actions pane on the far right, click New Accepted Domain.
Give the accepted domain a name, such as ehloworld.com, and enter the domain name for which Exchange will receive email, such as ehloworld.com.
Click
Authoritative Domain to indicate that Exchange is responsible for
delivering email for that domain in the Exchange organization.
Click New, then click Finish.
Right-click the newly created accepted domain and choose Set As Default, as shown in Figure 4. Click Yes when you see the confirmation message.

You can accomplish the same thing in the Exchange Management Shell using the New-AcceptedDomain cmdlet and the Set-AcceptedDomain cmdlet together:
New-AcceptedDomain -Name ehloworld.com
-DomainName *.ehloworld.com
-DomainType authoritative |
Set-AcceptedDomain -MakeDefault $true
2.1. Configuring Email Address Policies
Email address policies define how email addresses
are assigned to recipients within the organization. We'll configure one
for our domain, ehloworld.com, using these steps in the Exchange Management Console:
Navigate to Microsoft Exchange – On-Premises (server) => Organization Configuration => Hub Transport => E-mail Address Policies.
In the Actions pane, click New E-mail Address Policy.
Enter a name for the policy, such as ehloworld.com. Leave the Recipient Container and Recipient Type options at their default settings, and click Next.
Since we'll apply this policy to all users, we don't need to define conditions. At the Conditions screen, click Next.
On
the E-Mail Addresses page, click Add. Make sure that the E-mail Address
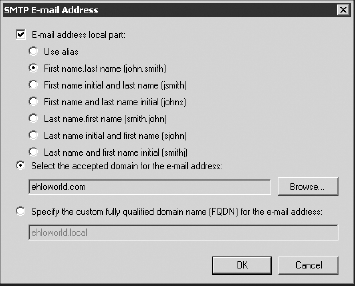
Local Part check box is selected, and choose a format for the email
addresses. The options are as follows:
Use Alias
First Name.Last Name (John.Smith)
First Name Initial And Last Name (Jsmith)
First Name And Last Name Initial (Johns)
Last Name.First Name (Smith.John)
Last Name Initial And First Name (Sjohn)
Last Name And First Name Initial (Smithj)
Check
the option Select The Accepted Domain For The E-mail Address, click
Browse, and choose the domain added in the accepted domains process
earlier, such as ehloworld.com, as shown in Figure 5.

Click OK twice, and then click Next.
On the Schedule screen, choose Immediately and click Next. This will apply the policy to all current recipients immediately.
On the New E-mail Address Policy summary screen, click New.
When the wizard completes, click Finish.
As with all the previous configuration settings
we've made, we can use the Exchange Management Shell to make these
changes using both the New-EmailAddressPolicy and Update-EmailAddressPolicy cmdlets together:
New-EmailAddressPolicy -Name ehloworld.com
-EnabledPrimarySMTPAddressTemplate "SMTP:%g.%[email protected]"
-IncludedRecipients AllRecipients -Priority 1 |
Update-EmailAddressPolicy
To verify that the policy has been applied, navigate to Microsoft Exchange On-Premises (server) => Recipient Configuration =>
Mailbox. Right-click the Administrator account and choose Properties.
Click the E-Mail Addresses tab, and you'll see that the list includes
the newly added address.
2.2. Send Connectors
A send connector is an object that holds
configuration information on how Exchange can send email out of the
organization. This can include to the Internet as well as to partner
email systems. Exchange has no send connectors configured by default.
We'll use the Exchange Management Console to create one for sending
mail to the Internet:
Navigate to Microsoft Exchange – On-Premises (server) => Organization Configuration => Hub Transport.
In the Actions pane, click New Send Connector.
On the Introduction screen, give the send connector a name, such as Outbound to Internet.
Under Select The Intended Use For This Send Connector, choose Internet and click Next.
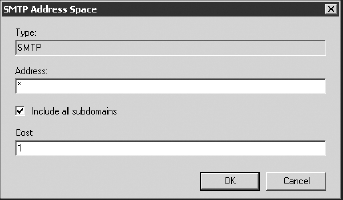
On the Address Space page, click Add.
In the Address field, enter *.
Check the box Include All Subdomains, as shown in Figure 6, click OK.

On the Network Settings screen, click Use Domain Name System (DNS) "MX" Records To Route Mail Automatically, and click Next.
On the Source Server screen, verify that the local server is listed, and click Next.
On the New Connector screen, click New, then click Finish.
To accomplish this in the Exchange Management Shell, use the New-SendConnector cmdlet:
New-SendConnector -name "Outbound to Internet"
-AddressSpaces "*" -DNSRoutingEnabled $true
-FQDN "mail.ehloworld.com" -Usage Internet
2.3. Receive Connectors
A receive connector is just the opposite of a send
connector. Receive connectors hold configuration for how Exchange will
receive mail. This can include mail from client machines as well as
from the Internet and other servers.
When Exchange Server 2010 is installed, two receive
connectors are created. The first is called Client (server), such as
Client EX1. This connector receives mail on TCP port 587, and is used
for receiving email from client computers.
The second receive connector is called Default
(server), such as Default EX1. This connector receives mail on TCP port
25, and is designed for receiving mail from other servers within your
organization that use authentication.
By default, there is no receive connector configured
to receive email from the Internet. Creating one is fairly
straightforward with these steps:
Open the EMC and navigate to Microsoft Exchange – On-Premises (server) => Server Configuration => Hub Transport.
In the Actions pane, click New Receive Connector.
On the Introduction screen, give the receive connector a name, such as Inbound from Internet.
Under Select The Intended Use For This Receive Connector, choose Internet, and click Next.
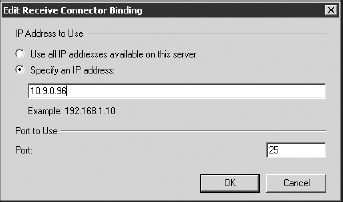
On the Local Network settings screen, highlight the (All Available IPv4) entry and click Edit.
Click Specify An IP address, and enter the IP address of the server, as shown in Figure 7.

Enter the FQDN name that will be used, such as mail.ehloworld.com, and click Next.
On the New Connector page, click New, and then click Finish.
In the Exchange Management Shell, you can create the same receive connector using the New-ReceiveConnector cmdlet:
New-ReceiveConnector -name "Inbound from Internet"
-Usage Internet -Bindings "10.9.0.96:25"
-FQDN "mail.ehloworld.com"
2.4. Installing Antispam Agents
Like its predecessor, Exchange Server 2010 comes
with some robust antispam agents. These agents are installed by default
on servers with the Edge Transport role installed, but can also be
installed on servers with the Hub Transport role. These agents can be
useful when you're testing Exchange or in organizations that don't have
Exchange servers with the Edge Transport role installed.
Installation of the antispam agents is accomplished in the Exchange Management Shell:
Close the Exchange Management Console.
Click Start => All Programs => Microsoft Exchange Server 2010 => Exchange Management Shell.
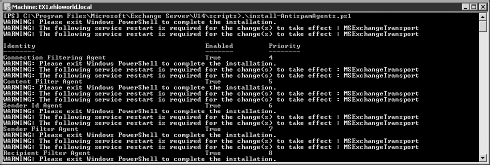
Navigate to the \scripts folder (which by default is c:\Program Files\Microsoft\Exchange Server\V14\scripts).
Type .\Install-AntispamAgents.ps1 and press Enter, as shown in Figure 8.

Restart the Exchange Transport service from within the Exchange Management Shell using the Restart-Service cmdlet and specifying the name of the service, as shown here:
Restart-Service MSExchangeTransport
Close the Exchange Management Shell.
Restart the EMC and navigate to Microsoft Exchange => Microsoft Exchange On-Premises (server) => Organization =>
Hub Transport. You should notice an Anti-spam tab now that allows for
configuration of the various agents. All the agents should be enabled.
2.5. Testing the Configuration
You now have a significant amount of configuration
finished in Exchange. You can test Exchange using some built-in
PowerShell cmdlets. To begin, start the Exchange Management Shell and
type Test-mailflow. Check the results in the TestMailflowResult column. It should say Success.
Next, test MAPI client connectivity using Test-MAPIConnectivity. You should see Success under Result for each database.
You can verify that all necessary Exchange-related services are running by using Test-ServiceHealth.
The output of this cmdlet breaks down the services needed for each of
the installed server roles. If everything is running correctly, you
should see True for each of the RequiredServicesRunning results.