Understanding security is a key piece of working with
Microsoft Dynamics GP. The free Support Debugging Tool provides options
to resolve security issues easily with its Security Profiler feature.
The Security Profiler portion of the Support Debugging Tool provides
security resource specifics about any window in Dynamics GP including
who has access to a resource and what role and tasks this window is
assigned to.
We've covered features of the Support Debugging Tool
in the last several recipes. Because of its power, the Support Debugging
Tool has to be requested from a Dynamics GP partner, even though it's
free.
Let's look at how to explore security with the Support Debugging Tool.
How to do it...
To understand Security Profiles with the Support Debugging Tool:
1. With the Support Debugging Tool installed, select Tools | Support Debugging Tool from the Microsoft Dynamics GP menu.
2. Select the Options button on the main window and select Security Profiler:

3. With the Security Profiler window still open, select Financial from the Navigation Pane. Select General from the Financial Area Page under Transactions. Opening a window populates the Security Profiler window.
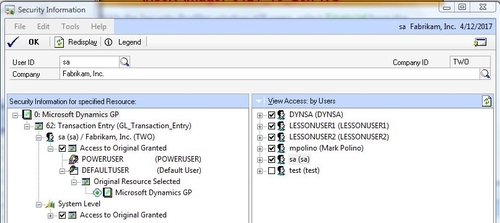
4. In the Security Profiler window highlight the line where the technical name is GL_Transaction_Entry and click on Security:

5. The User ID and Company ID fields are displayed at the top.
6.
The left-hand side pane holds Role and Task information. The right-hand
side pane holds User IDs of who can access this resource. This is
extremely useful when trying to set up a user to match the access of
someone else.
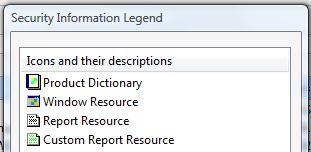
7. Click on the Legend button to get an explanation of the icons on this window:

8.
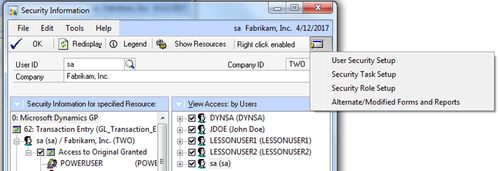
The GoTo button in the upper-right opens the various security windows
allowing security settings to be changed on the fly, assuming that the
logged in user has the appropriate access of course:

How it works...
It's not uncommon to find frustrated users trying to
set security but unsure of what settings give access to a specific
window. The Security Profiler feature of the Support Debugging Tool can
make this process much clearer.
There's more...
The Security Profiler feature doesn't just provide
resource information on request. Security information can be exported
and sent by e-mail to a security administrator. Also, the Security
Profiler can pop up the appropriate information automatically when
access to a resource is denied. This makes it easy for an administrator
to adjust access at the point of the problem.
Automatic Security Profiles
The Security Profiler can be set up to automatically
display when access to a resource is denied. To apply this, the Support
Debugging Tool must be installed and Administrator access turned on.
To allow the Security Profiler to be activated
automatically users have to be added to the MBS DEBUGGER USER role in
security, otherwise access to the Security Profiler window itself is denied.
To turn on automatic display of the Security Profile when access is denied to a resource:
1. In the Support Debugging Tool window select Debugger | Administrator Settings.
2. Enter the system password if prompted.
3. In the General tab set the Automatic Open Mode field under Security Profile Settings to either Open on Errors Only or Open on Errors & Warnings and click on OK.

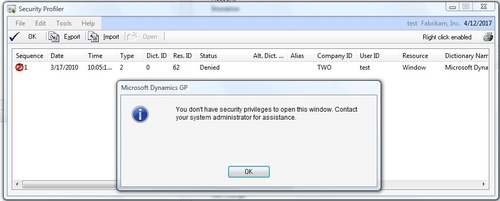
Now when access to a window is denied, the Security
Profiler activates with more information on the denied resource. This
makes validating security and, if appropriate, providing security to
that resource much easier:

Export/Import Security Logs
On the Security Profiler
window is an option to Export a profile to a file or e-mail. Once
exported, this file can be sent to a security administrator. The
administrator can then use the Import button to bring in the file and drill back to security to adjust the settings.
A common scenario looks like this: an employee is
denied access to a resource. They export the automatically opened
Security Profiler information and e-mail it to their security
administrator. The administrator imports the file and then drills back
to security to review. If access should be granted, the administrator
can grant the appropriate rights to the user or update the role for all
related users right from that screen.