Scenario/Problem: You want to create a new document library.
Solution: To create a document library, you need to use the Your Apps page as explained in the preceding section.
From the list of apps
available, click on the Document Library one and then give the document
library a name in the dialog that opens (see Figure 1).
The name for the document library determines not just the title that
the users will see but also the link that will be created to the
document library. For example, if you call the document library Presentations,
the link to the document library is the link to the site and then
/Presentations. This is important because although you can change the
title of the document library later, you cannot change its link.

FIGURE 1 The Adding Document Library dialog.
Tip
If you want to avoid creating complicated
links, choose a short name for the document library when you are
creating it and then later change the title for the document library.
For example, if you want to create a document library for human
resources policies, you can name it HRP when creating it and then change
the title to Human Resources Policies after it has been created. That
way, the link is short and easy to type or view (when sending it in
e-mail, for example), and the title explains to all users what should be
in that document library.
Using this approach can also help you avoid
unreadable links. For example, if your document library’s name has
spaces in it, the link to the document library will have the special
character combination %20 instead of the spaces, which will make the
link look long and complex. You can create the document library with a
short name without spaces and then rename the title to have the spaces.
The simpler link will remain.
Although you can have two document libraries
with the same title, you cannot have two document libraries with the
same link. This means that the link to the document library must be
unique, and in this initial screen, you choose the unique name. If that
name is already in use, SharePoint prevents you from creating the
document library and asks for another name. Remember that you can always
change the title later.
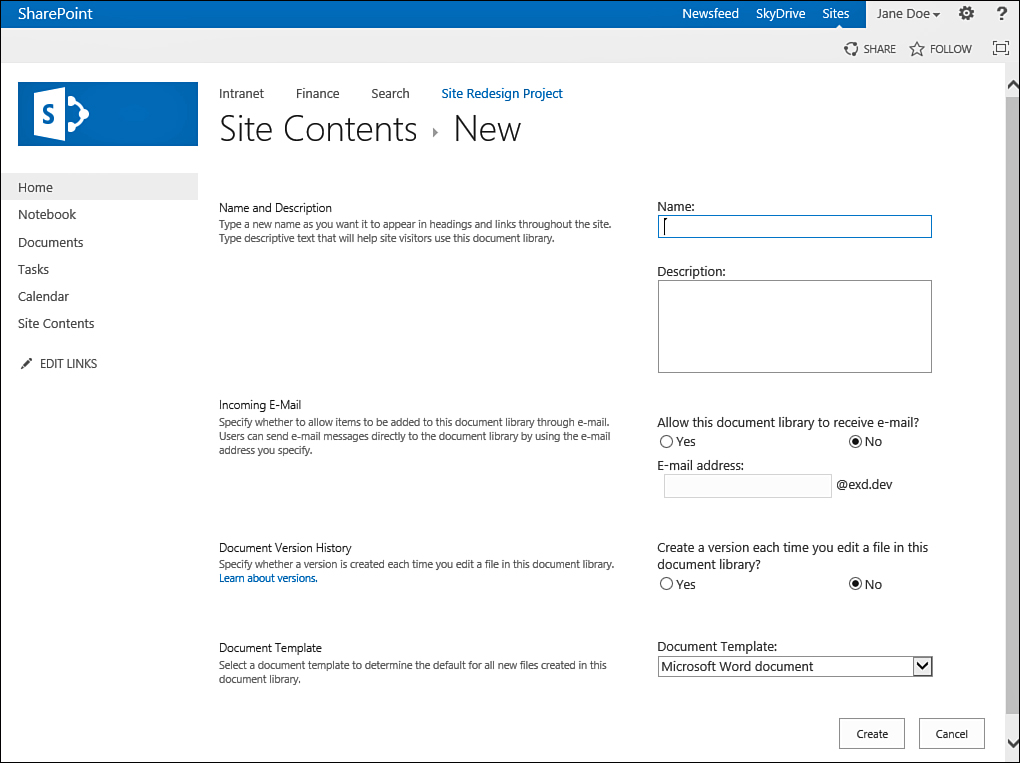
After selecting a name for the document
library, you can either click Create to create the new document library
with the name you chose and the default settings for that kind of
library, or you can click Advanced Options to switch to a page with more
settings for the new document library, as shown in Figure 2.

FIGURE 2 The Advanced Options page for creating a document library.
This dialog might show different options for
the document library, depending on the server configuration. For
example, some SharePoint servers can allow a document library to have an
associated e-mail address and receive e-mails sent to that library
directly into the document library itself. If that option is enabled in
the server, the settings page asks you for additional information, such
as the e-mail address that should be associated with the document library. If the option is not enabled, the setting isn’t either (see Figure 2).
First on this page, you can set the
description for the library. This description is usually displayed to
users in the All Site Contents page next to the library’s name. In most
cases, it also appears in all the views for the library, just above the
view. You can change the description later, in the library’s settings.
The next choice to make is whether SharePoint
should manage versions for documents in the document library. If you
choose Yes, all changes in documents will create new versions of the
documents. Although you can change this option later, if you choose No,
all changes made in documents until you change the setting will not be
stored in separate versions. However, if your site has a size quota and
you are worried about consuming a lot of space, leaving this setting
turned off can save quite a bit of space.
The last option, Document Template, enables
you to choose the application or type of file that will be used when the
user clicks the New Document button in the document library. For
example, you can choose Microsoft Word to have SharePoint open an empty
Microsoft Word document when the user clicks the New Document button, or
you can choose any of the other Microsoft Office applications. For web
pages, you can choose Basic Page to create an empty page that you can
type text on. Or you can choose Web Part Page to create a page that
allows the user to add web parts.
By default, the new document library has only
the Document content type associated with it, so the New Document button
in the ribbon does not show any options for different kinds of file
types, whereas the New Document button in the list view itself will
still open a dialog with multiple types. However, here you can set the
specific file type that the users can use with the New Document button.
When you are finished selecting the options,
click Create to create the document library. A new, empty library is
created with the settings you chose.