You can think about query flow
in four different ways. The first is to imagine the query using a
logical flow. Some developers, on the other hand, think through a query
visually using the layout of SQL Server Management Studio's Query
Designer. The third approach is to syntactically view the query . You
can view the query in a specific fixed order: SELECT – FROM – WHERE – GROUP BY – HAVING – ORDER BY.
Finally, to illustrate the declarative nature of SQL, the fourth way to
think about the query flow — the actual physical execution of the query
— is to execute in the most efficient order depending on the data mix
and the available indexes.
Syntactical Flow of the Query Statement
In its basic form, the SELECT
statement tells SQL Server what data to retrieve, including which
columns, rows, and tables to pull from, and how to sort the data. The
order of the clauses in the SELECT statement are significant; however,
they process in an order different from how they are syntactically
specified.
Following is an abbreviated syntax for the SELECT command:
SELECT
 [DISTINCT][TOP (n)] *, columns, or expressions
 [FROM data source(s)]
  [JOIN data source
   ON condition](may include multiple joins)
 [WHERE conditions]
 [GROUP BY columns]
 [HAVING conditions]
 [ORDER BY Columns];
The SELECT
statement begins with a list of columns or expressions. You need at
least one expression — everything else is optional. An integer, scalar
function, or a string value encapsulated in single quotes can represent
the expression. The simplest possible valid SELECT statement is as follows:
SELECT 1;
If you do not supply a FROM clause, SQL Server returns a single row with values. (Oracle requires a FROM DUAL to accomplish the same thing.)
When you include the FROM portion of the SELECT statement, it assembles all the data sources into a result set, which the rest of the SELECT statement uses. You can represent these data sources in many ways.
The WHERE clause acts upon the record set assembled by the FROM clause to filter certain rows based upon conditions. You can specify several conditions in the WHERE clause.
Aggregate functions perform summation-type operations across the data set. The GROUP BY clause can group the larger data set into smaller data sets based on the columns specified in the GROUP BY
clause. The aggregate functions are then performed on the new smaller
groups of data. You can restrict the results of the aggregation using
the HAVING clause.
Finally, the ORDER BY
clause determines the sort order of the result set. You can sort the
data in ascending or descending order based on one or more columns in
the list of columns from the SELECT statement. If you do not specify a sort order, the default is ascending.
A Graphical View of the Query Statement
SQL Server Management Studio includes
two basic methods to construct and submit queries: Query Designer and
Query Editor. Query Designer offers a graphical method to build a
query, whereas Query Editor is an excellent tool for writing SQL code
or ad hoc data retrieval because there are no graphics to get in the
way, and the developer can work as close to the SQL code as possible.
Even further, limiting yourself to the Query Designer may limit your
ability to fully understand the SQL programming language and how to
debug any potential errors you may encounter.
From SQL Server's point of view, it doesn't
matter where the query originates; each statement is evaluated and
processed as a SQL statement.
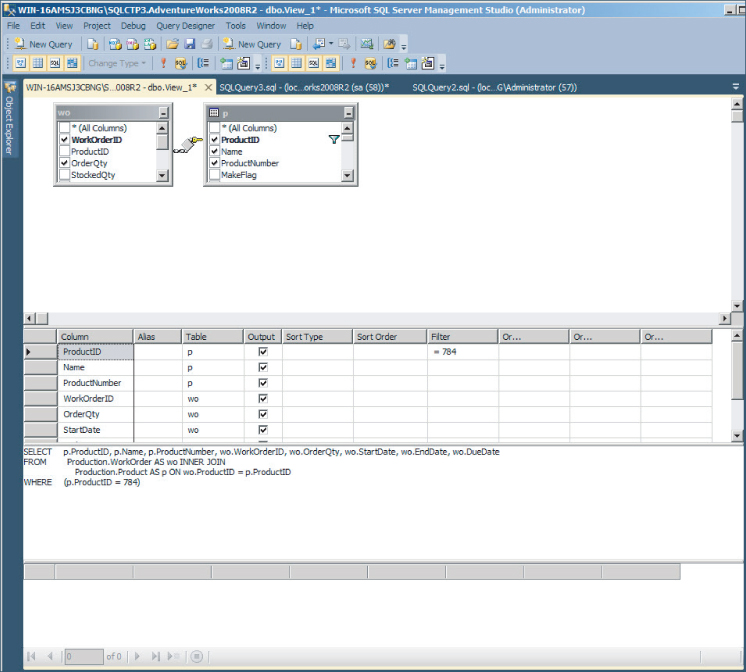
When selecting data using the Query Designer, you can enter the SQL statements as raw code in the third pane, as shown in Figure 1.
The bottom pane displays the results in Grid mode or Text mode and
displays any messages. The Object Browser presents a tree of all the
objects in SQL Server, as well as templates for creating new objects
with code.
Tip
If you select text in the Query Editor,
then only the highlighted text is submitted to SQL Server when you
press the Execute command button or the F5 key. This is an excellent
way to test single SQL statements or portions of SQL code.
Tip
Although it may vary depending on the
user account settings, the default database is probably the master
database. Be sure to change to the appropriate user database using the
database selector combo box in the toolbar, or the USE database
command.
The best solution is to change the user's default database to a user database and avoid master altogether.
Figure 1 Use the Query Designer to graphically create queries.
