2. Dynamic Disk Management
If you are using only Windows 7 on a system,
upgrading your storage devices to dynamic disks is usually the best way
to go because of the many advantages of the dynamic disk storage system.
Remember, though, that you can’t boot into or read your dynamic disks
from any other OS after you upgrade them. You can upgrade a disk through
Disk Management, right-clicking the drive’s icon in the bottom pane
(click the part of the graphical display that reads “Disk 0,” “Disk 1,”
and so on, not on the volume), and choosing Convert to Dynamic Disk.
Then, choose the disk and click OK. Next, just select the disk to
convert from the list that appears and click Convert.
Tip
Another good time to use
this feature is when you’ve backed up application data onto a CD or DVD
disc. If you want to use the backed-up data in an emergency, you can add
a path for your DVD drive to make its files appear in the original data
location your application expects. That way, you can use the data off
the media without restoring it to disk or reconfiguring your
application. Later, you can delete the path to regain access to the
“real” folder. |
If you don’t have the option of upgrading to
dynamic disks, one of two possible issues might be the cause. First, the
disks might have already been upgraded to dynamic disks. Second, the
disk might not be a hard drive, but rather a CD, DVD, or removable media
device.
3. Extending a Disk
One of the cool options available in Disk
Management is the option to extend the volume on a dynamic storage
drive. Extending is actually another way of “stretching” a simple volume
to a specified size when unallocated space is present on the disk.
Sometimes, you might want to rearrange the way you’ve set up your disks,
so this option can come in handy.
Caution
Dynamic disks cannot be changed back to basic disks using
Windows 7’s Disk Management without completely destroying any
partitions and reformatting the disk, so back up all data first. When
you’re ready, right-click the volume and select Delete Volume. From there, you can re-create your simple volume by right-clicking a disk and going through the applicable steps. |
To
perform the actual extend operation on a disk, you need to have an area
of the disk that is unallocated. From there, right-click an existing
partition and select Extend Volume to bring up the Extend Volume Wizard.
The wizard enables you to specify the size you want to extend the
volume to. Finishing the operation leaves you with a disk that is now
larger than before. This operation is not limited to volumes that are
mounted as drive letters; you can also perform this task on volumes that
are mounted into directories.
Note
You can also extend a basic volume; however, it must be raw (not formatted with a file system) or formatted with NTFS. |
When Disk Management extends a disk, it is
actually creating a new partition and mapping it to the same drive
letter as the partition to be extended. It is, in effect, a spanned
volume. Although this approach is a bit different from the traditional
method performed by disk utilities, such as PartitionMagic, the upside
of the Disk Management approach is that you can extend your disk without
needing to wait for the volume to be resized and data to be shuffled
around. The Disk Management approach happens very quickly, without even
rebooting your system.
Caution
If you shrink your
system’s boot volume, you cannot extend it (unless you want to connect
your system’s hard disk to another system running Windows 7). Before you
shrink a boot volume, be sure you calculate how much room you’ll need
for future data, programs, and updates to Windows 7. |
4. Shrinking a Disk
Windows 7 supports shrinking a basic or dynamic
disk volume as well as extending it. When you shrink a volume, the space
removed from the volume becomes unallocated space. You can use it for
another volume or save it for a future multibooting OS. To shrink a
volume, right-click it and select Shrink Volume. The system calculates
the amount of space that can be removed, and you can use all or part of
this amount.
5. Creating a Spanned Volume
A spanned volume is a volume in which the disk
space spans multiple partitions and disks. Using a spanned volume is a
handy way of turning a couple of small disks into one large disk,
mounted under one drive letter or folder. Simple volumes can also be
extended using spanned volumes, as shown in the previous section.
Spanned volumes can be created only on dynamic disks. A spanned volume
basically is the same as an extended volume, except that the former adds
drive space from other hard drives and the latter adds drive space from
the same drive.
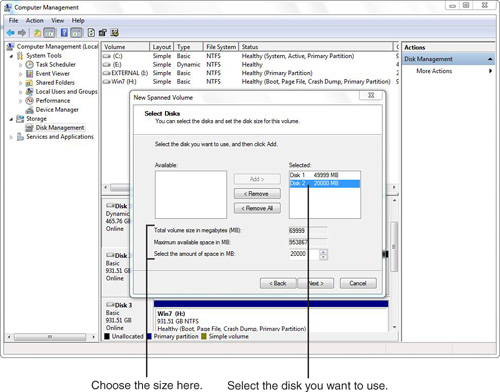
Creating a spanned volume is just a matter of
right-clicking an empty partition and selecting New Spanned Volume,
which starts the New Spanned Volume Wizard. This wizard enables you to
select which disks to include in your spanned volume from the Available
box and click Add. They then appear in the Selected box (see Figure 4).
At this point, you also can select the amount of space to use for each
disk. The total size of your spanned volume is the cumulative total of
the space you select on each disk. After clicking Next, you are prompted
to assign a drive letter or drive path (mount point) for the new
spanned volume. Click Next. Choose whether to format the new volume and,
if you choose to do so, select a file system and allocation unit size,
enter a volume label, and choose whether to enable file and folder
compression. Click Next. In the summary screen, if no changes are
necessary, click Finish to create the spanned volume.
