2. Adding an Additional Email Domain Name
One request we see regularly in the SBS forum is how to add an
additional email domain that SBS can receive email for. Often a
small-business owner combines several businesses under a single
office and a single SBS network, but still needs to be able to
receive email for each of those business names. Exchange Server
makes that easy to implement. You can add additional domains that
Exchange accepts mail for, and automatically update the email
addresses of your users to include the additional domains.
Before you can accept email for another domain, however, you
need to make sure that the outside world knows about that domain and
how to reach it. You need to register your second domain name with
one of the Internet registrars, and you need to set up DNS records
for the domain. Those records need to include an MX record that
sends mail to your SBS server. This record should point to the
public IP address of your router.
Accepting email for an additional domain, however, is only part of the
equation. You also need to change the recipient policies so that the
new domain will propagate to your users.
When you’re ready to have Exchange Server receive email for an additional domain, use the following steps to add the
domain:
Open the Exchange Management Console if it isn’t already
open.
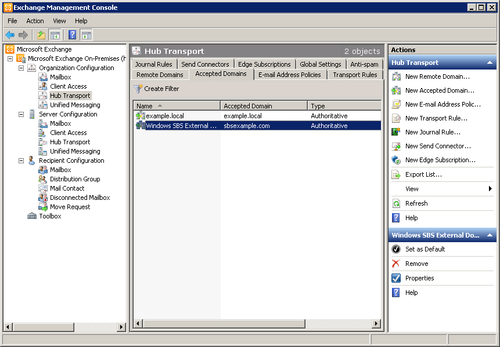
Navigate to Hub Transport in the Organization
Configuration container in the left pane and then click the
Accepted Domains tab in the center pane, as shown in Figure 11.
Click New Accepted Domain in the Actions pane to open the
New Accepted Domain Wizard shown in Figure 12.
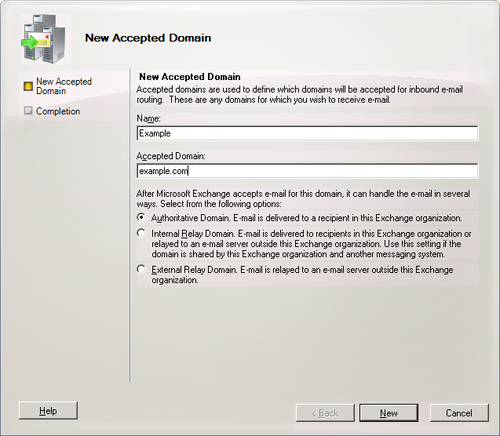
Enter a name for the domain you want to receive email for, and then enter the DNS domain name in
the Accepted Domain field.
Click New and then click Finish when the task has
completed. As with all other commands in the Exchange Management
Console, you can save the Windows PowerShell script that was
executed to complete the command on the Completion page before
you close the wizard.
Click New E-Mail Address Policy in the Actions pane to
open the New E-Mail Address Policy Wizard shown in Figure 13.
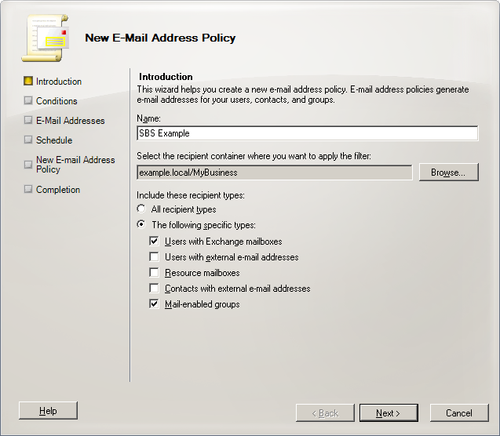
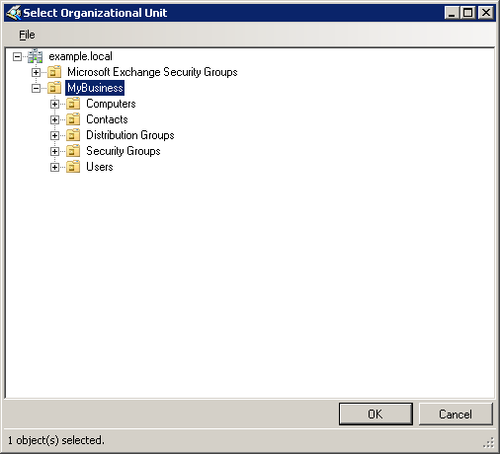
Type in a name for the new policy, and then click the Browse
button to set the OU to the MyBusiness OU, as shown in Figure 14.
Click OK to return to the Introduction page, and select
Users With Exchange Mailboxes and Mail-Enabled Groups as shown
in Figure 13.
This should be a good starting point for most SBS networks,
though if you’re heavy users of Resource mailboxes (such as for
scheduling conference rooms), you might want to add them as
well.
Click Next to open the Conditions page of the New E-Mail
Address Policy Wizard. You can use these conditions to filter
which recipients the policy applies to. Click Preview to see a
list of the accounts that will be affected by the current set of
conditions. In most cases, you should leave the conditions blank
on this page.
Click Next to open the E-Mail Addresses page.
Click Add to open the SMTP E-Mail Address dialog box shown
in Figure 15.
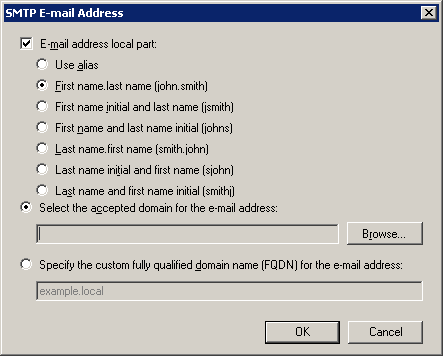
Select the format of the email address to use, and then choose Select
Accepted Domain For The E-Mail Address.
Click Browse to select the new accepted domain you added
earlier.
Click OK to return to the E-Mail Addresses page, which
will now show the address policy that will be applied, and click
OK.
Click Next twice to open the Configuration Summary.
Click New to apply the policy, and then click Finish on
the Completion page to close the wizard.
Select the original Windows SBS Email Address Policy and
click Change Priority in the Actions pane to open the Change
E-mail Address Policy Priority dialog box shown in Figure 16.
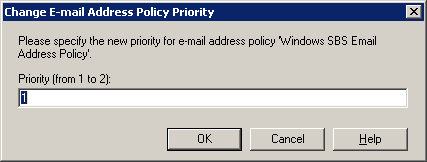
Click OK, and then click Apply in the Actions pane to open
the Apply E-mail Address Policy Wizard shown in Figure 17. Select
Immediately, click Next, and then click Apply to apply the
change.
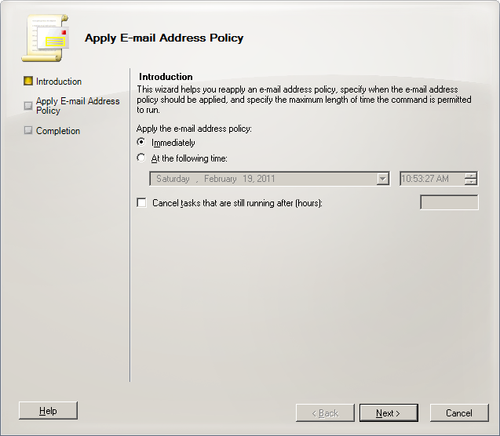
Click Finish to close the wizard and return to the
Exchange Management Console. You’re now receiving emails for the
new domain.
|
The Microsoft Exchange Server 2010 Management Console is
built entirely on Microsoft Windows PowerShell. All the commands
and functionality that can be performed in the console can also be
done from the Exchange Management Shell. Although most things are
easily done from the Exchange Management Console, doing repetitive
tasks from a graphical console can be a pain and is also far more
prone to errors. Using the Windows PowerShell command line that
the Exchange Management Shell provides gives you the ability to
automate routine tasks.
For those not very familiar with Windows PowerShell, using
the Exchange Management Console and then saving the Windows
PowerShell script that was actually performed on the Completion
page of the wizard gives you a great starting point for building
your own scripts to perform similar tasks. A useful resource is
the Exchange Team Blog at http://msexchangeteam.com.
Another good resource is Windows PowerShell itself, which is
an extremely self-discoverable language. You can start by getting
a list of all the Exchange-specific Windows PowerShell
commands:
Get-Excommand >
ExchangeCommands.txt
This creates a file that has a list of all the
Exchange-specific Windows PowerShell commands. If you see a
command that looks like it might do what you want, such as
creating a new distribution list, get some help with that
command:
Help New-DistributionGroup
You can get additional help, including examples of using the
command, by adding the –detailed switch to
the help command:
Help New-DistributionGroup
–detailed
To get some more general help with Windows PowerShell, try
the following:
Help about*
This will give you a list of available general help topics
and is a great way to start your Windows PowerShell Discovery
Tour.
|
3. Changing the Maximum Message Size
The default maximum size of email messages, both incoming and
outgoing, is set to 10 MB in SBS. Now for most organizations, this
is probably adequate, but if you need to support larger messages,
you can change the maximum size. But it turns out it’s not all that
easy, and there are lots of places you need to change it. Yes, you
could do this from the Exchange Management Console, but heck, this
is a perfect place to use a simple Windows PowerShell script to get
the job done quickly and easily. So here’s a simple script that
accepts a single command-line parameter, the maximum size in
megabytes that you want to set for your Exchange messages, and then
changes the setting where it needs to. If you forget to include the
size, it will prompt you for what size to set.
# Change-ExchSize.ps1

# Script to change the size of the maximum send and receive for
# a Windows SBS 2011 Standard installation with Exchange 2010
#
# Expects: maximum size parameter in MB or prompts
#
# Created: 19/2/2011
# ModHist:


param($MaxSize)
if (! $MaxSize ) {
$MaxSize = Read-Host "What's the max size(in MB) you want for all mailboxes? "
}
$stMaxSize = "$MaxSize" + "MB"

"Setting Maximum Send and Receive Transport Size to: $stMaxSize"
Set-TransportConfig -MaxSendSize $stMaxSize -MaxReceiveSize $stMaxSize
Get-TransportConfig | ft -maxsendsize,maxreceivesize

"Setting Maximum Send and Receive Connectors to: $stMaxSize"
$ReceiveConnectors = Get-ReceiveConnector
$SendConnectors = Get-SendConnector

ForEach ($Connector in $ReceiveConnectors ) {
   Set-ReceiveConnector -Identity $Connector.name -MaxMessageSize $stMaxSize
}
ForEach ($Connector in $SendConnectors ) {
   Set-SendConnector -Identity $Connector.name -MaxMessageSize $stMaxSize
}

"The Maximum Receive Connector size has been set to: "
Get-ReceiveConnector | ft Name, MaxMessageSize

"The Maximum Send Connector size has been set to: "
Get-SendConnector | ft Name, MaxMessageSize
Note:
This script must be run from the Exchange Management Shell
on the SBS server, from an account in the Network Administrator
role.