With PowerShell, you have a great tool to help you
automate users and groups in your AD environment. In the prior versions
to Windows Server 2008, you could use PowerShell to manage objects, but
it was cumbersome and not an easy task to accomplish. However, in
Windows Server 2008 R2, there are several improvements and additions for
easy management with Windows PowerShell. Specifically, there are newly
created PowerShell cmdlets and the AD Recycle Bin, which provides easier
access to working with AD at a PowerShell level. You will see both of
those in this section.
1. Load AD PowerShell Modules
Before you can begin using
the new cmdlets, you need to load the AD PowerShell modules. The AD
PowerShell modules are installed by default on a server when Windows
PowerShell and the Microsoft .NET Framework 3.5.1 are installed. You can
load the AD cmdlets in one of two ways:
Select Administrative Tools => Active Directory Module For Windows PowerShell.
or
Load a normal Windows PowerShell session, and run this cmdlet:
Import-Module ActiveDirectory
Verify the module was loaded by running this:
Get-Module
If you want to see a list of all the commands available from managing AD objects and resources, you can run this command:
Get-Command *ad*
2. Work with Users and Groups in PowerShell
You can also use the
AD PowerShell cmdlets to manage your users, groups. The reasons
for using PowerShell are the same generally with any scripting tool.
You may have a preference for using command-line and scripting tools.
Potentially, you may also find yourself repeating the same tasks over
and over again, and using PowerShell will provide you with a consistent
and repeatable approach to these tasks.
When working in the AD
PowerShell, you can also use directory-style commands to move around the
AD structure. For example, you can run this command to get to the top
of your AD structure:
cd AD:
When you run the command, you will see command prompt change to the following:
PS AD:\>
The command prompt will continue to change to reflect your current location in the directory hierarchy. From there you can run dir to see the objects at the root. To navigate to the actual domain, you will need to run a command similar to this:
cd "dc=yourdomainname,dc=com (or your FQDN ending)"
To change to an OU or container, after you have navigated to your domain structure, you can run this command:
cd cn=containername
If you want to switch to OU, the command is slightly different:
cd ou=Organizational Unit
Figure 1 shows an example of the previous commands and a dir command, which will show all the objects in the container.
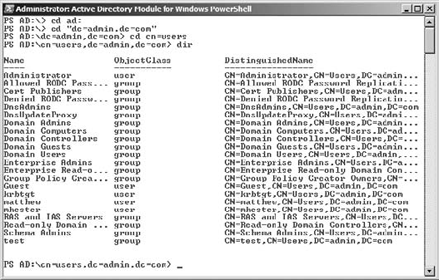
Table 1 lists some of
the common tasks for working with PowerShell with your users and groups.
When you run the commands listed in the table, they run from the
directory you are currently located in. If you need more information, do
not forgot about the built-in help system. You can use get-help with any of the following commands to learn more.
Table 1. Common PowerShell AD Commands
| cmdlet | Description | Example |
|---|
| Get-ADobject | Lists multiple AD objects. Like with users and groups, works similar to other getfilter, ldpafilter, and searchbase cmdlets. This command uses
to query the information. You can also combine this with the format and
output switches of PowerShell to work with the command's output. | This command will list all the objects in AD: Get-ADObject –Filter {name -like "*"} |
| Get-ADuser | Lists the AD users in the domain. This command uses filter, ldpafilter, and searchbase to query the information. You can also combine this with format and out switches to work with the command's output. | This command will list all the users at your current level of the AD hierarchy: Get-ADUser –Filter {name -like "*"} |
| New-ADuser | Creates
a new user in your AD environment. You can also control most of the
properties for this cmdlet. You will need to set a password and enable
the account for use. | This command will create a user called John Smith in the Marketing OU in the admin.com domain, with display name and given name filled out:
New-ADuser johnsmith -GivenName "Smith" -Surname "John" -Displayname "John Smith"
 -Path 'OU=Marketing,DC= admin,DC=com'
|
| Set-ADaccountpassword | Sets
the password for an AD account. Depending on the nature of how you use
this command, you may be presented with a series of prompts to set the
password. When you run this command, you do not need to specify the OU
or domain name if you are located in the OU that contains the user. | This command will reset the password of John Smith with a new password of p@ssw0rd:
Set-adaccountpassword -identity johnsmith -reset -newpassword
 (ConvertTo-SecureString -AsPlainText "p@ssw0rd" -force)
|
| Remove-ADuser | Removes
a user from AD. When you run this command, you do not need to specify
the OU or domain name if you are located in the OU that contains the
user. | This command deletes John Smith: Remove-aduser johnsmith |
| New-ADgroup | Creates a new group. You can also modify the group type, scope, and other properties of the group. | This command will create a new global security group called Accounting:
New-adgroup Accounting -groupscope global
|
| Add-ADGroupMember | Allows you to modify the membership of an AD group. | This command adds John Smith to the Marketing group in the admin.com domain.
Add-ADGroupMember -Member John Smith
|
| New-ADorganizationalunit | Creates a new AD organizational unit. | This command creates a new OU called Finance in the admin.com domain:
New-ADOrganizationalUnit -Name "Finance" –Path "DC=admin,DC=com"
|
3. Use the AD Recycle Bin
You may have at one time
deleted a user by accident. In previous versions of Windows, when an
accidental deletion occurred, you had to implement AD disaster/recovery
scenarios to recover the deleted object. This method, as you may know,
was complex. Accidental deletions also became the number-one reason you
may have implemented your AD disaster recovery scenarios. With Windows
Server 2008 R2 you can now use the new functionality called the Recycle
Bin as apart of your overall backup and recovery strategy; even though
the Recycle Bin provides you with the ability to recover AD objects, you
will still need to perform your regular backups in your environment.
One of the new additions
to Windows Server 2008 R2 is the AD Recycle Bin. This is an optional
tool you can enable on your Windows Server 2008 R2 domain controller.
The Recycle Bin provides a tool for you to recover deleted users,
groups, OUs, and so on. All attributes of the object are automatically
restored, including the description, password, group membership, and
managed by properties, as well as many of the other properties of the
user objects, including the formerly problematic "linked attributes."
Enabling the Recycle Bin
can increase the size of the Active Directory database file by about 5
to 10 percent when you install on a new DC. The amount of growth of the
database really depends on the size and frequency of object deletions in
your domain.
When you delete the object, the
object will have a lifetime of 180 days by default before it is put into
the normal tombstone and collection process in AD. You can modify the
value manually by modifying the msDS-deletedObjectLifetime
attribute. This applies only to newly deleted objects. Any objected
deleted before you enable the Recycle Bin will follow normal deletion
properties.
|
The Recycle Bin
requires Windows Server 2008 R2 forest functional level in Windows
Server 2008 R2. This is required in order to ensure that all DCs
preserve the attributes necessary to complete a successful object
recovery.
When you raise the
functional level, by itself it really has no effect other than allowing
optional features to be enabled, like the Recycle Bin. This allows you
to raise the functional level with confidence and avoid any unnecessary
side effects.
|
|
3.1. Enable the AD Recycle Bin
To work with the Recycle Bin, you need to enable the optional feature in your AD PowerShell:
Type the following command, and hit Enter to enable the Recycle Bin:
Enable-ADOptionalFeature "Recycle Bin Feature"
 -Scope ForestorConfigurationSet -Target 'your domain name'
Press Y to enable the feature.
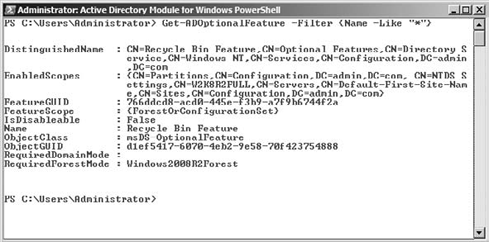
Verify the Recycle Bin has been enabled by running the following command and hitting Enter. Your screen will look similar to Figure 2:
Get-ADOptionalFeature -Filter {Name -Like "*"}
3.2. Using the AD Recycle Bin
If you have deleted a user and need to recover the user from the Recycle Bin, you will need to do this in PowerShell:
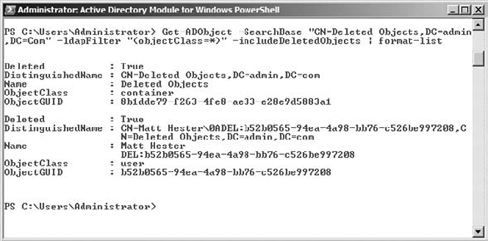
Type the following command to view the objects in the Recycle Bin:
Get-ADObject -SearchBase
 "CN=Deleted Objects,DC=your domain name,DC=Com"
-ldapFilter "(objectClass=*)"
-includeDeletedObjects | format-list
You could also use the out-gridview object to see a GUI of the deleted objects. Your results may look like Figure 3.
Write down or copy the ObjectGUID for the object you want to recover. This is the identity of the object you have deleted:
To copy text from a command prompt, right-click and then select Mark. Highlight the text to copy and then press Enter.
To paste, right-click and then click Paste.
Recover the object with the following command:
Restore-ADObject -Identity ObjectGUID from step 3