Running Through a Pre-Installation Checklist
For those who enjoy
working with computers, few things are as tempting as a new software
package. The tendency is to just tear into the box, liberate the source
disks, and let the installation program rip without further ado. This
approach often loses its luster when, after a willy-nilly installation,
your system starts to behave erratically. That’s usually because the
application’s setup program has made adjustments to one or more
important configuration files and given your system a case of
indigestion in the process. That’s the hard way to learn the hazards of a
haphazard installation.
To avoid such a fate, you
should always look before you leap. That is, you should follow a few
simple safety measures before double-clicking that setup.exe file. The next few sections take you through a list of things to check before you install any program.
Check for Windows XP Compatibility
Check to see whether
the program is compatible with Windows XP. The easiest and safest setups
occur with programs certified to work with Windows XP.
Set a Restore Point
The quickest way
to recover from a bad installation is to restore your system to the way
it was before you ran the setup program.
Read Readme.txt and Other Documentation
Although it’s the
easiest thing in the world to skip, you really should peruse whatever
setup-related documentation the program provides. This includes the
appropriate installation material in the manual, Readme
text files found on the disk, and whatever else looks promising. By
spending a few minutes looking over these resources, you can glean the
following information:
Any advance preparation you need to perform on your system
What to expect during the installation
Information you need to have on hand to complete the setup (such as a product’s serial number)
Changes the install program will make to your system or to your data files (if you’re upgrading)
Changes to the program and/or the documentation that were put into effect after the manual was printed
Virus-Check Downloaded Files
If you downloaded
the application you’re installing from the Internet, or if a friend or
colleague sent you the installation file as an email attachment, you
should scan the file using a good (and up-to-date) virus checker.
Although most
viruses come to us via the Internet these days, not all of them do.
Therefore, there are other situations in which it pays to be paranoid.
You should check for viruses before installing if
You ordered the program directly from an unknown developer.
The package was already open when you purchased it from a dealer (buying opened software packages is never a good idea).
A friend or colleague gave you the program on a floppy disk or recordable CD.
Understand the Effect on Your Data Files
Few software
developers want to alienate their installed user base, so they usually
emphasize upward compatibility in their upgrades. That is, the new
version of the software will almost always be able to read and work with
documents created with an older version. However, in the interest of
progress, you often find that the data file format used by the latest
incarnation of a program is different from its predecessors, and this
new format is rarely downward-compatible.
That is, an older version of the software will usually gag on a data
file that was created by the new version. So, you’re faced with two
choices:
Continue to
work with your existing documents in the old format, thus possibly
foregoing any benefits that come with the new format
Update
your files and thus risk making them incompatible with the old version
of the program, should you decide to uninstall the upgrade
One possible
solution to this dilemma is to make backup copies of all your data files
before installing the upgrade. That way, you can always restore the
good copies of your documents if the upgrade causes problems or destroys
some of your data. If you’ve already used the upgrade to make changes
to some documents, but you want to uninstall the upgrade, most programs have a Save As command that enables you to save the documents in their old format.
Use the Add or Remove Programs Feature
Double-clicking Control Panel’s Add or Remove Programs icon displays the window shown at the top of Figure 2.
You can use this window to launch a program installation wizard, but
most experienced Windows users don’t need a wizard to install a program.
Instead, Add or Remove Programs is useful for two things:
| Modifying a program’s installation | Clicking the Change or Remove Programs icon displays a list of your computer’s installed programs, as shown in Figure 2.
When you select a program, the window shows you the size of the
installation; how frequently the program has been used (rarely,
occasionally, or frequently); and when the program was last used. You
also get a Change button that you can click to modify the program’s
installation. (Some programs display a combined Change/Remove button
instead.) Depending on the program, modifying its installation might
mean adding or removing program features, reinstalling files, or
repairing damaged files. |
| Removing a program | Click
the Remove (or Change/Remove) button to uninstall the program. Note
that each uninstallable item in the Add or Remove Programs list has a
corresponding subkey of the following Registry key, as shown in Figure 2. |
| | HKLM\SOFTWARE\Microsoft\Windows\CurrentVersion\Uninstall
|
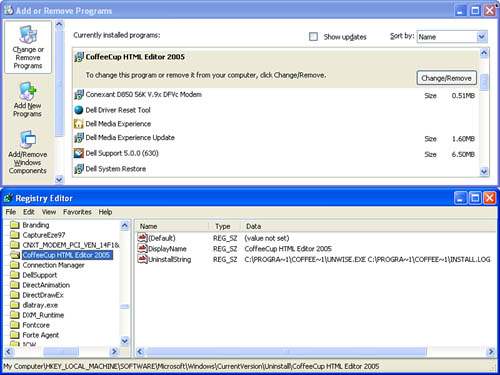
Tip
After you’ve
uninstalled a program, you might find that it still appears in the list
of programs in the Add or Remove Programs dialog box. To fix this, open
the Registry Editor, display the Uninstall key, and look for the subkey
that represents the program. (If you’re not sure, click a subkey and
examine the DisplayName setting, the
value of which is the name that appears in the Add or Remove Programs
list.) Delete that subkey and the uninstalled program will disappear
from the list.
Save Directory Listings for Important Folders
Another safe setup
technique I recommend is to compare the contents of some folders before
and after the installation. Windows programs like to add all kinds of
files to the %SystemRoot% and %SystemRoot%\System32 folders. To troubleshoot problems, it helps to know which files were installed.
To figure this out, write directory listings for both folders to text files. The following two DOS statements use the DIR command to produce alphabetical listings of the %SystemRoot% and %SystemRoot%\System32 folders and redirect (using the > operator) these listings to text files:
Note
To get to the command prompt, either select Start, All Programs, Accessories, Command Prompt, or select Start, Run, type cmd, and click OK.
dir %SystemRoot% /a-d /on /-p > c:\windir.txt

dir %SystemRoot%\system32 /a-d /on /-p > c:\sysdir.txt
When the installation is complete, run the following commands to save the new listings to a second set of text files:
dir %SystemRoot% /a-d /on /-p > c:\windir2.txt

dir %SystemRoot%\system32 /a-d /on /-p > c:\sysdir2.txt
The resulting text
files are long, so comparing the before and after listings is
time-consuming. To make this chore easier, use the DOS FC (File Compare) command. Here’s the simplified syntax to use with text files:
FC /L filename1 filename2
|
/L | Compares files as ASCII text |
| filename1 | The first file you want to compare |
| filename2 | The second file you want to compare |
Note
The FC command
can also compare binary files, display line numbers, perform
case-insensitive comparisons, and much more. For the full syntax, enter
the command fc /? at the command prompt.
For example, here’s the command to run to compare the files sysdir.txt and sysdir2.txt that you created earlier:
fc /l c:\sysdir.txt c:\sysdir2.txt > fc-sys.txt
This statement redirects the FC command’s output to a file named fc-sys.txt. Here’s an example of the kind of data you’ll see in this file when you open it in Notepad:
Comparing files C:\sysdir.txt and C:\sysdir2.txt
***** C:\sysdir.txt
08/04/2004 07:00 AM            258,048 WMVDS32.AX
08/04/2004 07:00 AM            264,192 WOW32.DLL
***** C:\SYSDIR2.TXT
08/04/2004 07:00 AM            258,048 WMVDS32.AX
11/22/2004 08:56 PM            913,560 wodFtpDLX.ocx
08/04/2004 07:00 AM            264,192 WOW32.DLL
*****
In this case, you can see that a file named wodFtpDLX.ocx has been added between WMVDS32.AX and WOW32.DLL.
Tip
The FC command is useful for more than just directory listings. You could also export Registry keys before and after and then use FC to compare the resulting registration (.reg) files.
Tip
Most
high-end word processors have a feature that enables you to compare two
documents (or any file type supported by the program). In Word 2003,
for example, open the post-installation file, select Tools, Compare and
Merge Documents, and then use the Compare and Merge Documents dialog box
to open the pre-installation file. Word examines the documents and then
inserts the changes using revision marks.
Take Control of the Installation
Some setup programs give new meaning to the term brain-dead. You slip in the source disk, run Setup.exe
(or whatever), and the program proceeds to impose itself on your hard
disk without so much as a how-do-you-do. Thankfully, most installation
programs are a bit more thoughtful than that. They usually give you some
advance warning about what’s to come, and they prompt you for
information as they go along. You can use this newfound thoughtfulness
to assume a certain level of control over the installation. Here are a
couple of things to watch for:
Choose your folder wisely—
Most installation programs offer to install their files in a default
folder. Rather than just accepting this without question, think about
where you want the program to reside. Personally, I prefer to use the
Program Files folder to house all my applications. If you have multiple
hard disks or partitions, you might prefer to use the one with the
largest amount of free space. If the setup program lets you select data
directories, you might want to use a separate folder that makes it easy
to back up the data.
Tip
Most installation programs offer to copy the program’s files to a subfolder of %SystemDrive%\Program Files (where %SystemDrive%
is the partition on which Windows XP is installed). You can change this
default installation folder by editing the Registry. First, display the
following key:
HKLM\SOFTWARE\Microsoft\Windows\CurrentVersion\
The ProgramFilesDir
setting holds the default install path. Change this setting to the path
you prefer (for example, one that’s on a drive with the most free disk
space).
Use the Custom install option—
The best programs offer you a choice of installation options. Whenever
possible, choose the Custom option, if one is available. This will give
you maximum control over the components that are installed, including
where and how they’re installed.