Depending on the choices that were made when you (or
someone else) first installed OneNote, you can change certain
installation settings at any time.
Personalizing Your Copy of OneNote 2010
If you use shared
notebooks with OneNote 2010, it’s highly recommended that you tell
OneNote your full name and your initials so that your edits can be
properly identified in the author information which will be visible to
others may be working in a shared notebook with you.
To verify or update your personalization, do the following:
1. | Click the File tab, and then click Options.
|
2. | In the OneNote Options dialog box, click the General category on the left side.
|
3. | On
the right side, under Personalize Your Copy of Microsoft Office, type
your full name into the User Name box, and then type your initials into
the Initials box.
|
4. | Click OK to save your changes.
|
Changing OneNote 2010 Setup Options
To view or change Setup
options in your standalone copy of OneNote 2010 or in your edition of
Microsoft Office 2010 that contains OneNote 2010, do the following:
1. | Exit OneNote and any other Office programs that you may be running.
|
2. | In Windows 7, click the Start button and then click Control Panel.
|
3. | In Control Panel under Programs, click the blue Uninstall a Program link.
|
4. | In
the Uninstall or Change a Program list that appears, find either
Microsoft OneNote 2010 or Microsoft Office 2010 and then click its entry
once to select it in the list.
|
5. | Near the top of the list, click Change.
|
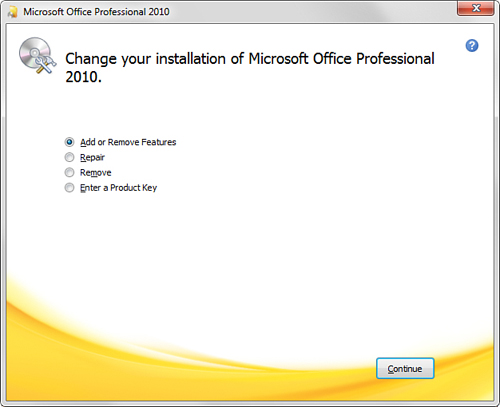
6. | In the window that appears (see Figure 1), click Add or Remove Features, and then click Continue.

|
7. | On the next screen, click the control buttons to the left of specific features that you want to enable or disable.
|
8. | If you make any changes in this list, click Continue and then follow any instructions that appear.
|
9. | If no changes are necessary, click the Close button (the red X) in the upper-right corner of the window.
|
10. | When prompted if you want to cancel Setup, click Yes and then click Close.
|
Repairing Your OneNote 2010 Installation
If any particular feature in
OneNote 2010 does not work as you expect it to, it’s possible that you or someone else who
is using your computer might have inadvertently changed something. If
you don’t know what’s changed and you can’t use the preferences in the
OneNote Options dialog box to fix the problem, you can try repairing
your installation of OneNote 2010 or Office 2010 by doing the following:
1. | Exit OneNote and any other Office programs that you are running.
|
2. | In Windows 7, click the Start button and then click Control Panel.
|
3. | In Control Panel under Programs, click the blue Uninstall a Program link.
|
4. | In
the Uninstall or Change a Program list that appears, find either
Microsoft OneNote 2010 or Microsoft Office 2010 and then click its entry
once to select it in the list.
|
5. | Near the top of the list, click Change.
|
6. | In the window that appears, click Repair and then click Continue.
|
7. | Follow any instructions that appear.
|
|
It’s a good idea to
restart your computer after you repair a program. This frees up any
files that might have been in use and it gives you a fresh start with
the newly restored settings.
|
Checking for OneNote 2010 Software Updates
If you don’t have
Windows Update configured to automatically check for OneNote 2010 and
Office 2010 updates for some reason, you can manually check for software
updates right in OneNote by doing the following:
1. | Click the File tab and then click Help.
|
2. | Under Tools for Working with Office, click Check for Updates.
|
It’s
a good idea to keep all of your software programs updated so you’ll
have all of the latest feature enhancements and security updates.
Setting Preferences for the OneNote Taskbar Icon
OneNote taskbar icon, also called the OneNote
2010 Screen Clipper and Launcher. Although its default behavior is
suitable for most occasions, you can set some options for this small
program that runs in the background and gives you access to OneNote
features even when OneNote isn’t running.
To set preferences for the OneNote taskbar icon, do the following:
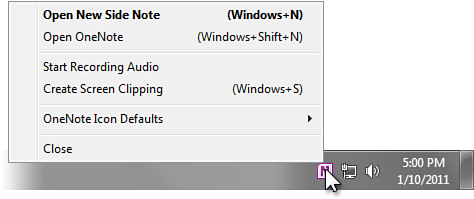
1. | On the Windows taskbar, right-click the OneNote icon in the notification area near the Windows clock (see Figure 2).

|
2. | Click
OneNote Icon Defaults and then choose the default command that OneNote
should use when you left-click the icon. For example, if you want to
open OneNote by clicking this icon instead of creating a new side note
(the initial setting), click Open OneNote. Your new preference is saved
as soon as you make a selection.
|
Displaying OneNote 2010 Version Information
Lastly, if you should ever
need to troubleshoot OneNote, you might be asked what specific version
of OneNote 2010 you’re running. To display this information, do the
following:
1. | Click the File tab and then click Help.
|
2. | At
the far right, under About Microsoft OneNote, you’ll see a long string
of numbers that indicates the exact version of the program that you are
currently running. In parentheses after that, you can see whether you’re
running the 32-bit or the 64-version of OneNote 2010 or Office 2010
(this might also be important information for troubleshooting).
|
3. | To
obtain product support from Microsoft, click the Microsoft Customer
Services and Support link on this screen and then follow the
instructions that are displayed. Alternately, you can visit http://www.office.com
to learn more about your Support options for your Microsoft Office 2010
programs—including OneNote 2010. You can also visit the official
Microsoft product support forums on the Web by visiting http://answers.microsoft.com.
|
Make sure that you have a
legally obtained copy of OneNote or Office before attempting to obtain
product support and make sure that your product was properly activated
after installation. You can view your product activation status by
clicking the File tab, clicking Help, and then looking at the activation
status information underneath the Microsoft Office logo at the far
right of the screen.