2. Exporting Data from ProjectMost
often, you export data from Project so you can work with the data in
ways that Project doesn't handle well. For example, financial analysis
is Excel's strong suit, not Project's. Exporting data is also useful when colleagues don't have Project, or just want to see the data in another format. The steps in the Export
Wizard bear a strong resemblance to those in the Import Wizard, but
there are a few key differences. Here's how you export Project data to another format: Open the Project file you want to export and choose File→Save As. The Save As dialog box opens. In the "Save as type" drop-down list, choose the file format you want to use. If
you save to one of the Project file formats (Project, Microsoft Project
2007, Microsoft Project 2000-2003, Project Template, or Microsoft
Project 2007 Templates), Project opens the Save As dialog box, not the Export
Wizard. However, saving to an Excel workbook, a text file, a
comma-delimited file, or the XML format all start the Export Wizard. In the "File name" box, type the name for the file and click Save. Project
fills in the "File name" box with the Project file's name, but you can
rename the export file to whatever you want. Project sets the file
extension based on the file format you choose. If you choose an older
file format, such as Excel 97-2003 Workbook or CSV (Comma delimited),
when you click Save, a message box tells you that the older file format
may be less secure than a new file format. If you want to save the file
to that format, simply click Yes. To quit, click No, and then repeat
steps 1 and 2 to choose a different format. Project starts the Export Wizard. Click Next to bypass the welcome screen. On the Export Wizard—Map page, select the "New map" option and click Next. To use an existing map to match up fields , select the "Use existing map" option. On the Export Wizard—Map Options page, select the types of data you want to import. Click Next. Your
choices are the same as the ones on the Import Wizard—Map Options page,
with one exception; the "Include Assignment rows in output" checkbox is
now active but turned off. If you want to export all the assignment
rows for tasks, then turn on this checkbox. On the mapping page, specify the fields you want to export. You
see the mapping page (Map Tasks Data, Map Resources Data, or Map
Assignments Data) corresponding to the type of data you're exporting.
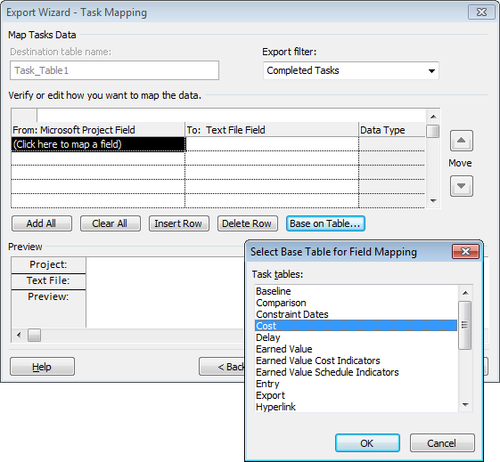
The Export Wizard mapping pages have a few additional options, as you
can see in Figure 4. 
Because
you're exporting to a blank file, Project doesn't fill in the field
table for you. Instead of selecting field after field, you can use a
Project table like Entry, Cost, or a custom table you create to fill in
the field cells. Underneath the field table, click Base on Table. The Select
Base Table for Field Mapping dialog box opens, and you can select any
table in your project. The granddaddy of all tables is the Export
table, which fills in a whopping 83 fields. (If you're exporting tasks,
the dialog box displays all the task tables; it lists resource tables
if you're exporting resources.) Remember, you can edit the field names
in the To: column to specify the headings you want in the export file.
Tip: To
export exactly the fields you want, use the Add All, Clear All, Insert
Row, and Delete Row buttons to build a collection of fields.
The
Preview area shows values in your Project by field. The Project and
<destination> field names (where <destination> is the
destination file format you choose) are initially identical. To define
the field names in your export file to match the needs of a destination
program, change the field name in the To: <destination> Field
cells. Optionally, to save the map you've defined, click Next. The
Export Wizard—End of Map Definition page presents the Save Map button,
which saves a map exactly like the Import Wizard does. Click Finish. Project exports the data to the file format you selected, but it doesn't open the file for you. If
clicking Finish displays a message about trying to save a file in an
older file format, then Project isn't playing nicely with older
Microsoft file formats (as well as other file formats that Project
doesn't recognize initially). To correct these poor manners, choose
File→Options. In the Project Options dialog box, choose Trust Center, and then click Trust Center Settings. Choose Legacy Formats, select the "Allow loading files with legacy or non default file formats" option, and then click OK.
3. Using an Existing MapThere's
no reason to map the same fields every time you import or export them,
for things like monthly reports you produce. Saving a map and reusing it
in future imports and exports is a real timesaver. Bear in mind, using
an existing map doesn't bypass any of the pages in the Import or Export
Wizard, but you don't have to match fields on the mapping page.
Moreover, after you apply an existing map, you can tweak the mapping if
it isn't quite right. Here's how to use an existing map: When
you start either the Import or Export Wizard, follow the steps until
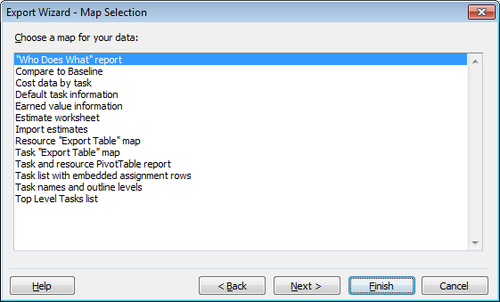
you get to the Import Wizard—Map page or the Export Wizard—Map page. The wizard pages vary depending on what you're importing or exporting. On the Import Wizard—Map page or the Export Wizard—Map page, select the "Use existing map" option and then click Next. The Map Selection page appears, as shown in Figure 5. Select the map you want and click Next. If
you want to review your settings or make minor adjustments to the map,
clicking Next steps you through the remaining wizard pages as described
in the previous sections on importing and exporting.

|