|
Arranging columns in the right order, selecting data,
and copying it to the right place can be tedious and error-prone. A
more dependable way to get data from one place to another is importing
or exporting, depending on which direction the data is headed.Importing means pulling data into Project from another program,
for instance importing
data from an Excel spreadsheet or an Access database. Exporting pushes
data out of your Project file to another file format like Excel or XML.
Unlike linking and embedding,
importing and exporting convert data from one file format to another,
so the data is the same as what you enter directly in the destination
program. 
The great thing about importing
and exporting is the control you have over the data you transfer and
where it goes. Because you map fields in one program to fields in the
other, you can make sure the right types of data go where you want. Project provides wizards for importing and exporting data to and from your Project files. The wizards (as the box on File Formats for Importing and Exporting
explains) start automatically when you open a file in another format or
save to another format. For example, if you open an Excel spreadsheet
in Project, then the Import Wizard starts up. Saving a Project file as a text file launches the Export Wizard. Maps
are sets of settings that match up Project fields with fields or
columns in the other program. Project comes with several built-in maps,
for example to export cost data, earned value, or basic task information.
Because Excel is second only to Project as a project management tool,
Excel comes with special templates for transferring data to and from
Project. For example, one template places all the information about
tasks, resources, and assignments on separate worksheets within an Excel
spreadsheet. 1. Importing Data into ProjectBringing
data from other programs into Project is as easy as opening that file
in Project. The Import Wizard guides you through mapping the data to the
right Project fields, and takes care of transferring the data. Although
Project includes a few special tools for importing Excel data, the basic steps for importing any kind of data are the same: In Project, choose File→Open. The Open
dialog box automatically sets the "Files of type" box to Microsoft
Project Files, so you have to tell Project which type of file you want
to import. Project
can take in more file formats than it's willing to spit out. For
example, Project can open different types of Project files, Microsoft
Access databases, Excel files, text files (tab-delimited),
comma-delimited files, and XML files.
On
the other hand, you can save a Project file to other Project file
formats, Excel workbooks, text-delimited files, comma-delimited (CSV)
files, and XML. Project doesn't save projects as web pages, because you
can use an XML file to generate a web page (as well as for other
purposes). Similarly, you can't save a Project file directly to a
database format, although you can use a visual report to accomplish that. The
steps you take to open or save these files vary depending on the
format. For example, you can open an earlier Project file format simply
by choosing File→Open. However, when you choose File→Open with Access
databases, Excel file formats, and so on, the Import Wizard starts.
Similarly, when you save files to formats other than the standard
Project formats, the Export Wizard starts. |
In
the Microsoft Project Files box, click the down arrow, and then choose
the file format you want to import, for instance Microsoft Access
Databases, Excel Workbook, or "CSV (Comma delimited)". As
you navigate to the folder that contains the file to import, the list
shows only the files of the type you selected. So if the file you want
is conspicuously absent, it might be a different format than you think. In the file list, double-click the name of the file (or click the filename, and then click Open). The Import Wizard starts. Click Next to bypass the welcome screen, which does nothing but explain the process. On the Import Wizard—Map page, keep the "New map" option selected. Click Next. If
an existing map (either a Project built-in map or one you've saved)
matches fields the way you want, then select "Use existing map". This
option shortens the import process by several steps. On the Import Wizard—Import Mode page, select an option to tell Project where you want to import the data. Click Next. Project automatically selects the "As a new project" option, which creates a brand new Project file from the data you're importing.
The "Append the data to the active project" option is ideal when you
want to import several files into the same project, for instance when
you receive WBSs from several team leaders. Appended data appears in the
current Project table after the existing rows. Selecting
the "Merge the data into the active project" option is perfect when you
want to import values into existing tasks, like importing estimates into your Project file . To import values into existing tasks, Project needs a way to match the tasks in each file, as the box on Importing Data into Existing Rows explains. How do I import data from another program into the correct tasks or resources in Project? If
you're importing values and merging them into existing tasks or
resources, like estimates of task work, Project needs to know how to
identify matching tasks or resources. After you map the fields on the mapping page and then click Next, a message box might appear asking for a primary key
so Project can merge the imported data. This message means you must
tell Project which fields are unique identifiers for tasks (or
resources). For example, a WBS code is an ideal primary key because
every task has one, and each one is different. On
the mapping page, in the table of matched fields, select the cell in
the To column that represents the primary key, and then click Set Merge
Key. Both cells in the row change to include the words MERGE KEY: in
front of the field name. |
On the Import Wizard—Map Options page, select the types of data you want to import, as shown in Figure 2. Click Next. First,
you have to specify the type of data you want to import: tasks,
resources, or assignments. The Tasks and Resources options import data
specifically for tasks or resources. Selecting the Assignments option
imports information
about tasks, and who's assigned to them.
If
the first line or row of the source file includes column names, make
sure the "Import includes headers" checkbox is turned on. The "Include
Assignment rows in output" checkbox stubbornly remains grayed out no
matter what you do, because this checkbox only applies to exporting. On the mapping page, map the import fields to their corresponding Project fields, as shown in Figure 3. The
mapping page that appears depends on the data you selected to import:
Task Mapping, Resource Mapping, or Assignments Mapping page. 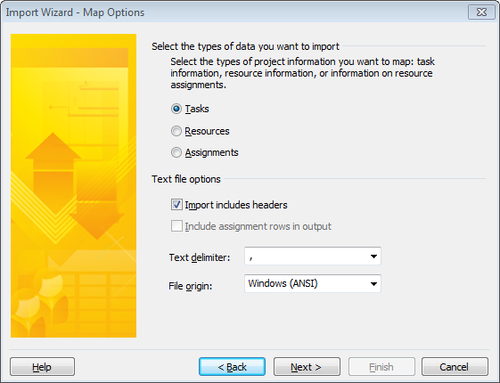
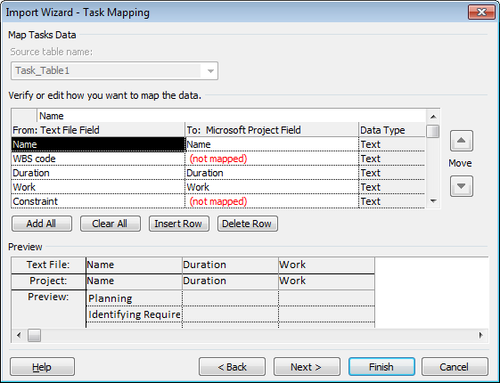
The "From: <source> Field" column (where <source> is Text File if you're importing
a text file, Excel if you're importing from Excel, and so on) displays
column headings from your import file, if they're present. Otherwise,
the first cell in the From: Text File Field column displays the number
1. For each field you
want to import, choose the corresponding Project field in the To:
Microsoft Project Field cell. Project makes educated guesses about
mappings based on the imported column heading name. For example, Project
maps a Name field in the import file to the Name field in Project. The
value "(not mapped)" in the To: Microsoft Project Field cell is
Project's way of saying that you need to tell it which Project field you
want. To choose a field, click the down arrow in the To: Microsoft
Project Field cell, and then choose the field. Leaving the value as
"(not mapped)" is how you tell Project not to import the field. The
Preview area shows a sample of the import. The first row in the preview
shows the names of the selected source fields. The Project row
identifies the fields into which the imported data goes. And the Preview
rows show several values from that field in the import file, for
example, Identifying Requirements as one task name. Optionally, to save the map you've defined, click Next. The Import Wizard—End
of Map Definition page appears with the Save Map button sitting by
itself mid–dialog box. Click Save Map to open the Save Map dialog box.
In the "Map name" box, type a short but meaningful name for the map,
like Import WBS Tasks. Clicking Save adds the map to your global template and closes the dialog box. Click Finish. You
may see a warning message if you're importing an older file format.
Click Yes to continue opening the file. Project imports the tasks into
your Project file.
|