Generating Cross References
ACROSS-REFERENCE
points to another item or location in the document, such as a
particular heading, item in an automatically numbered list, a bookmarked
location, footnote or endnote, numbered figure, or a table or equation. Inserting items as
an automated cross-reference provides two advantages. First, the
cross-reference is created as a hyperlink by default, so the reader can
use it to navigate in the document when viewing it in Word.
Additionally, if you move content around in the document, the
cross-references update automatically to reflect the changed locations
of the cross-references.
Use these steps to insert any type of cross-reference:
If
you want to enclose the cross references in quotation marks (as when
referencing a heading) or parentheses, position the insertion point at
the desired location and type the opening quotation mark or left
parenthesis.
Choose References > Captions > Cross Reference. The Cross-Reference dialog box opens.
Make a choice from the Reference Type drop-down list. As shown in Figure 1, the list of items matching that reference type appears in the For Which <type> list at the bottom of the dialog box.
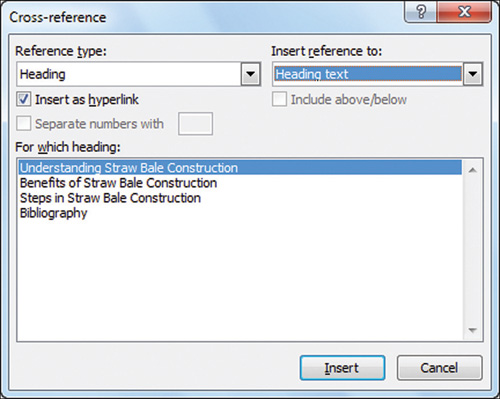
Click the desired item to cross-reference in the For Which <type> list.
If
you would like the cross-reference to display as something other than
the text being referenced, such as the page number where the referenced
material is located, make the appropriate choice from the Insert
Reference To list.
Click Insert to create the cross-reference.
Indexing Content
AN INDEX LISTS THE PAGE NUMBERS
where important terms appear in a document. While indexes are most
common for lengthy publications, such as books, you may need to include
an index for a shorter work if it contains a lot of jargon and technical
explanations. An index generally appears at the very end of a document,
starting at the top of a new page.
As for the other
reference features you’ve already learned about, creating an index is a
two-step process. First mark the entries to index throughout the
document, and then insert the index.
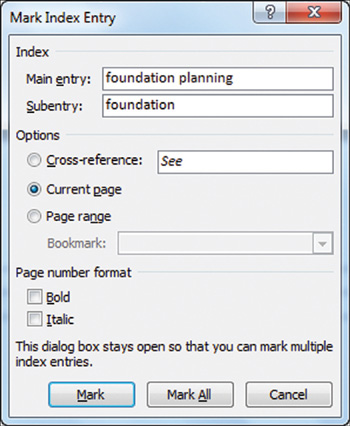
For standard entries, select the text to mark for the index, and then
choose References > Index > Mark Entry. In the Mark Index Entry
dialog box that appears (see Figure 2),
type any subentry that you want to create for the entry in the Subentry
text box. If you are creating only a cross-reference, click the
Cross-Reference option button and type the term to cross-reference to
the right of See in the accompanying text box. Or, if you previously
created a bookmark that will serve as the cross-reference, click the
Page Range option and select the bookmarked location from the Bookmark
drop-down list. Enable options under Page Number Format as desired, and
then click Mark to mark only the current selection or bookmark, or click
Mark All to have Word find and mark all matching instances of the term
for the index. Then click Close.
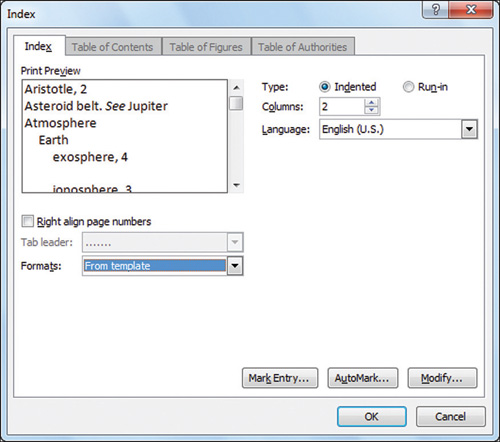
After you have marked all the
items to index, press Ctrl+End to go to the end of the document, and
then press Ctrl+Enter to start a new page. Choose References > Index
> Insert Index. The Index dialog box appears, as shown in Figure 3.
In the case of an index, the From Template choice in the Formats list
results in a very bland index. If your index is lengthy, consider
choosing one of the other Format choices, all of which add a divider to
start each new letter of entries. For a brief index, consider reducing
the columns setting from 2 to 1. When you have made those and other
choices, click OK. Note that Word does not include a heading for the
index, so you should probably insert a top-level (Heading 1 style)
heading that reads Index, and update the table of contents to reflect
the index location. If you need to update the index itself after marking
or deleting terms, choose References > Index > Update Index or
press F9.
Tip
To delete an index entry,
choose Home > Paragraph > Show/Hide. Then select the entry field
and its braces, and press Delete. Finally, click in the index and choose
References > Index > Update Index.