4. Exchanging Data with ExcelBecause
Excel spreadsheets can contain more than one worksheet, the settings in
the Import and Export Wizards are slightly different from the ones you
see when you work with text files. For example, you can import and
export tasks, resources, and assignments all at once. Moreover, when you
have both Project and Excel installed on your computer, Excel includes
two templates to jump-start your data exchange.
When you create an Excel file using either of these templates, the
column headings are set up to map to Project fields.
4.1. Exporting Project data to ExcelWhen
you want to export specific portions of your Project file to Excel, you
can save the Project file as an Excel workbook and use the Export
Wizard to specify what's exported. The steps are similar to exporting to other types of files. Here's how exporting to an Excel spreadsheet works: Open the Project file you want to export to Excel. Display the view that contains the data
you want to export, for instance the Gantt Chart view for tasks, the
Resource Sheet for resources, or Task Usage for assignments. You can
also export specific rows by selecting them. To export all the data in
the table, at the top of the ID column, click the Select All cell. Choose
File→Save As. In the "Save as type" drop-down list, choose Excel
Workbook. In the "File name" box, type the name for the file, and then
click Save. Project launches the Export Wizard. Click Next to get going. On
the Export Wizard—Data page, the wizard automatically selects the
Selected Data option, which exports the data you selected in the view.
Click Next to continue. The Project Excel Template option takes the reins and exports your entire file. On the Export Wizard—Map page, select the "New map" option and click Next. If you already have a map you want to use, select the "Use existing map" option, and then select the map . On the Export Wizard—Map Options page, turn on the checkboxes for each type of data you want to export and click Next. Because
Excel can handle several types of data on separate worksheets, this
page includes checkboxes for Tasks, Resources, and Assignments, as you
can see in Figure 6. 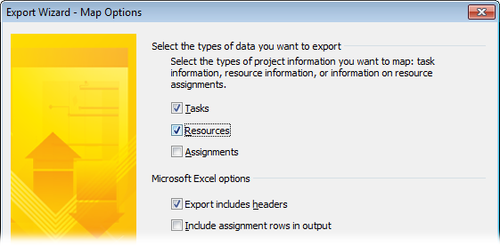
The
wizard automatically turns on the "Export includes headers" checkbox.
This setting exports Project field names to column names in Excel, which
is usually what you want. If you want to export all the details about
assignments, then turn on the "Include assignment rows in output"
checkbox. On the first mapping page that appears, in the "Destination worksheet name" box, type a name for the Excel worksheet. The
mapping page that appears depends on the checkboxes you selected on the
Export Wizard—Map Options page. For example, if you turned on the Tasks
checkbox, then the first Mapping page you see is Export Wizard—Task
Mapping. The "Destination worksheet name" box automatically sets the worksheet name to something like "Task_Table1." You can stick with that or change the name to something else. Set up the field mapping as you would for any other kind of export. You
can choose a filter to export specific parts of your Project file. The
rest of the mapping page is the same as the one that appears for exporting to a text file or another format .
For instance, you can map fields based on an existing Project table or
use the buttons below the table to insert and delete rows. Repeat steps 6 and 7 for each mapping page that appears. The
mapping pages appear in the same order every time: tasks, resources,
and then assignments. However, if you aren't exporting a type of data,
that mapping page doesn't show up. The wizard creates a separate
worksheet in the Excel file for each type of data you export. Click Finish. Project
exports the tasks into a new workbook, but you must start Excel and
open the file to see it. After you open the spreadsheet in Excel and try
to save it, you may see a message box asking if you want to overwrite
the older Excel format (if you exported to Excel 97-2003 format, for
example) with the current format. If you click Yes to update the format,
Excel saves the spreadsheet to the version of Excel installed on your
computer.
Tip: The
cells in an Excel export file are set to the General format, which
doesn't apply any specific formatting to the values. To display data the
way you want or to calculate values, you can change the data types for
cells. For example, you can modify cost cells to the Excel Currency
format to show dollar signs. To change the data type in Excel, select
the column heading. Choose Home→Cells→Format→Format Cells. Choose the
category, such as Number or Currency, and then click OK.
4.2. Exporting an entire project to ExcelThe
Export Wizard contains an option for exporting all the task, resource,
and assignment data in a Project file with a minimum of effort. Although
the resulting export file doesn't include time-phased data, you can
create an Excel spreadsheet with separate worksheets for tasks,
resources, and assignments. Here are the steps: Open
the Project file you want to export to Excel, and then choose File→Save
As. In the "Save as type" drop-down list, choose Excel Workbook. In the
"File name" box, type the name for the file, and then click Save. Project launches the Export Wizard. Click Next to start the wizard. On the Export Wizard—Data page, select the Project Excel Template option, and click Finish. That's
it. Project exports your project data to an Excel file that contains
three worksheets: Task_Table, Resource_Table, and Assignment_Table.
4.3. Importing data from ExcelImporting data from Excel without a built-in template is almost identical to importing any other kind of data (Section 20.2.1). In fact, you'll find only two exceptions: The
Import Wizard—Map Options page has checkboxes for each type of data you
want to import, because Excel can create separate worksheets for each
type of data. On
the Mapping pages, Project fills in the Excel worksheet names in the
"Source worksheet name" box. If the spreadsheet contains more than one
worksheet for a type of data, then choose the name from the drop-down
list.
The Excel templates actually come with Project, so you won't see the Microsoft Project Task Import Template and the Microsoft Project
Plan Import Export Template in the Excel template list unless you have
Project installed on your computer. However, you can copy the templates
to a folder so anyone can use them. Using
Windows Explorer on a computer running Project and Excel, navigate to
Program Files→Microsoft Office→Templates→1033. 1033 is the English
language code. If you installed Project in another language, navigate to
the folder for that language code. Copy the files Tasklist.xlt and
Projplan.xlt to the folder you use to store other custom Excel
templates. |
4.4. Using an Excel template to import dataSuppose you want team leaders and stakeholders to help you build the project task list. Or you want to collect information
about tasks, resources, and assignments to load into your Project file.
You can use the out-of-the-box importing steps, but Project offers an
easier way. If you have both Project and Excel installed on your
computer, Excel includes two templates whose worksheets and columns are
tailored to work perfectly with Project's Import Wizard: The Microsoft Project Task List Import Template
is an Excel template with columns for basic task fields. It contains a
Task_Table worksheet with columns for ID, Name, Duration, Start,
Deadline, Resource Names, and Notes. The Microsoft Project Plan Import Export Template
has four worksheets: Task_Table, Resource_Table, Assignment_Table, and
Info_Table. The Task_ Table worksheet includes columns for ID, Duration,
Start, Finish, Predecessors, Outline Level, and Notes. The
Resource_Table worksheet mimics the field you see in the Project
Resource Sheet. The Assignment_Table includes columns for Task Name,
Resource, Name, % Work Complete, Work, and Units.
First, you create a new Excel file from
either of the templates. Give the Excel files to others to fill out.
When your colleagues send the filled-in files back, you import them into
Project using the Import Wizard. Here are the steps from start to
finish: In Excel, choose File→New. The Backstage view opens to the Available Templates page. Click Sample Templates. The Available Templates list appears. Select
either Microsoft Project Task List Import Template or Microsoft Project
Plan Import Export Template, and then click Create. The Task List template creates a new file called Tasklist1, which contains a worksheet with basic task columns. The Project Plan template creates a file called Projplan1 with four worksheets for tasks, resources, assignments, and information about the template. The
Info_Table worksheet merely explains what the template can do, not how
to fill it in. Tell your team members that they don't have to enter
dates despite the presence of the Start and Finish columns. If tasks
have critical finish dates, team members can enter them in the Deadlines
column. Choose
File→Save. In the Save As dialog box, navigate to the folder where you
want to save the file. In the "File name" box, type the file name; in
the "Save as type" drop-down list, choose Excel Workbook. Then click
Save. Excel saves the file. Distribute the file to team members, so they can open the file and enter data. The
first row in the file displays Project field names, so people know
which columns contain which fields. They don't have to fill in every
cell. When team members finish entering data, they simply save the file
and send it to you to import into Project.
Note: The
Excel files based on these templates don't apply specific formatting to
the columns, so whoever fills in the files must enter the values
correctly. For example, duration is a length of time like 5d or 3w. If
the values aren't valid, then the Project Import Wizard displays an
error message .
Now you're ready to import the Excel file into Project. When you import data from an Excel template, the mapping between Excel columns and Project fields is already done.
|