1. Configuring General Properties
You use the General tab in the Microsoft Exchange dialog box to
configure the account name, the connection state, and other general
settings, as follows:
Exchange Account This option
specifies the name under which the account appears in your Outlook
2010 configuration. This name has no bearing on the Exchange
Server name or your account name. For example, you might name the
account Office Email, Work Account, or Microsoft Exchange
Server.
Automatically Detect Connection
State This option directs Outlook 2010 to detect the
connection state (offline or online) at startup and choose the
appropriate state. Use this option if your computer is connected
to the network all the time. Also use this option if you're
setting up an Exchange Server account on a notebook computer under
a profile that you use when the notebook is connected to the
network.
Manually Control Connection
State This option controls the connection state at
startup. Choose this option if you're setting up an Exchange
Server account on a computer that is sometimes disconnected from
the network (a notebook computer, for example) or that always
accesses the computer running Exchange Server remotely. Choose one
of the following suboptions, depending on how you want Outlook
2010 to connect to the server:
Choose The Connection Type When
Starting Specifies which method Outlook 2010 uses to
connect to the computer running Exchange Server at startup. If
this check box is selected, Outlook 2010 prompts you each time
it starts, asking whether you want to connect to the network
or work offline. Clear this check box if you want Outlook 2010
to make that determination.
Connect With The Network
Connects to the computer running Exchange Server through the
network rather than initiating a dial-up connection. Use this
option if your computer is hard-wired to the network or always
online, such as with a Digital Subscriber Line (DSL), cable
modem, or other persistent remote connection.
Work Offline And Use Dial-Up
Networking Use dial-up networking to connect to the
computer running Exchange Server. Specify the connection
options on the Connection tab.
Seconds Until Server Connection
Timeout This option specifies the time-out for connection
attempts to the computer running Exchange Server. If you are working
remotely over a slow connection, increase this value to give Outlook
2010 more time to establish the connection to the server.
Tip:
INSIDE OUT Increase TCP Time-Out for On-Demand Connections
If you use Internet Connection Sharing (ICS) or demand-dial
router connections, you've no doubt had your client computer time
out while waiting for the ICS or demand-dial router to establish a
connection. This can cause a remote connection to the computer
running Exchange Server to fail.
Transmission Control Protocol (TCP) sets a
retransmission timer when it attempts the first data transmission
for a connection, with an initial retransmission time-out value of 3
seconds. TCP doubles the retransmission time-out value for each
subsequent connection attempt, and by default, it attempts
retransmission two times. The first attempt is made at 3 seconds,
the second at 3 + 6 seconds, and the third at 3 + 6 + 12 seconds,
for a maximum time-out of 21 seconds. Increasing the initial
retransmission timer to 5 seconds results in a total maximum
time-out of 5 + 10 + 20, or 35 seconds.
The initial TCP retransmission time-out is defined by the
registry value
HKEY_LOCAL_MACHINE\System\CurrentControlSet\Services\Tcpip\Parameters\InitialRtt.
The InitialRtt value is a REG_DWORD with a valid range from 0 to
65,535 and specifies the time-out in milliseconds.
The number of connection attempts is defined by the registry
setting
HKEY_LOCAL_MACHINE\System\CurrentControlSet\Services\Tcpip\Parameters\TcpMaxDataRetransmissions.
The TcpMaxDataRetransmissions value is also a REG_DWORD with a valid
range of 0 to 65,535.
2. Configuring Advanced Properties
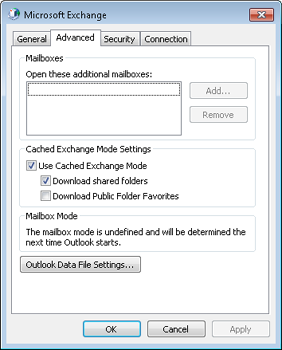
You use the Advanced tab in the Microsoft Exchange dialog box, shown
in Figure 1, to
configure additional mailboxes to open, as well as security and
offline processing settings. Why use additional mailboxes? You might
own two mailboxes on the server and need access to both of them. For
example, if you are the system administrator, you probably need to
manage your own account as well as the Administrator account; or
perhaps you've been delegated as an assistant for a set of mailboxes
and need to access them to manage someone's schedule. The
Advanced tab is where you add mailboxes that you own or for which
you've been granted delegate access.

The options on the Advanced tab are:
Open These Additional
Mailboxes This option defines the set of mailboxes you
want Outlook 2010 to open. These can be mailboxes that you own or
for which you've been granted delegate access.
Use Cached Exchange Mode This
option has Outlook 2010 create and work from a locally cached copy
of your mailbox. This setting corresponds to the Use Cached
Exchange Mode setting on the Exchange Server Settings page of the
E-Mail Accounts Wizard.
Download Shared Folders
Select this option if you want Outlook 2010 to download the
contents of shared folders, such as other users' Inbox or Calendar
folders made available to you through delegate permissions or
Microsoft SharePoint folders.
Download Public Folder
Favorites Select this check box if you want Outlook 2010
to cache the public folders that you have added to the Favorites
folder in the Public Folders branch. Before selecting this check
box, consider how much replication traffic you will experience if
the folders in your Favorites folder contain a large number of
posts and are very active.
Outlook Data File Settings
You can use this option to set up an .ost file to use as your data
cache while working offline. You need to use an .ost file only if
the account is configured to store your data in your Exchange
Server mailbox. If your primary data file is a personal folders
(.pst) file, or if you don't work offline, you don't need an .ost
file.