2. Managing User Mailboxes
Administrators
can utilize the Exchange Management Console to perform a wide variety
of user-specific configurations on an individual mailbox. Each
mail-enabled object in an Exchange environment has specific settings
that can be configured for that individual mailbox. This can come in
handy when an individual user has different requirements than other
users located in the same database. Settings on the database that apply
to the majority of users can be overwritten using these individual
settings.
Several mailbox configurable
properties are available on individual user mailboxes, including
mailbox settings, mail flow settings, and mailbox features.
Mailbox Settings
Mailbox
settings address storage quotas and records management functionality.
Some of the detailed functions covered in mailbox settings are as
follows:
Storage Quotas-—
By default, individual mailboxes are configured to use the mailbox
database defaults for storage quotas. However, you can select the
Storage Quotas tab in the individual mailbox properties to override
this setting. By removing the checkmark from Use Mailbox Database
Defaults, you can configure custom Warning, Prohibit Send, and Prohibit
Send and Receive quotas for the mailbox. In addition, you can specify a
deleted item retention time that differs from the database default. Messaging Records Management—
On this tab within the mailbox properties, you can configure a Managed
folder mailbox policy that differs from the database default. This
setting can be turned on for all messages, or can be turned on for a
particular time period using the Start and End date feature located
here.
Mail Flow Settings
Mail
flow settings can be modified to allow for changes in delivery options,
message size restrictions, and message delivery restrictions. Some
specifics on the mail flow settings are as follows:
Delivery Options—
Utilizing this tab, you can enable other user accounts to “Send on
Behalf” of this user. You can also configure the mailbox to forward
messages to another mailbox and can dictate whether the original
recipient should receive a copy, or if the message should only go to
the forwarded mailbox. You can also use this tab to set recipient
limits on the mailbox, stating the maximum number of recipients that
user can send to at a time. Message Size Restrictions—
Utilizing this option, you can mandate the maximum message size that a
user can send or receive. Bear in mind, by setting different sizes for
these two settings, you can run into a situation where a user is able
to receive a message, but cannot forward it (or reply with the original
message attached) because he has a lower Sending Message Size
restriction. Likewise, if the Receive limits are lower than the Send
limits, he might be able to send a message to a fellow employee, but
not receive a reply that includes the original message. Set these
settings carefully. Message Delivery Restrictions—
With this feature, you can dictate whether an individual mailbox can
receive messages from all senders, or only specified senders. You can
require that all senders are authenticated, or configure the mailbox to
reject messages from particular senders.
Mailbox Features
Several
property options for mailbox features allow for changes in settings for
Outlook Web Access (OWA), Exchange ActiveSync, unified messaging, and
the Messaging Application Programming Interface (MAPI) communications
protocol. Specific details on these mailbox feature properties are as
follows:
Outlook Web Access—
Although there are no properties to be configured on this option, you
can elect whether to allow the user to access his mailbox utilizing
OWA. This setting can be set to Enable or Disable. By default, OWA
access is enabled for all user mailboxes in an organization. Exchange ActiveSync—
This feature can be enabled or disabled for an individual mailbox. If
enabled, you have the option in the properties to apply an Exchange
ActiveSync mailbox policy for the mailbox. By default, Exchange
ActiveSync is enabled for all user mailboxes in an organization. Unified Messaging— You have the option to enable or disable unified messaging for the mailbox using this feature setting. MAPI—
With this setting, you can dictate whether the user can access his
mailbox from a MAPI-enabled client. You have the option to enable or
disable MAPI access. By default, MAPI access is enabled for all user
mailboxes in an organization.
3. Managing Mailbox Locations
Because
Exchange 2007 is designed to be implemented on 64-bit systems, there is
improved performance and capacity for individual servers. The
Enterprise Edition of Exchange Server 2007 now supports as many as 50
storage groups per server. Although a storage group can contain as many
as five databases, there is a limit of 50 databases per server.
When designing your organization’s mail storage solution, you should keep the following in mind:
Decreased database restoration time—
Whether because of catastrophic server failure or severe database
corruption, there is always the possibility of the loss of a server or
a mail database. This possibility is the driving force behind the need
for comprehensive server backup policies and procedures. If the need to
recover a server or database from your backups ever comes to pass,
smaller databases can be recovered faster than larger ones simply
because of the amount of data to be transferred. Whether your company
prioritizes management, customer service, or sales departments, by
breaking key users apart from the pack and placing their mailboxes into
separate, smaller databases, there is the potential to recover these
users quickly, get them online, and then move on to recovering the
remaining users. Distribution of user load—
Users can be broken up into separate mailbox storage groups or
databases. The benefit of this is to mitigate risk by distributing your
user load. You have probably heard the phrase “Don’t put all of your
eggs in one basket.” This concept follows that principle: If all of
your users have their mailboxes stored on a single server, something as
simple as an unplanned server reboot, or a disconnected network cable,
can bring your entire organization down. By distributing your user load
across multiple databases, storage groups, servers, or even sites, you
can increasingly mitigate the possibility of a single point of failure
negatively impacting your entire organization. User mailbox policies and restrictions—
Users can also be broken out into separate mailbox databases to ease
user interruption caused by the implementation of storage limits and
mailbox deletion policies. For example, if users in your Customer
Service department are allowed 100MB of mail storage, but users in your
Sales department are allowed 500MB, this can easily be implemented by
maintaining the users in separate databases and setting the policies on
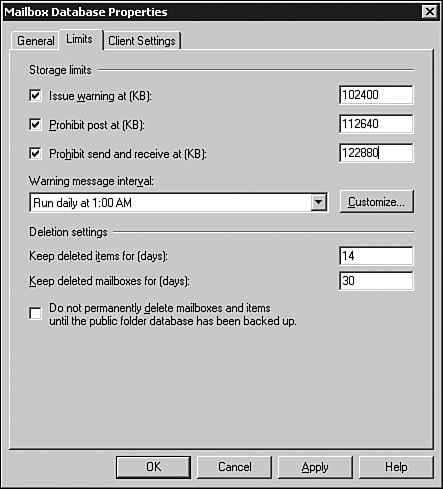
the database, rather than on individual users. You can see the options
for setting message size restrictions on a database in Figure 2.

Managing Email Addresses
When
a new mail-enabled user is created in your Exchange environment, the
creation of their primary SMTP address is controlled by a recipient
policy. By default, the recipient policy creates two email addresses:
an X400 address and a primary SMTP address that is formatted as First
Initial, Middle Initial, Last Name at your default organization. For
example, user James A. Weinhardt at companyabc.com would have a default
SMTP address of [email protected].
However,
the default behavior of this recipient policy can easily be modified to
create primary SMTP addresses that conform to your organization’s
standard. For example, if your organization uses [email protected]
as their standard SMTP address, you can configure the recipient policy
to generate this address for you when the user mailbox is created. To
do so, perform the following procedure:
1. | Start the Exchange Management Console.
| 2. | In the console tree, select Organization Configuration, then select Hub Transport.
| 3. | In the results pane, select the E-Mail Address Policies tab, and then highlight the default policy.
| 4. | In the action pane, click Edit.
| 5. | On
the Introduction page, when modifying the Default Policy, all of the
options are hard-coded and cannot be changed. If you are creating an
additional policy, these settings can be modified. Click Next to
continue.
| 6. | On the Conditions page, leave the default settings and click Next to continue.
| 7. | On
the E-Mail Addresses page, you can see the two default addresses that
are generated. To modify the SMTP address, under SMTP, select the
policy and click Edit.
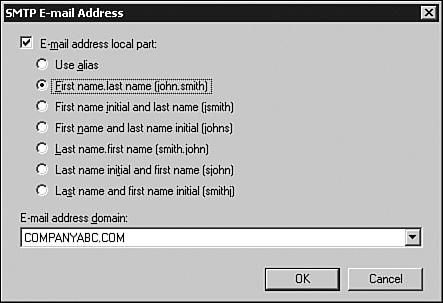
| 8. | By
default, this is set to Use Alias. To modify the policy, click the
E-Mail Address Local Part check box, and then select the appropriate
SMTP naming standard for your organization. For available options, see Figure 3.
In the example, First Name.last name is selected. Select the
appropriate entry, and then, under E-Mail Address Domain, use the
drop-down box to select from the available email domains. After you are
ready, click OK to continue.

| 9. | You should now be back at the E-Mail Addresses page. Click Next to continue.
| 10. | On
the Schedule page, specify when the email address policy will be
applied. Note that if you select a time and date in the future, the
wizard will remain open until the countdown has completed. Select the
appropriate option, and click Next to continue.
| 11. | On
the Edit E-Mail Address Policy page, the Configuration Summary is
shown. Review the policy to ensure all is correct, and then click Edit
to continue.
| 12. | On
the Completion page, a summary is shown informing you how many items
were modified, how many succeeded, and how many failed. Click Finish to
continue.
|
After
this policy has been applied, existing users will have a new SMTP email
address generated that conforms to the policy and it will be set as
their primary (reply-to) address. Previously assigned addresses will
remain in place as secondary addresses. Users created from this point
on, however, will have only the new address, and it will be set as
their primary SMTP address.
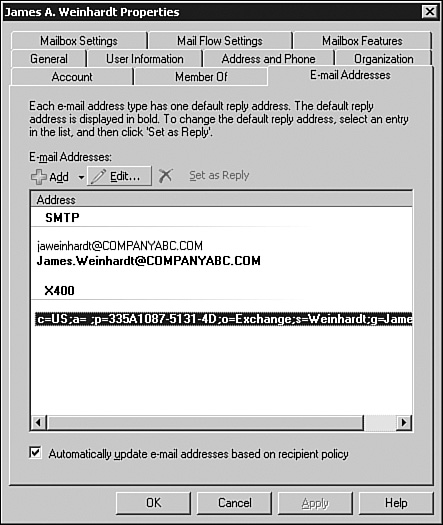
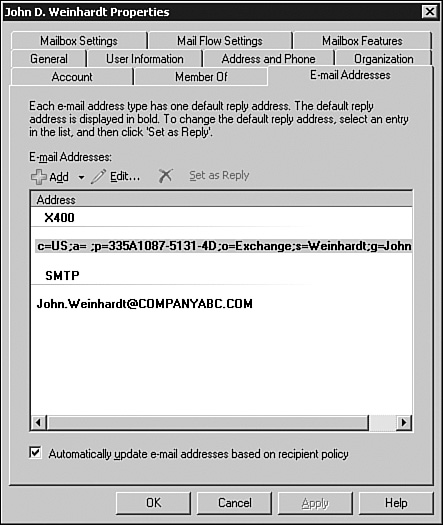
Note the difference in the two users shown in Figures 4 and 5. The first, James Weinhardt, shown in Figure 4, was created prior to the modification of the policy. The second, John Weinhardt, shown in Figure 5, was created after the policy was modified.


|