The ConfigMgr console has a new fresh look,
with a different look and feel from the older Systems Management Server
(SMS) 2003 console. This new look and feel is because the console is
based on the new Microsoft Management Console 3.0 (MMC) framework.
Using the MMC, an administrator can load multiple tools, known as snap-ins.
A snap-in is an application built to run within the MMC. Adding
snap-ins themselves has much improved with MMC 3.0; instead of having
to use a tedious procedure involving two dialog boxes to build a
separate console, version 3.0 provides a single dialog box, thus making
it much easier to create custom consoles. You can then make these
consoles available to individuals when you want to delegate specific
management tasks.
The capability to add
these custom consoles is of particular interest to ConfigMgr
administrators, because the ConfigMgr Administrator console itself is
actually a snap-in hosted
by the MMC. Using the MMC allows ConfigMgr admins to create consoles
easily that allow users to see only a specific part of the ConfigMgr
functionality. As an example, you may want to create a custom console
for helpdesk users where they only have the ability to use the
ConfigMgr Remote Tools feature.
1. Touring the Console
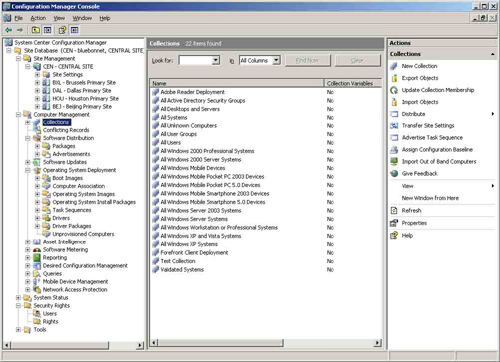
When opening the ConfigMgr 2007 console, you will notice it contains the following three panes:
Console tree—
The console tree is on the left side of the console. It allows you to
browse the multiple nodes to manage your site and clients.
Result pane— The result pane is the middle section of the console. When you select a tree object, this pane displays the results.
Actions pane—
The Actions pane is the pane displayed at the right side of the
console. This is the only pane that you can hide. The Actions pane
contains options and tasks, which are available as well when you
right-click an object in the console tree or the result pane.
Figure 1 shows the ConfigMgr console.

The
ConfigMgr 2007 console includes search folders, a search bar, allows
drag and drop, can replicate folders down the hierarchy, and
incorporates home pages. The next sections discuss several of these
features.
2. New Console Features
As described earlier, the MMC 3.0 framework introduces many new features and capabilities in the Configuration Manager console:
Drag and drop—
The ConfigMgr 2007 console allows you to drag and drop objects. As an
example, you can drag a program and drop it onto a collection to create
an advertisement. This saves much time and keystrokes, and can help you
keep things organized.
Home pages—
When you select a main node such as Software Distribution or Desired
Configuration Management, a home page will display in the result pane.
These home pages give you a quick overview of the status of a certain
feature when you select the root node of that feature. As an example,
you can view the status of deployed packages or the percentage of
compliant systems with Desired Configuration Management.
Sort columns—
This is not exactly a new feature because it was also an option with
SMS 2003, although the SMS 2003 version did not work and was very
buggy. This feature now functions with ConfigMgr 2007. You can also
sort the columns to find information more quickly.
Search bar—
Sites can grow very fast with custom collections, packages, programs,
and advertisements. Also, over 300 reports come with the ConfigMgr 2007
product. The search bar at the top of the results pane will help you to
find all your objects in multiple columns.
Search folders—
Search folders comprise another new feature. Although search folders do
not ship with the console, you can create your own search folder in
most nodes. Search folders are not available in the Collection nodes
and on several of the main nodes such as Software Distribution and
Operating System Deployment. You can define a query criterion for each
search folder, which filters the results that will display in the
folder. Search folders provide a great way to arrange different
objects, and they make things much easier for those individuals who
want to organize their admin consoles.
Creating a Search Folder
Search
folders work great for filtering and organizing the objects and
information in the console. As an example, you can create a search
folder for all your packages with a specific manufacturer. To create
this search folder, perform the following steps:
1. | Navigate to the Computer Management node, expand Software Distribution, and then right-click Packages.
|
2. | Select New and choose Search Folder.
|
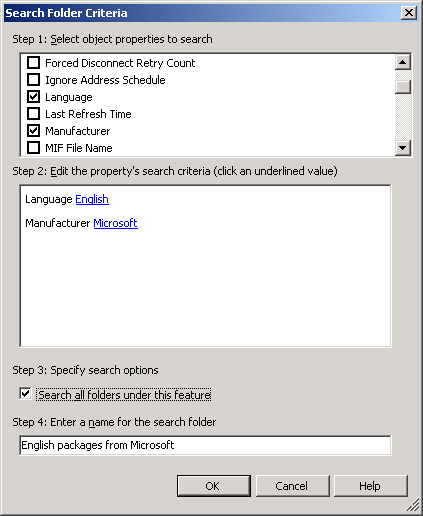
3. | In the Search Folder Criteria dialog box, choose the object Manufacturer.
|
4. | In the Edit the property’s search criteria box, click the <text to find> hyperlink.
|
5. | Specify a manufacturer to define your search criteria (such as Microsoft). Click Add and then OK.
|
6. | Repeat steps 4 and 5 to define multiple combined criteria, as displayed in Figure 2.

|
7. | By
default, the search folder will only search in the current folder. You
can mark the “Search all folders under this feature” option in the
bottom of Figure 2 to let Configuration Manager search in all subfolders.
|
8. | The last step is to define a friendly name for the search folder, such as English packages from Microsoft.
|
In
addition to organizing and filtering information in the console, you
can combine search folders with an action (for example, with software
updates).
You can create a search folder
containing a criterion that filters required updates released in a
previous month for client computers or servers. The use of search
folders is part of the Software Updates workflow. This allows you to
add the resulting updates from the search folder to an update list, to
create reports to display compliancy, and eventually to create a
deployment based on the software update list.
Perform the following steps to create a search folder to locate updates released on a specific date:
1. | In
the Configuration Manager console, navigate to Site Database ->
Computer Management -> Software Updates -> Update Repository.
|
2. | The Update Repository contains a search folder by default. Right-click Search Folders and then select New Search Folder.
|
3. | To define the criteria, select Date Released to specify the date the software update was released.
|
4. | Check the box Search all folders under this feature.
|
5. | Enter a name for the folder (as an example, Updates released in March) and click OK.
|
6. | Back
in the console, click the folder you created. The software updates are
displayed by article ID and are based on the criteria you specified for
this search folder. In the folder, you can check if the software update
is required for computers and create an update list based on the
results.
|
Home Pages
Another
new feature in the ConfigMgr 2007 console is home pages. The goal of
the home page is to deliver a complete status overview specific to the
selected node. Home pages are available for the following nodes:
Software Distribution—
This home page shows the status of all package advertisements. For each
advertisement, you can see how many have started, succeeded, failed,
retried, or are waiting.
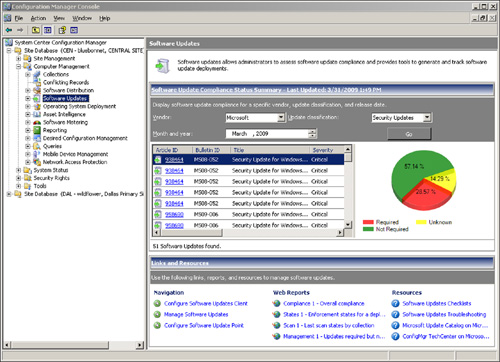
Software Updates—
Here you can see the status of required, deployed, and already
installed updates. It also shows the update compliancy percentage of
the site.
Operating System Deployment—
The Operating System Deployment home page also shows the status of
advertisements, but only for those task sequences that are advertised.
Asset Intelligence— This home page shows the inventoried software titles, categories, and software families.
Desired Configuration Management— The compliancy of Desired Configuration Management items is shown in this home page.
Network Access Protection— This home page also shows compliancy and remediation errors, and the total number of computers in remediation.
When you select any of these main nodes, the home page appears in the result pane.
As
an example, the Software Distribution home page by default shows the
status of the top-10 active advertisements in the last 7 days.
Home pages are divided in three sections.
On each home page, the first section enables you to configure the filters for the results shown in the middle section.
Every
home page has different types of filters you can apply. As an example,
with the Desired Configuration Management home page, you can set
filters such as time-frames and severities. The Software Updates home
page provides you with filters such as Vendor and Update
classifications as well as the ability to apply a filter for the month
and year the update was released.
When the filters are applied, the middle section displays the results, with the number and a chart for a quick status overview.
The
bottom of each home page has a Links and Resources section. This
section contains shortcuts to other nodes such as Advertisements,
enabling you to navigate quickly through the console. It also contains
links to web reports and help resources.
To run web reports, you must configure a reporting point.
Figure 3 displays the home page of Software Updates.

The results in the home pages are automatically refreshed. This is also known as home page summarization. Except for the Asset Intelligence node, each node has a summarization interval. Table 1 shows the interval for each node.
Table 1. Default Refresh Interval for Each Home Page
| Home Page | Summarization Interval |
|---|
| Software Distribution | 1 hour |
| Software Updates | 4 hours |
| Operating System Deployment | 1 hour |
| Desired Configuration Management | 2 hours |
| Network Access Protection | 30 minutes |
If
you prefer a tighter or specific interval, you can configure a custom
schedule with the Schedule Home Page Summarization link provided in the
Actions pane. To apply the new custom schedule, click Run Home Page
Summarization, also provided in the Actions pane.