1. Convert from FAT to NTFS
Aside
from managing drive volumes in the Disk Management utility, you can
also change a partition’s file system using a built-in Windows 7 tool. Convert is a command-line program that converts an existing FAT16 or FAT32 partition to NTFS.
Caution
This
conversion process is a one-way street. The only way to revert an NTFS
partition back to a FAT partition with the native tools is to reformat
the drive. To revert and not lose your data, you have to use a program
such as PartitionMagic (from Symantec; www.symantec.com) or Partition Commander Professional 10 (www.avanquest.com). |
The command-line syntax for the Convert program is as follows:
CONVERT volume /FS:NTFS [/V]
The arguments are as follows:
| volume | Specifies the drive letter (followed by a colon), mount point, or volume name |
| /FS:NTFS | Specifies that the volume should be converted to NTFS |
| /V | Specifies that Convert should be run in Verbose mode |
Considering the work the Convert program has to do, it’s surprisingly fast, even on a well-populated disk.
2. Windows 7 Disk Maintenance Tools
As
you’ve learned in previous sections, the Disk Management utility
provides all the essential tools for creating, sizing, converting, and
deleting drives and partitions. There are, however, other disk
maintenance tools in Windows 7 that help you keep disks clean and
healthy. We cover many of the most frequently used tools of this type
throughout this section.
You’ll
find that several disk maintenance tools are available through a
drive’s Properties dialog box. To reach the dialog box, right-click a
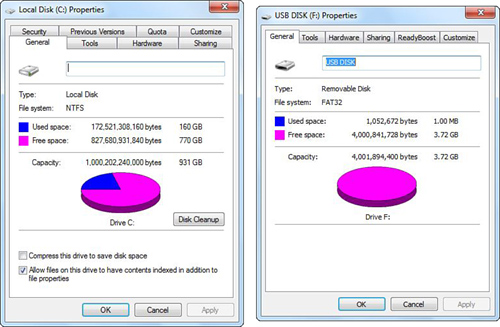
drive in the Computer window and select Properties. Figure 1
shows the properties for both an NTFS drive and a FAT drive. Notice the
difference in the number of tabs—NTFS has more options because of its
support for security and quota management.
The following sections explain how to use many of the disk maintenance tools included in Windows 7.
2.1 Disk Cleanup
In
the course of daily use, Windows 7 generates thousands of temporary
files to aid in system operation. These files are critical to the
operation of the programs that use them. However, as most people are
well aware, temporary files have a habit of being much more persistent
than their name implies. And over the course of time, these files add
up and consume large amounts of valuable disk space. The Disk Cleanup
utility provides you with a safe and reliable way to delete these
temporary files from all their various hiding spots and thus free up
disk space on your hard drive.
To access this utility, do the following:
1. | Start
Disk Cleanup from the General tab of a drive’s Properties dialog box;
from the Accessories, System Tools folder; or from the Performance
Information and Tools applet in Control Panel, among other methods.
|
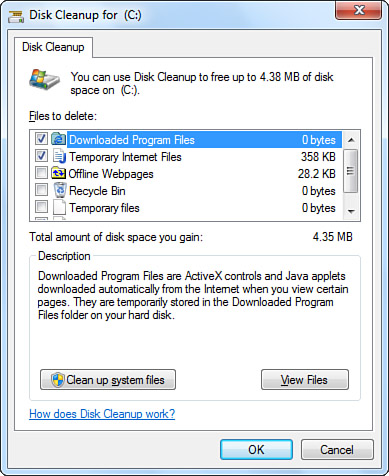
2. | Specify
which drive you want to clean up (if you have more than one drive
installed). Disk Cleanup calculates your disk space, searching for
files that can be safely deleted or compressed. The details of this
analysis are then displayed in a dialog box similar to the one shown in
Figure 2.
|
3. | If you agree with the items Disk Cleanup has chosen for deletion, click Clean Up System Files.
|
Understanding Disk Cleanup Options
Near
the top of the Disk Cleanup dialog box is the total amount of disk
space you can free on this drive by accepting the selected
recommendations listed shortly. You can exclude or include file groups
from the cleanup process by removing or placing a check mark in front
of the types listed. When you select an entry, you see a description of
which files that group contains and what their purpose is. By selecting
a group and then clicking the View Files button, you can see in the
resulting folder window exactly which files are slated for death. Use
this option if you have any doubts about a group of files, where they
reside, or what they do.
The following file groupings might be listed:
Downloaded Program Files—
These files are ActiveX controls and Java applets used by web pages you
have visited. If you delete them, they will be reloaded the next time
you visit the pages.
Note
Agreeing to delete temporary Internet files does not delete your cookies
(personalized settings for websites), so don’t worry about needing to
re-enter user ID information or other such information for sites you
frequently visit. Cookies and temporary Internet files are stored by
default in x:\Users\<username>\AppData\Local\Microsoft\Windows\Temporary Internet Files (where x: is the volume the system is installed on). If
you’re concerned about web-surfing privacy, including electronic
commerce and banking or confidential business matters, you should
delete temporary Internet files frequently. |
Temporary Internet Files—
This one is a biggie. Every time you access a web page, your browser
stores or caches the various elements of that page on the hard disk.
When you revisit a page, any elements that have not changed since your
last visit are reloaded from the hard disk instead of the site itself,
to speed the rendering process. Deleting these temporary Internet files
frees the largest amount of disk space of any of the group lists.
However, if you use a modem to access the Internet, you will notice
longer rendering times the next time you return to one of your favorite
sites.
Offline Webpages—
These files are web pages you’ve visited that are stored on your PC so
you can access them when you’re not online. Deleting offline web pages
doesn’t affect your personalized settings for web pages.
Recycle Bin—
Clearing this folder is the same as manually clearing your Recycle Bin.
It is a good idea to have a quick look at the files stored there before
choosing this option. Select this option and click the View Files
button under the group description; a folder window then opens, listing
the contents.
Temporary Files—
Similar to cached web pages, when you connect to a network location and
access a read-only file, a temporary copy is sometimes stored on your
hard drive. Clearing these temporary copies does not erase the files
you explicitly marked as available for offline use, so this is a safe
choice.
Offline Files— If you use the Windows 7 Sync Center, selected files and folders from a network
connection are stored locally for access while you are disconnected. Do
not delete these files unless you’re sure you can work without the
local copies. You’ll lose any changes you made to offline files if you
delete them here, so don’t make this choice without synchronizing first.
Thumbnails—
Thumbnails are generated automatically by Windows 7 for picture, video,
and document files. Deleting thumbnails forces Windows 7 to re-create
thumbnails when you open a folder.
Per User Archived Windows Error Reporting— Windows Error Reports are used when reporting errors and checking for solutions.
After
running Disk Cleanup initially, a tab named More Options appears in the
Disk Cleanup dialog box. The Programs and Features Clean Up button
opens the Uninstall or Change a Program window, so you can uninstall
programs you no longer use.
Tip
Running
Disk Cleanup weekly can do wonders to improve a system’s performance,
especially if you are using a hard disk that has less than 25% of its
space available at any given time. The first time you run it, the
program might take quite a while to run, but with regular exercise,
this program speeds up because the disk stays cleaner. Once a
month—after you check the contents of the individual folder groups
carefully—you should empty all folders of all temporary files. |
You
can use the System Restore Clean Up button to delete all but the most
recent restore points. This might free up a significant amount of drive
space, but it will eliminate your capability to roll back to previous
states of the system, and it also eliminates file shadow copies and
older system images that are part of restore points. Use this option
only if you are desperate for additional space on your drive, because
deleting this information could prevent you from recovering from a
system problem later.
Using Internet Explorer’s Cache Cleanup
If
you would prefer not to use the Disk Cleanup utility, you can choose a
second option for clearing out those disk-hogging cached Internet files.
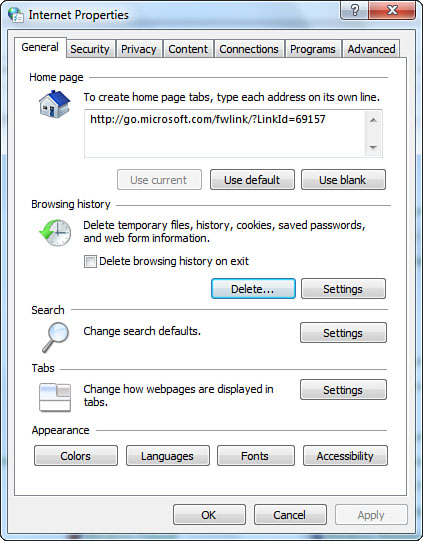
To
access it, open Control Panel, Network and Internet, Internet Options.
On the General tab of the Internet Properties dialog box, you will find
a section titled Browsing History (see Figure 3).
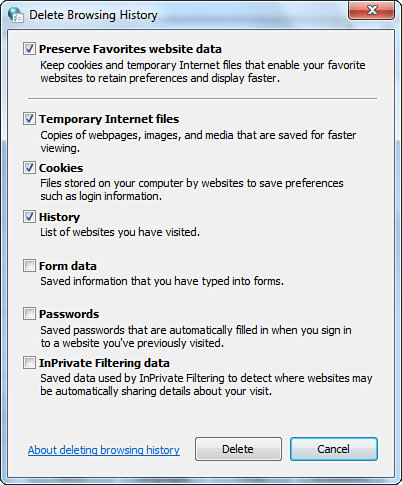
The Delete button opens a Delete Browsing History dialog box (see Figure 4).
Here you can selectively delete temporary Internet files, cookies,
history, form data, passwords, or InPrivate Filtering data. The
Preserve Favorites Website Data option at the top of the dialog box
helps you ensure your Favorites list is preserved, regardless of other
files you choose to delete.
Clicking
the Settings button in the Browsing History section of the Internet
Properties dialog box opens the Temporary Internet Files and History
Settings dialog box (see Figure 5).
You can configure options for how often cached files are checked
against their original counterparts, how much disk space these cached
files are allowed to take up, and in which folder they are stored.
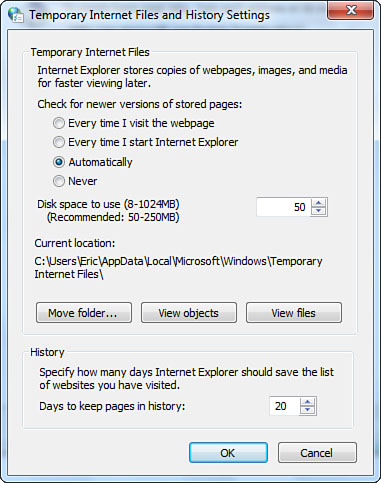
When
the disk space setting is exceeded, files are removed on a “first in,
first out” basis; that is, the oldest files are deleted to create space
for newer ones.
Tip
Changing
the location for the storage of temporary Internet files is especially
a good idea if the system is a client on a domain network and roaming
profiles are in use. By storing the temporary files outside your
profile, it will take less time to log in and log out, plus your
profile will consume less space on the network server. |
Clicking
the Move Folder button lets you specify a location where these
temporary files will be stored. You can, for example, change this path
to a temporary folder or a drive with lots of free space. If you do a lot of web surfing, you’ll want to map
this temp location to a fast volume that is not on the same physical
hard drive as your main Windows partition.
Clicking
the View Objects button opens the Downloaded Program Files folder, and
clicking the View Files button opens the Temporary Internet Files
folder. You can also control how many days Internet Explorer saves
items in your History folder from this dialog box.