SBS includes a customized and configured version of Windows
Server Update Services (WSUS). The SBS team has already done the heavy lifting
to get WSUS configured and working optimally for SBS networks. When
the SBS install is finished, updates are already being managed and
deployed, but you can do additional customization from the Updates
page of the Windows SBS Console.
1. Configuring Software Update Settings
The default software update settings for SBS 2011 are adequate
for most small businesses, but there are additional settings you can
use to customize how updates are handled on your network. You
can
Change the update level for servers and clients.
Change the update schedule.
Change which computers are managed by WSUS.
Note:
For those familiar with SBS 2003 R2, these settings are very
similar, though the interface is different.
1.1. Changing the Update Level
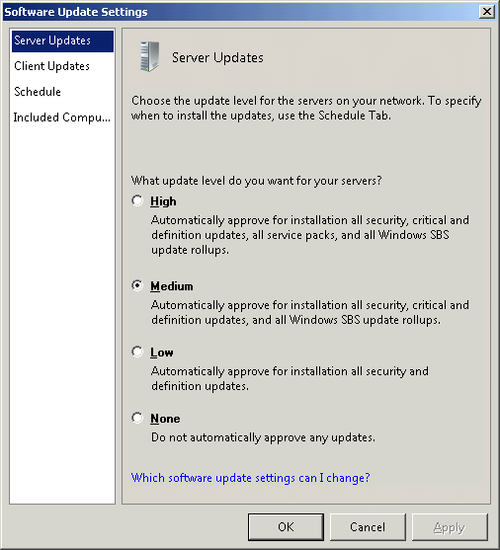
SBS uses the following four update
levels to control which updates for SBS and your SBS
client and server computers are automatically deployed:
High Automatically
approves all security, critical, and definition updates, and
also approves all service packs. This is the default for
client computers.
Warning:
IMPORTANT This
setting will automatically approve service packs. This is a
change in behavior from SBS 2003 R2, and you should allow
this only if you understand the repercussions in the event
of issues with a service pack, such as those experienced
with Windows 7 SP1.
Medium Automatically
approves all security, critical, and definition updates. This
is the default for server computers.
Low Automatically
approves all security and definition updates. Critical updates
that are not security-related will not be automatically
approved.
None No updates are
automatically approved. Each update must be manually approved or rejected—not
a good idea.
To change the level for a class of computers, follow these
steps:
Open the Windows SBS Console if it isn’t already
open.
Click Security on the navigation bar.
Click on the Updates tab, if it isn’t on top, to display
the Updates page, as shown in Figure 1.

Click Change The Software Update Settings in the Tasks
pane to open the Software Update Settings dialog box shown
Figure 2.

In the left pane, click Server Updates to change the
settings for servers, or click Client Updates to change
settings for client PCs.
Select the level to use for this class of computers, and
then click OK to close the dialog box and change the
level.
1.2. Changing the Update Schedule
You can change the day of the week and the time of day that
automatic updates happen, and also configure updates to download
automatically to computers but wait for the user to initiate the
installation, by changing the update schedule. To change the
update schedule, use the following steps:
Open the Windows SBS Console if it isn’t already
open.
Click Security on the navigation bar.
Click on the Updates tab, if it isn’t on top, to display
the Updates page.
Click Change The Software Update Settings in the Tasks
pane to open the Software Update Settings dialog
box.
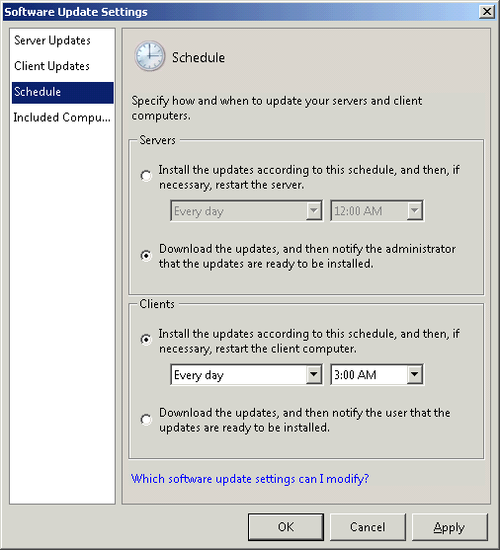
Click Schedule in the left pane to open the Schedule
page of the Software Update Settings dialog box as shown in
Figure 3.

To configure automatic downloads to client computers,
select that option in the Clients section.
Note:
Configuring client computers for automatic downloads
requires that an administrator initiate the install on the
client.
To configure servers to automatically update, including
automatically rebooting, change that option in the Servers
section.
Note:
Configuring servers to automatically install updates
is a really bad idea. This will cause the server to
automatically reboot if the update requires a reboot, and
you run a significant risk of lost work or unexpected
downtime. This option should be chosen only if you’ve
carefully considered all the alternatives and have a clear
understanding of the need for automatic update installation.
And even then we think that server updates should be a
manual process.
To change the day of the week or the time of day that an
automatic update is installed, select the day of the week from
the drop-down list. You can have updates always be installed
on a specific day, or on any day that they’re available. The
default is Every Day. The default time of day for updates is
3:00 A.M. If you have automatic backups of client computers,
you should adjust this time to not
interfere with the backup window.
After you’ve completed any changes to the update schedule, click OK to close the dialog
box and implement the changes.
1.3. Excluding Computers from Automatic Updates
By default, Software Updates in SBS includes all computers
on your SBS network and automatically assigns updates to either
server or client computers. You can use the exclusion to prevent
any updates from being offered to a particular computer, while
also excluding it from error reporting on update
status.
To exclude a computer from automatic updates, follow these
steps:
Open the Windows SBS Console if it isn’t already
open.
Click Security on the navigation bar.
Click on the Updates tab, if it isn’t on top, to display
the Updates page.
Click Change The Software Update Settings in the Tasks
pane to open the Software Update Settings dialog
box.
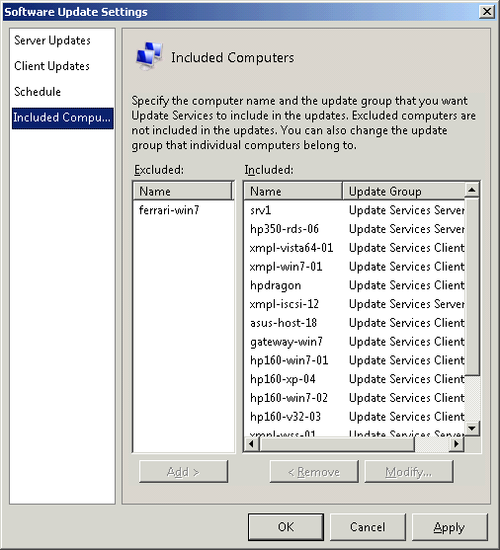
Click Included Computers in the left pane to open the
Included Computers page of the Software Update Settings dialog
box as shown in Figure 4.

Select the computer you want to exclude from the list of included computers, and click
Remove to move it to the Excluded list.
After you’ve completed your changes to the Included
Computers page, click OK to close the dialog box and apply the
changes.
1.4. Modifying the Update Group
Generally, SBS correctly identifies whether a computer is a
server or a client and includes it in the appropriate group for
update purposes. You wouldn’t normally change that setting. But if
you want to force a particular computer that is a server to
automatically be updated, for example, or to ensure that a
particularly critical workstation isn’t automatically rebooted at
3:00 A.M. the Wednesday morning after Patch Tuesday, you can
modify the group the computer is in to match the behavior you
need.
To modify the update group of a computer, follow these
steps:
Open the Windows SBS Console if it isn’t already
open.
Click Security on the navigation bar.
Click on the Updates tab, if it isn’t on top, to display
the Updates page.
Click Change The Software Update Settings in the Tasks
pane to open the Software Update Settings dialog
box.
Click Included Computers in the left pane to open the
Included Computers page of the Software Update Settings dialog box.
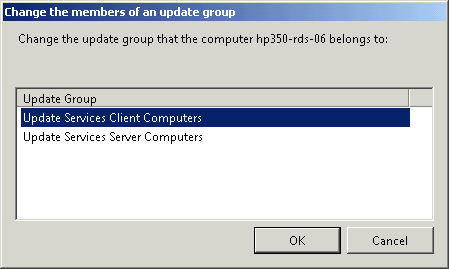
Select the computer you want to change, and click Modify
to open the Change The Members Of An Update Group dialog box,
as shown in Figure 5.

Select the group to move the computer to, and click
OK.
After you’ve completed your changes to the Included
Computers page, click OK to close the dialog box and apply the
changes.