Sometimes a photo has good general exposure but there
are areas in the image that are too light or too dark. These areas need
some local adjustment, and this is where the Dodge and Burn tools come
in handy.
The Dodge and Burn tools are
part of the bitmap-retouching toolset; their effects are permanent
(sometimes called “destructive”) in that the tools completely alter
pixel values. As we go along in this exercise, you will also learn how
to protect your original image.
1. | Choose File > Open, and browse for the detective.jpg file .
|
2. | Click Open.
This image is in pretty good shape, but the subject’s face is a bit too
dark and his white shirt a bit too bright. You’ll use the Dodge and Burn
tools to correct this.
|
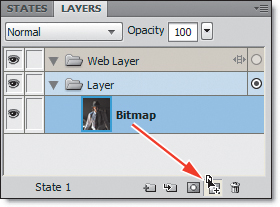
3. | To
keep your original safe, make a copy of the photo by dragging its
thumbnail down to the New Bitmap Image icon in the Layers panel.
|
4. | Double-click the word Bitmap next to the selected image in the Layers panel, and rename it Retouch. This will help you to differentiate between the two images with a quick glance at the Layers panel at any time.
|
5. | Use the Zoom tool to magnify the subject’s face.
|
Now we’re ready to delve into the different uses of the two specific tools.
Tip
Rather than adjusting the
zoom level from the Application bar or menus and then having to
reposition the image focus on the detective’s face, you’ll find it
easiest to use the Zoom tool to drag a marquee around the face. When you
release the mouse, Fireworks automatically centers the selected area on
the canvas, and you’re ready to go.
Lightening with the Dodge tool
Dodging—an
old photo darkroom term for making specific areas of a photo
brighter—has been carried over into a variety of bitmap-editing
software. The Dodge tool lightens up local areas of an image by painting
over the area.
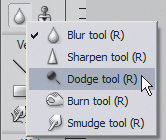
1. | Select the Dodge tool from the Tools panel.
|
2. | In the Properties panel, change Size to 48. Make sure Edge is set to 100 (for a soft-edged brush), Shape to Circular, Range to Shadow, and Exposure to 6.
Note
Dodging and burning are
more realistic if the exposures are set to low values and then reapplied
if necessary. If you find the changes you’re making to be too subtle,
you can paint over the area a second time—or more, if you prefer.
|
3. | Carefully
paint over the actor’s face and neck without releasing the mouse. Avoid
painting over the hat. Because you have chosen Shadows as the range,
you can safely paint over the bright areas of his face without concern.
|
4. | Press
Ctrl+Z (Windows) or Command+Z (Mac) to undo the editing, and compare
the original with the lightened version. The effect is subtle, but
noticeable.
If you find the effect too subtle, you can paint over the area again.
|
5. | Press Ctrl+Y (Windows) or Command+Y (Mac) to reapply the dodging.
|
Darkening with the Burn tool
The Burn tool does the exact opposite of the Dodge tool; it darkens specific areas when it is applied.
1. | Switch to the Burn tool.
|
2. | In the Properties panel, change Size to 33, Range to Midtones, and Exposure to 15. Leave Edge and Shape the same (100 and Circular).
|
3. | Paint over the bright area on the actor’s cheek.
Burning in will add exposure, making the cheek slightly darker. This
should give an appearance of more evenly applied lighting to the
detective’s face, instead of one side being significantly lighter or
darker than the other.
Now we’ll alter the shirt slightly to complete the changes this image needs.
|
4. | Set the Zoom level to 100% again.
If you find the effect too subtle, you can paint over the area again.
|
5. | Change Size to 60, Range to Highlights, and Exposure to 8. You don’t have to change the Shape and Edge settings.
|
6. | Without
releasing the mouse button, paint over the white shirt sleeve and shirt
on the left side of the image. Notice how the shirt gets somewhat
darker.
|
7. | Hide
the upper copy of the image by clicking its eye icon in the Layers
panel to compare the original with the altered image. Although each of
the changes we made was small, the overall effect on the image is quite
substantial.
Tip
A quick way to get to 100
percent magnification is to press Ctrl+1 (Windows) or Command+1 (Mac) or
simply double-click the Zoom tool in the Tools panel.
|
8. | Continue to alter the image if you like, or simply save the file by pressing Ctrl+S (Windows) or Command+S (Mac).
|