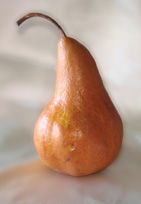
It’s a good example of a simple still life subject. It looks good enough to eat and
draw (not necessarily in that order). There are other delicious images
in the Produce section of the folder. All are ripe for the picking and
painting.
|
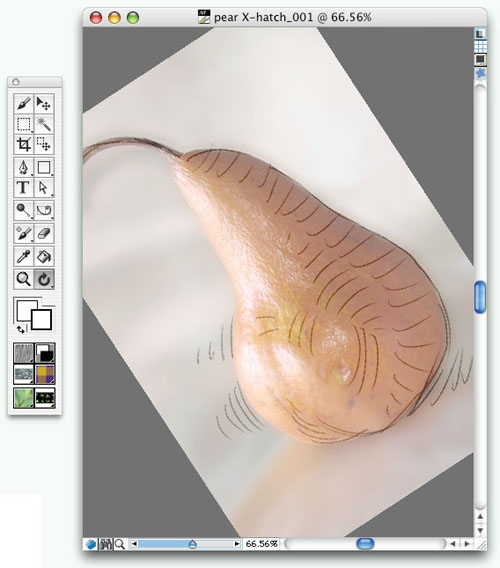
You may want to change the size of the pear
image to fit your screen. That’s easy. Selecting Canvas > Resize
brings up the Resize dialog box, shown in Figure 2.
Before you enter the new height or width, be sure to uncheck the
Constrain File Size box. If you don’t, the change in dimensions will be
compensated with a change in resolution, and the image will be exactly
the same size on screen!

|
Clone-and-Trace
Take
a good look at the pear. Ignore the bruises and scratches, and focus on
the edges of the shape. It is made up of a series of curves. The
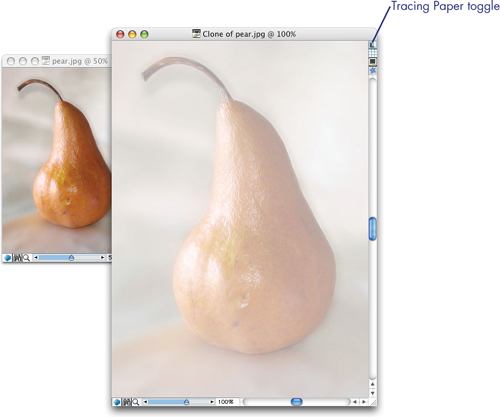
easiest way to make a simple outline of this shape is to trace it, and
the easiest way to set up Painter’s Tracing Paper function is to click
File > Quick Clone. Painter automatically creates an exact copy of
the image, names it Clone of pear.jpg, deletes the image to give you a
blank canvas, and shows you the original pear at 50% opacity (see Figure 2.3). You’ll need to keep the original (Clone Source) open while you work on the clone. Figure 3
points out the icon that toggles tracing paper on or off (keyboard
shortcut is Cmd/Ctrl+T), which you’ll need to do as your sketch
develops.
|
Painter
X introduces changeable opacity for tracing paper. Just hold down the
tracing paper icon to choose thicker or thinner paper. This is a handy
feature for accommodating different stages in your drawing or different
kinds of source images.
|
So, you just need to pick a brush variant and a
color, and you’re ready to trace. I chose a rich brown, sampled from the
shadow side of the pear source image. You don’t have to actually switch
to the Eyedropper tool to pick a color from an open image—just hold
down the Opt/Alt key and your brush cursor becomes an eyedropper. After
you click on the color you want, release the modifier key and it’s a
Brush tool again.
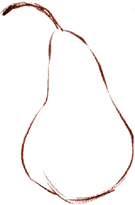
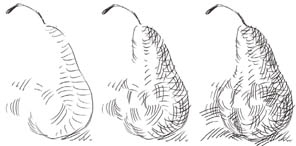
Use a Crayon, Pencil, or Colored Pencil variant for lines that show paper grain. My simple sketch in Figure 4
was done with Sharp Colored Pencil 7. I started with the stem, using
heavy pressure and several strokes to add thickness. It took three
curved strokes to draw the right side of the fruit, and then I
overlapped a couple of strokes to emphasize weight at the bottom of the
shape. A hint of the pear’s “cleavage” was made with very light
pressure. Don’t forget to turn off Tracing Paper to see your drawing!
|
If you accidentally close the source image
while you’re working, or if the relationship between the source and the
clone is “broken” for any reason, reconnecting them is easy. Open the
source image again and select File > Clone Source to designate it as
the one you want for reference.
|
Tonal Drawing
This
outline drawing looks flat. Examine the pear photo again, and this time
notice the areas of light and shadow. We’ll do another drawing that
emphasizes these light and dark shapes, so we can create the illusion of
depth. A traditional way to render light and dark effectively involves
working on medium gray or tinted paper. Paper color does a lot of the
work, and all you have to do is add the lightest and darkest parts.
Save your outline drawing, if you wish, and use
the Quick Clone command for a fresh canvas. Sample a medium to light
orange color from the left side of the fruit, but not the brightest
part. Choose Set Paper Color from the Canvas menu. Nothing happened yet,
but when you choose Select > All (Cmd/Ctrl+A) and Delete/Backspace,
your new color will fill the blank canvas. (Painter defines Paper Color
as the color revealed by an Eraser. So, you just erased the whole
image.)
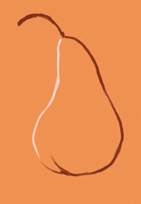
This time I’m using a Conte stick for the
outline, but I switched to white for the left edge, indicating the light
source. Real French Conte sticks are firmer and creamier than chalk or
charcoal, and Painter creates the illusion digitally quite well. Figure 5 was done with Tapered Conte 8. That white line implies volume, like an embossed shape raised a bit from the paper surface.
|
Most palettes have a popup menu of options,
revealed when you click on the black triangle to the right of the
palette name. The other black triangle, at the left edge, simply opens
or closes the palette. You can hide a palette completely by clicking on
the X on the right and hide a group of palettes by clicking the tiny
circle at the upper left. You won’t need the Layers palette for this
lesson, and you’ll probably never need the Channels palette, so make
them go away now.
|
|
A
great feature in versions IX and X is Iterative Save in the File menu.
When you want to save stages in the development of an image, this
command automatically numbers each version in order. File format must be
RIFF, Painter’s default format. Use it for this project, and any
project—you’ll thank me someday.
|
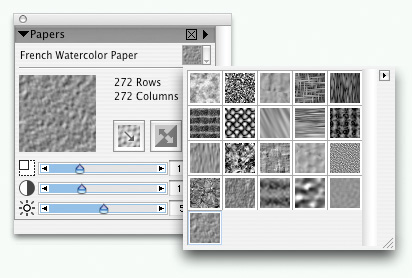
Take another close look at the pear and notice
its texture, most apparent where the light shines obliquely but not
directly on the fruit. To bring out that texture, we will use a strongly
“grainy” variant, such as Pastels > Round Hard Pastels. First,
choose a paper texture that imitates the pear’s skin. It’s not always
easy to predict what a texture will look like just from the paper
swatches, even when they are displayed as thumbnails. Figure 6
shows not only the swatches of the current Paper library but also
sliders to control size, brightness, and contrast adjustments.
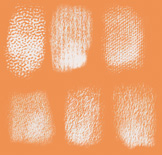
Go ahead and test a few textures on a new canvas
the same orange color as your pear drawing, using white with a Hard
Pastel variant. The top row of Figure 7
shows three papers that won’t work for this project: Pebble Board, Hard
Laid Paper, and Coarse Cotton Canvas. Any of the bottom three papers
will do nicely. They are, from left to right, Italian Watercolor, Rough
Charcoal, and Charcoal Paper. With slightly vertical striations,
Charcoal Paper is just about perfect.
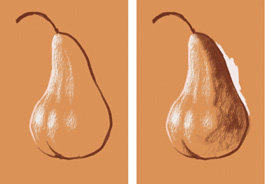
Now that you have the outline, you don’t really
need tracing paper anymore, so turn it off and use the “eyeball”
method—just look at the source photo to guide your placement of
highlights and shadows. Apply a few white strokes with a Hard Pastel
variant in the light areas, pressing harder in the brightest spots.
Sample the dark brown color from the outline to create the shadow areas.
Try not to let white and brown strokes overlap or even touch each
other, but rely on the paper color to express mid-tones. Only a few
strokes are needed to bring out this voluptuous form. Refer to Figure 8 for guidance and encouragement.
Switch
to the Conte stick to make a clean white edge where the light
background meets the darkest part of the pear. Go back to Hard Pastel to
add some white background on both sides of the pear, feathering out the
edges with light pressure.
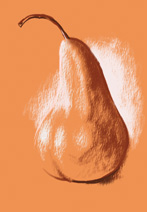
Figure 9
shows my completed drawing, with a few finishing touches. I added a
small cast shadow under the pear. A couple of details on the stem were
made with Charcoal > Sharp Charcoal Pencil 5, drawn in white and with
the paper color. Finally, I gently removed some of the white outline on
the lower left of the pear, allowing it to merge into the background.
No need to switch to an Eraser variant for those last few strokes—use
the other end of your Wacom pen!
|
How do you know when you’re finished with a
drawing or painting? If you’ve spent more than 15 minutes on this one,
you’re done! Trying to make your artwork perfect? Fuhgeddaboudit!
|
Crosshatch Contours
Take yet another close look at the pear. This
time, concentrate on its rounded contours. We’ll work on white paper
with black lines. Tone and form will be built up from overlapping
strokes that follow the contours of the pear. This is another
traditional method often used by cartoonists and graphic artists,
especially for commercial black-and-white printing.
So, make another Quick Clone of the photo.
Choose a thin pencil or pen that has little or no variation in thickness
or opacity. I’m using the 2B Pencil. Sketch the stem and right edge of
the pear quickly and begin to make a series of roughly parallel strokes
that follow the curves of the fruit. Use strokes that vary in length and
direction, building up the form. Your wrist will have to twist as you
work.
|
To keep from twisting your wrist too much, use
Painter’s cool Rotate Page tool, available in all versions. It shares a
space on the Toolbox with the Grabber hand, right next to the Magnifier.
Figure 11
shows the tool active and the image tilted as desired. When you’re
ready to return to normal orientation, double-click the Rotate Page
tool.
|