Because the type of artwork you usually
design in CorelDRAW is vector artwork, the objects you create need to be
written to screen from moment to moment: the process is called rasterizing.
With today’s video cards and computer processors, the response time
between changing an element in a file and seeing the change can usually
be measured in a fraction of a second. CorelDRAW has always supported
different levels of detail with which you view your CorelDRAW work.
They’re accessed through the View menu, and these view modes can help
you find an object and draw an object when your design becomes intricate
and the page gets cluttered.
View modes
are used to specify how your drawing appears onscreen. Modes offer
feedback as to how a design will print or export, and lower-quality view
modes can help you locate an object hidden by other objects. You switch
between view modes by using the View menu and through keyboard
shortcuts. The View menu itself indicates the current view using a button indicator to the left of each menu item.
You have the option of choosing from one of six
display qualities: Simple Wireframe, Wireframe, Draft, Normal, Enhanced,
and Pixels. The default mode is Enhanced, and this is the best proofing
quality for working and displaying your work to others. Additionally,
you can check or uncheck Simulate Overprints and Rasterize Complex
Effects when viewing in Enhanced mode. The following section explains
how these display modes render to screen paths and objects that have
different fills and effects. Here you can see the list of View commands:

Wireframe and Simple Wireframe
The
views listed make a top-to-bottom progression from low to high detail.
At the top, Simple Wireframe and Wireframe provide the least detail and
refresh onscreen almost immediately when you make edits or change the
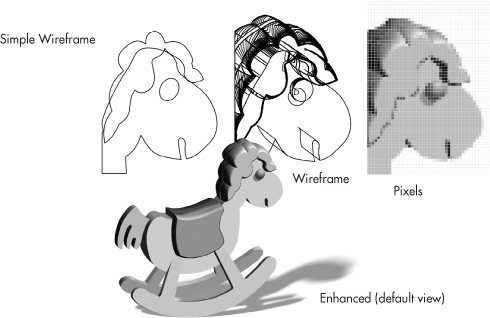
zoom level of your document. In Simple Wireframe viewing mode, all you
see is the silhouette of vector objects: a thin black outline with no
fill. This is a very useful view mode for locating a shape on the page
when you don’t have the time to perform a search in CorelDRAW .
Simple Wireframe mode provides no view of object fills, but it does
reveal the structure of effects objects such as extrudes and blends. Figure 1
is a visual comparison of Simple Wireframe, Wireframe, Pixels view, and
the default viewing mode in CorelDRAW, Enhanced. Clearly, you’re not
going to apply fills to objects in Wireframe mode while you work;
however, these different modes indeed provide user information about
objects you don’t usually see, and you can edit paths, copy objects, and
perform most other necessary design tasks in any of these view modes.
Getting a Draft View
Draft view is the
middle-ground of view quality between Wireframe and Enhanced modes. In
Draft viewing mode, the objects in your drawing are rendered with color
fills, but only Uniform fills are displayed with any accuracy. Outline
properties such as dashed lines, width, and
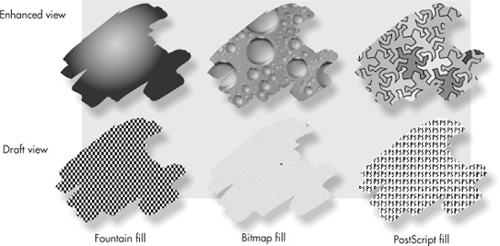
color are displayed. The two greatest visual differences between Draft
and Enhanced views are that there is no anti-aliasing in Draft mode (so
object edges look harsh and jaggy), and bitmaps and Fountain fills do
not display as you’d expect them to. Figure 2
shows a Fountain fill, a Bitmap fill, and a PostScript fill viewed in
(the default) Enhanced view at the top and then at bottom in Draft mode.
There is a subtle visual indication that you can use to tell the
difference between a Bitmap fill and a Fountain fill in this mode, but
it’s hardly worth the challenge. Draft mode is best used to evaluate
basic color schemes in a vector drawing and for quickly navigating
incredibly dense and complex illustrations such as CAD architecture
designs and a single page containing 45,000 Extrude effect objects.
Using Normal View
Normal view displays
all object properties—Bitmap fills, Fountain fills, and PostScript
fills—correctly, unlike Draft and Wireframe views. The only difference
between Enhanced and Normal view modes is that Normal mode does not
anti-alias the edges of objects. Anti-aliasing
is part of the rasterization process because visual data is written to
the screen that creates a smooth transition, whereas image areas have
very different colors and brightness. This is usually done by adding
pixels to the color edge of an object whose color is a blend between the
neighboring, contrasting areas. The effect of anti-aliasing is
particularly evident along edges of objects that travel diagonally
across the page, and in curved areas such as circles and ellipses.
Without anti-aliasing, the Normal view might remind you of Microsoft
Paint back in 1991, when the best monitor you could buy was a VGA and
you ran Windows 3.x.
Normal
view mode will appeal to users whose video card doesn’t have a lot of
RAM, and to artists who create thousands of objects on a page. Screen
refreshes are quicker, and if you don’t mind the stair-steppy edges of
aliased object edges, you can pick up some speed using Normal mode.
Note
Bitmaps—whether they’re
imported photos or bitmap fills you define using the Interactive fill
tool—do not change their screen appearance if you switch from Normal to
Enhanced view mode. Bitmaps do not update or refresh in CorelDRAW
because the pixel color definitions are set within the image or fill.
Using Enhanced View
When you use Enhanced view, all vector objects (text
is a vector object, too) are anti-aliased around the edges. It’s your
best view of your work and is the default setting in CorelDRAW.
Previewing with Pixels View
New to version X5 is a view option that displays both
vector and bitmap data onscreen as though the objects all were
constructed from pixels. Pixels view quality depends on the resolution
of your document, another new X5 feature. When you open a new document,
you’re presented with the Create A New Document screen; there, you set
the Rendering Resolution—the factory default setting is 300 dpi (dots,
or pixels, per inch). As an example, suppose you’re creating a web
graphic. Because CorelDRAW artwork is vector- and resolution-independent
in nature, you can’t truly preview what a bitmap version of your vector
design will look like on the Web, because every zoom level you choose
displays the vector graphic smoothly using Enhanced view. The previewing
solution is simple—before you draw, set up your document to 96 dpi in
the Create A New Document box, and then use Pixels view mode to preview
your artwork before delivering it and getting paid handsomely for it.
The higher the resolution of the document, the smoother that Pixels view displays your artwork.
Tip
To change the resolution of
a document, double-click the gray page border to bring up the Page Size
tab in Options. Change the Rendering Resolution to suit your current
need, and go to town.
Simulate Overprints
Simulate Overprints is a print production preview
mode. Overprinting is part of the standard commercial printing process
used to simulate how colors actually will print to a physical page and
also is used to check for any gaps between printed objects due to any
printing registration problems. If you have no need for commercial
printing, Simulate Overprints will be a seldom-used view. However, if
you use CorelDRAW for physical commercial output, bear in mind two
things:
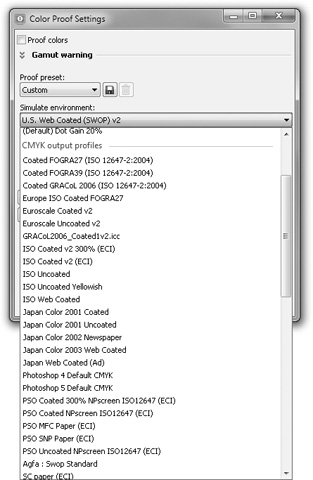
You need to check in with Window | Dockers |
Color Proof Settings and to ensure that your intended output device is
chosen from the Simulate Environment list (shown next). If you don’t
find the printing press of your choice, contact the commercial printer
and request the drivers or ICM profile they use. By default, SWOP is the
color space when proofing, and chances are good that the simulation of a
CMYK color space will display colors as accurately as any monitor can.
“Simulation”
means exactly that. It is physically impossible to proof physical
pigments rendered to a physical surface with total accuracy by using a
monitor that displays virtual artwork. However, CorelDRAW’s color
simulation of real-world color output is excellent, and “close” is far
better than “none” when it comes to proofing printed material on your
screen.
Tip
To quickly switch between your current view mode and the last-used view mode, press SHIFT+F9.