8. Printing High-Quality Materials
You’ve worked all night and created a perfect,
beautifully formatted Visio diagram that has lots of color, good-looking
themes, gradient fills, and transparency. Your company’s leaders are so
impressed that they want to use your diagram for a brochure and poster
at the next trade show. What do you do to get a good result?
There are a number of issues that can stand in the
way of getting great output, suitable for distribution to the public.
Among these are
Your print shop or service bureau might not
have Visio and isn’t able to read your VSD file. Because Visio evolved
as an office app, it doesn’t have the print-production pedigree that
applications such as Adobe Illustrator or Adobe Photoshop have.
Some printers have trouble printing gradient fills and transparency from Visio.
PDF exports can experience similar problems with gradients and transparency.
I’ve
used Visio to create shiny business cards, posters, and brochures, and
I’ve run into all these problems. The solution I use is simple and crude
but effective: export your file as a high-resolution bitmap image.
Visio is a vector-based graphics program, and vectors
print smoothly, using the full resolution of the printer. Bitmaps are
collections of dots that get uglier as you blow them up, so exporting to
an image seems to go against the whole purpose of using vectors in the
first place.
The secret is to export an image that has the same
resolution as the target printer. Since the printer can’t print any
better than that anyway, the bitmap will print well.
Exporting a High-Resolution Bitmap Image
1. | Start with any sample document from File, New, Sample Diagrams, or open a document that you’ve created.
|
2. | Go to the page that you want to print. Exporting to an image works for only one page at a time.
|
3. | Make
sure that no shapes are selected if you want the whole page to be
exported. If you want to export just a portion of the diagram, select
the shapes you want.
|
4. | Click File, Save As. The Save As dialog appears.
|
5. | Choose a location for the file and give it a name, such as High-Res-Visio-Export.bmp.
|
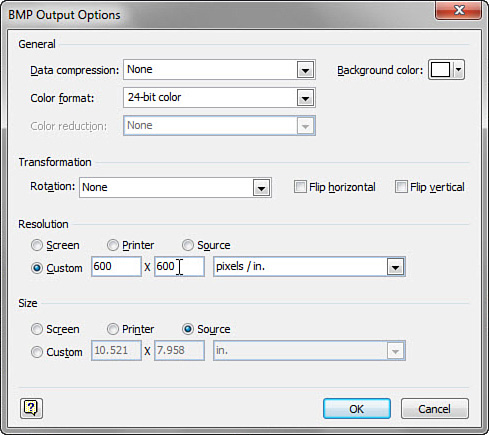
6. | In the Save As Type drop-down, select Windows Bitmap (*.bmp, *.dib) and then click Save. The BMP Output Options screen appears.
|
7. | In
the Resolution section of the dialog, select Custom and enter the
resolution of your target printer. You can check your printer’s
documentation or call your print shop and ask for a sufficient
resolution. In Figure 10, 600 × 600 dots, or pixels/inch, has been entered.

|
8. | Click
OK to save your export. A very large BMP file is created in the
location you specified. You can now send this file to the printer and be
assured of high-quality printed output.
|
The
BMP file format doesn’t use any compression algorithms, as JPG, GIF and
PNG do, so the file size will likely be huge. As an example, I exported
the Topology Page in the IT Asset Management sample at 600 × 600 dpi.
The file size was 88 MB! BMPs retain full-fidelity, so they’re still a
good choice. The other formats can lose detail and introduce unwanted
artifacts in the interest of file compression, so they might not print
as well.
If your USB key isn’t large enough for such a file,
never worry. Bitmaps zip well. That 88 MB file zips to just 915 KB,
making transportation and e-mailing practical. To compress, just
right-click the file, then choose: Send To Compressed (zipped) Folder.
The resulting file will be
readable by any print shop around, and the resulting output will be
suitable for public distribution and display.