Before installing the first
Exchange Server 2010 server into an existing Exchange Server 2007
environment, a number of prerequisites have to be met:
All domains in an existing Active Directory forest have to be running in native mode.
The Active Directory forest has to be running on a Windows Server 2003 forest functionality level.
Each
site in Active Directory should have at least one Domain Controller and
the Global Catalog server on a Windows Server 2003 SP2 level. Although
not enforced, it is recommended to have 64-bit type Domain Controllers
and Global Catalog Servers for optimal performance.
The
Schema Master of the Active Directory needs to be a Windows Server 2003
SP2 or a Windows Server 2008 SP1 server. This can either be a 64-bit or
a 32-bit server.
All Exchange Server 2007 servers must have Service Pack 2 installed.
The Internet facing Active Directory sites must be the first sites that will be upgraded to Exchange Server 2010.
Likewise, the physical server where Exchange Server will be installed needs to meet the following prerequisites:
The server needs to be a 64-bit (64-bit, Itanium is not supported!) based computer.
Windows Server 2008 SP2 or Windows Server 2008 R2 64-bit needs to be installed.
Internet Information Server needs to be installed.
Windows Remote Management (WinRM) 2.0 needs to be installed.
PowerShell 2.0 needs to be installed.
.NET Framework 3.51 needs to be installed.
Depending on the version of Windows 2008 you're using
(i.e. Service Pack 2 or R2) a number of hotfixes need to be installed. I
strongly recommend you bring your server up to date with the latest
hotfixes from Windows Update.
1 Exchange Server 2010 order of installation
Exchange Server 2010 can be installed into an
existing Exchange Server 2007 environment in the same forest and the
same domain, but there are some issues with compatibility. You have to
take the installation order of the Exchange Server 2010 servers into
account to minimize the impact of this:
First – Exchange Server 2010 Client Access Server. The Client Access Server can work with an Exchange Server 2007 Mailbox Server as well as an Exchange Server 2010 Mailbox Server.
Second – Exchange Server 2010 Hub Transport Server.
Third – Exchange Server 2010 Mailbox Server.
The
Edge Transport Server can be installed at any time, since an Exchange
Server 2010 Edge Transport Server can be subscribed to an Exchange
Server 2007 SP2 Hub Transport Server.
After you've installed the Mailbox Server role and
established a proper Public Folder replication between Exchange Server
2007 and Exchange Server 2010, you can start moving mailboxes to the new
Mailbox Server. Of course, the Public Folder replication needs only be
configured when Public Folders are used in Exchange Server 2007.
Please bear in mind that an in-place upgrade to Exchange Server 2010 in any scenario is NOT supported!
2 Installing Exchange Server 2010
Although there's a specific order to the installation of server roles, these roles can, of course, be combined on one server.
When upgrading to Exchange Server 2010 the following steps need to be performed:
Upgrade the Active Directory Schema.
Upgrade the Active Directory Configuration.
Upgrade the Active Directory Domain.
Install the Exchange Server 2010 server roles.
So, let's get started with the upgrade.
2.1 Upgrading Active Directory
Before you even think about installing server roles,
the first step in upgrading the Exchange Server 2007 environment to
Exchange Server 2010 is upgrading the Active Directory Schema. Bear in
mind that it is also possible to use the graphical setup program, as
this can be found on the installation media as setup.exe.
When you use this program, all steps below are automatically performed.
The command prompt system is mainly for people who want to retain more
fine-grained control over their transition.

Once the Schema has been upgraded, the Configuration
(which is stored in the Active Directory Configuration Container) can
follow.
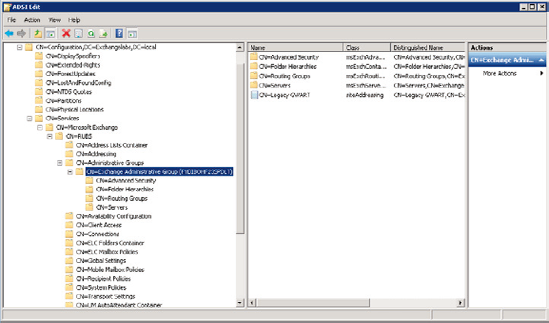
The Exchange Server 2007 organization called "RUBS" can be seen in Figure 1. All Exchange Server 2007 servers are stored in the default Administrative Group Exchange Administrative Group (FYDIBOHF23SPDLT). If your Exchange 2007 has previously been upgraded from Exchange Server 2003, then it's very likely that you will see a First Administrative Group as well. If the upgrade was finished correctly, this First Administrative Group should be empty, or almost empty.
Exchange Server 2010 also uses the Exchange Administrative Group (FYDIBOHF23SPDLT),
but there are differences in how Exchange Server 2010 works, for
example, with databases. In Exchange Server 2007, a database is bound to
a Mailbox Server, while in Exchange Server 2010 databases exists on the
organization level, independent of any Mailbox Server. So when
upgrading the Exchange Configuration, the Administrative Group is
changed to facilitate both the Exchange Server 2007 environment as well
as the Exchange Server 2010 environment.
When you want to change the Exchange Configuration,
open a Command Prompt, navigate to the Exchange Server 2010 installation
media, and enter the following command:

After upgrading the Exchange Configuration, some
Exchange Server 2010 specific entries appear in the Exchange
Administrative Group, like the Database Availability Group and the
Databases container. This is more or less what you should see:

The next step is to prepare the domain (or domains if
you have multiple domains that host user accounts with Exchange Server
mailboxes) for use with Exchange Server 2010. To do this, open a command
prompt, navigate to the installation media and enter the following
command:

And if you want to prepare all domains in your environment, enter the following command:

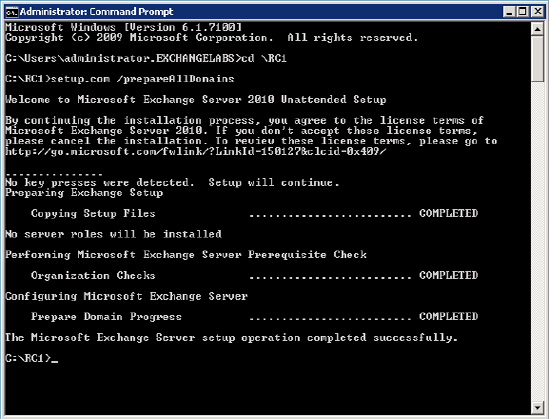
When the setup /PrepareDomain is finished, the Active Directory is now ready to install the first Exchange Server 2010 server.
2.2 Installing the Exchange Server 2010 servers
As mentioned earlier, the only
supported order of installation of Exchange Server 2010 server roles
into an existing Exchange Server 2007 environment is as follows:
Client Access Servers
Hub Transport Servers
Mailbox Servers.
Also, the Internet-facing Active Directory site, the site associated with your external Autodiscover record, should be the first
to be transitioned. Then you should transition other Internet-facing
Active Directory sites. The last sites you should transition are the
internal Active Directory sites. Transitioning internal Active Directory
sites before the Internet-facing Active Directory sites have been
transitioned is not supported.
In our test environment, we are installing a combined
Exchange Server 2010 Client Access Server role and Hub Transport Server
role, and one dedicated Exchange Server 2010 Mailbox Server role.
First, ensure that Windows Server 2008 Server and all
the prerequisite software is installed on the target server. To install
Internet Information Server 7 (or 7.5 in the case of Windows Server
2008 R2) and other prerequisites, open a command prompt, navigate to the
\Scripts directory in the installation media and enter the following
command:

This will install Internet Information Server, as
well as other prerequisites, with the right configuration for the Client
Access Server and the Hub Transport Server.
To install the actual Exchange Server roles you can
use either the command-line setup or the graphical setup. Right now, we
will use the graphical setup program, and to open this setup application
you just need to start the setup.exe program in the installation media.
During
the setup, choose the Exchange language option. You can choose to
download additional language packs from the Microsoft website, or use
the language as available on the DVD. Select "Install all languages from
the language bundle" to download additional language information.
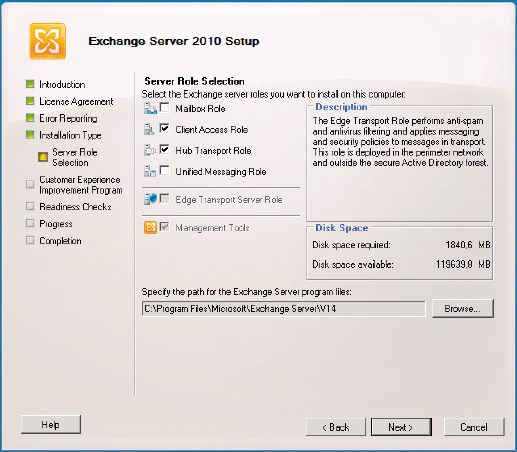
Follow the setup wizard, and at the Installation Type
windows select "Custom Exchange Server Installation" in order to select
the server roles that need to be installed. Select the Client Access
Server Role and the Hub Transport Server Role.
You are not asked to select a Hub Transport Server in the Exchange
Server 2007 environment. This is because both versions use Active
Directory sites for routing messages, and so this should work right away.
Once
everything is OK and the Readiness Checks are successful, you can start
the actual installation of the Exchange Server 2010 Client Access
Server and Hub Transport Server roles. When the setup is finished, close
the setup application and reboot the server (if the setup asks you to
do so).
2.3 Certificate installation
After the installation of the Exchange Server 2010
Client Access Server, the coexistence still has to be configured.
Eventually, users will connect to the new Client Access Server and, if a
user's mailbox exists on the new Exchange Server 2010 Mailbox Server,
the request will be processed as usual. When the user's mailbox still
exists on the Exchange Server 2007 Mailbox Server, however, the request
is either forwarded to the Exchange Server 2007 Client Access Server, or
processed by the Exchange Server 2010 Client Access Server, and the
information retrieved from the Exchange Server 2007 Mailbox Server. This
all depends on the protocol that's being used, but it is important for
determining the certificates being used on the Client Access Server as
explained below.
Outlook Web Access clients naturally connect to the
Exchange Server 2010 Client Access Server. After validating the user's
credentials, the Client Access Server checks the mailbox server and, if
this is still running on Exchange Server 2007, the request is redirected
to the Exchange Server 2007 Client Access Server.
After installing the Exchange Server 2010 Client
Access Server, a new third-party certificate needs to be requested. A
self-signed certificate is created by default during the setup of the
Client Access Server, but this is not at all usable for a production
environment. The certificate that ideally needs to be used on a Client
Access Server is a certificate with multiple domain names, and these
certificates are also known as Unified Communications (UC) certificates.
The additional domain names are stored in the "Subject Alternative
Names" property of the certificate. For more information regarding these
certificates and a list of supported UC certificate vendors, you can
visit the Microsoft website: HTTP://TINYURL.COM/CERTVENDORS.
This UC certificate should at least contain the following domain names:
Webmail.inframan.nl
– this is the primary entry point for all Outlook Web Access, Exchange
Active Sync (EAS) and Exchange Web Services (EWS) requests.
Autodiscover.inframan.nl.
Legacy.inframan.nl – this is the namespace for the Exchange Server 2007 Client Access Server.
If you chose not to enter the external domain during
setup (in the case of an Internet-facing Client Access Server) a number
of external URLs will also need to be configured as explained in the
next section.
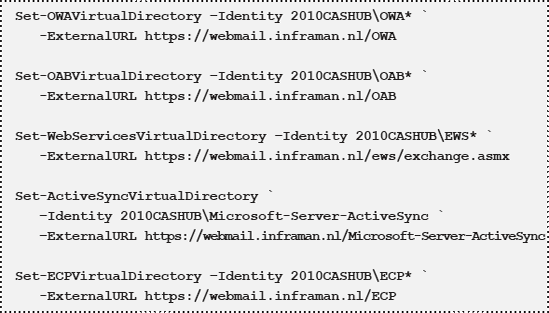
2.4 Configure Exchange Web Services
Exchange Server 2010 uses the Client Access Server to
offer the Offline Address Book and Free/Busy information using the HTTP
protocol, and these can therefore be used by Outlook 2007 and Outlook
2010. To configure the Exchange services, open an Exchange Management
Shell and enter the following commands:
In the coexistence scenario, the Offline Address Book
generation server is still the Exchange Server 2007 Mailbox Server. We
want to move this to the Exchange Server 2010 Mailbox Server, so we
follow these steps:
Log on to an Exchange Server 2010 server and open the Exchange Management Console.
Expand the Microsoft Exchange On-Premises (SERVERNAME).
Expand the Organization Configuration container and select the Mailbox option - click the Offline Address Book tab.
Right click the "Default Offline Address Book" and select Move.
Use the Browse button to select the new Exchange Server 2010 Mailbox Server and click Move.
It is also possible to move the generation server to
Exchange Server 2010 using the Exchange Server 2010 Management Shell. On
an Exchange Server 2010 server, open the Exchange Management Shell and
enter the following command:

If your Exchange Server 2007 environment has Public
Folders, it is likely that you will want these on your Exchange Server
2010 Mailbox Server as well. The Public Folder database is, in this
case, automatically created, but you have to manually configure
replication, which is a bit of a hassle.
Log on to an Exchange Server 2007 Mailbox Server and open the Exchange Management Console.
In
the Exchange Management Console, double-click the Toolbox. Double-click
the Public Folder Management Console in the results pane.
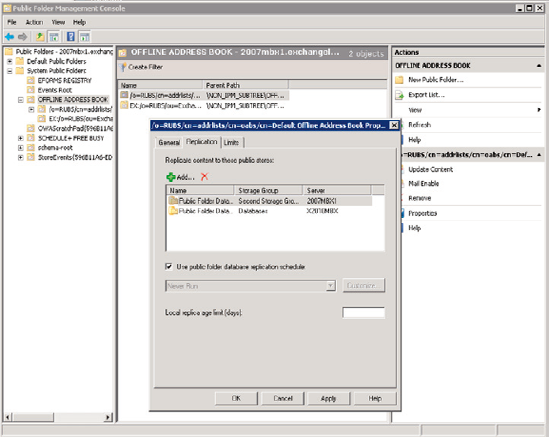
Select the Offline Address Book and, in the results pane, right-click the "/o=<<organization>>/cn=addrlists/cn=oabs/cn=Default Offline Address Book" and then select the Replication tab. Use the Add button to add the Exchange Server 2010 Public Folder Database, and then click OK to close the properties window.
Repeat these steps for:
EX:/o=<<organization>>/ou=Exchange Administrative Group (FYDIBOHF23SPDLT)
OAB Version 2
OAB Version 3a
OAB Version 4
EX:/o=<<yourorg>>/ou=Exchange Administrative Group (FYDIBOHF23SPDLT)
Schedule+ Free Busy: EX:/o=<<yourorg>>/ou= Exchange Administrative Group (FYDIBOHF23SPDLT).
3 SMTP Infrastructure
The Exchange Server 2007 Edge Transport Server needs
to be transitioned to Exchange Server 2010 as well. Before doing so, you
need to make sure the Active Directory has been transitioned first:
Install Exchange Server 2007 SP 2 on all Client Access Servers in the entire Exchange organization.
Install
the Exchange Server 2010 Hub Transport Server (after you've installed
the Exchange Server 2010 Client Access Server!) and subscribe the
existing Exchange Server 2007 Edge Transport Server to this new Hub
Transport Server. This can coexist for some time if needed.
Install the Exchange Server 2010 Edge Transport Server in the DMZ.
Remove
the subscription from the Exchange Server 2007 Edge Transport Server,
and subscribe the new Exchange Server 2010 Edge Transport Server to the
Exchange Server 2010 Hub Transport Server.
It's actually rather simple, although you should bear
in mind that this is one of the rare cases when the relationship
between Exchange Servers 2007 and 2010 is asymmetric! Specifically, an
Exchange Server 2010 Edge Transport Server cannot be subscribed to an
Exchange Server 2007 Hub Transport Server.
4 Moving mailboxes to Exchange Server 2010
Mailboxes should be moved from Exchange Server 2007
to Exchange Server 2010 using the 2010 version of the Exchange
Management Console, or the Exchange Management Shell. Even more
interesting, the new onlinemove mailbox functionality (now called MoveRequest) can be used, which results in a minimal downtime for the users. Even when they have a multi-Gigabyte mailbox!
During an online move-mailbox, a new mailbox is
created on the Exchange Server 2010 Mailbox Server and the contents are
synchronized between the old (on Exchange Server 2007) and the new
mailboxes. The user is still working
with the old mailbox and new messages still arrive at the old mailbox.
When both mailboxes are in sync the old mailbox is closed, Active
Directory is updated with information regarding the new mailbox location
and the new mailbox on Exchange Server 2010 is fully up and running.
Lastly, note that the online move-mailbox
functionality only works between Exchange Server 2010 servers, and when
moving from Exchange Server 2007 to Exchange Server 2010. When moving
from Exchange Server 2010 to Exchange Server 2007, the move is offline.
It also doesn't work with Exchange Server 2003, which is a shame.
Either way, congratulations!
You should now have Exchange Server 2010 running in Coexistence with
either your Exchange Server 2003 or 2007 environment!