Windows Server 2008 was the
first Operating System that came with PowerShell 1.0 by default,
although it was available as a download as far back as Windows Server
2003. In case you don't know about it, PowerShell is a very potent
command-line interface which can be used to fully manage your Windows
server, and the first Microsoft application to fully utilize it was
Exchange Server 2007; the Exchange Management Shell is actually a
superset of commands built on top of PowerShell. Product Teams within
Microsoft create their own Management Shell solutions, and Exchange
Server was one of the first products building theirs. Naturally, there
are other tools with Management Shells, such as the System Center
products for example, and many of them are also built on top of
PowerShell.
Exchange Server 2010 uses PowerShell version 2 (as
does Exchange Server 2007 SP2), and in addition to the command-line
interface this version also has an "Integrated Scripting Environment,"
which is an integrated graphical user interface that can be used to
easily create PowerShell scripts. As I mentioned earlier, PowerShell 2.0
is also integrated with Windows Remote Management (WS-MAN), making it
possible to use PowerShell to remotely manage your Exchange 2010
environment using the standard HTTPS protocol. All that's needed is a
workstation or a server that has PowerShell version 2 installed on the
workstation!
Even the Exchange Management Console uses the Management Shell (i.e. is written on top of it), and so there are some functions which are not available in the Console but are
available in the Shell, such as Attachment Filtering in the anti-spam
options. As the Exchange Management Shell is the primary management tool
in Exchange Server 2010 (as it was in Exchange Server 2007), this
development direction may hurt a little bit if you're a diehard GUI
administrator.
When the Exchange Management Shell is started, you'll
basically see an empty box with just a command prompt – exactly like
the Windows command prompt. You can get a list of all available commands
at this stage by entering Get-Command.
For the benefit of those diehard GUI administrators, a
PowerShell command consists of two parts: a Noun and a Verb. Verbs can
be instructions like get, set, new, remove, enable, disable etc., and
the Noun component can be any objects in Exchange Server. Just combine
the Noun and the Verb like this:
Get-ExchangeServer – retrieve a list of all Exchange 2010 Servers in the organization.
Set-MailboxDatabase – set a property on a Mailbox Database.
New-Mailbox – create a new mailbox enabled User.
Remove-Mailbox – deletes a user object and its mailbox.
If you want to learn more about PowerShell commands, a quick web search will turn up scores and scores of learning resources.
NOTE
Besides the Exchange
Management Shell, there's also the Windows 2008 PowerShell on your
server or workstation. If you start the PowerShell instead of the
Exchange Management Shell, you'll see a Command Prompt with a blue
background, and the Exchange Server 2010 cmdlets won't be available. If
you are new to PowerShell and the Exchange Management Shell, there will
be a day when you start the wrong Shell.
1 Exchange Management Shell help
If there's anything you're not sure about when you're
using the EMS, you have a friend in the form of the Quick Reference
Guide, located in C:\Program
Files\Microsoft\ExchangeServer\v14\bin\en\ExQuick.htm. This contains the
most important and most-used cmdlets, and their variables.
If you need help on the fly, it's also possible to
use the Shell's built-in help function. To get a list of all available
help items, just type help *. If you need help about a specific cmdlet, just type help and the name of the cmdlet. To get help about mail-enabling an existing user, for example, just type help enable-mailbox.
2 Pipelining
Another great feature in PowerShell and the Exchange Management Shell is the pipelining
function, which uses the output of one cmdlet as the input for a second
command. This can drastically reduce the amount of work you need to put
in to accomplish relatively complex tasks, and is more or less just
limited by your own ingenuity.
For example, if you want to move all mailboxes in a mailbox database called "Mailbox Database 1988197524" to another mailbox database called "Mailbox Database 0823751426", you can use the following command:

This is what happens:
Get-Mailbox –Database "Mailbox Database 1988197524"
retrieves a list of all mailboxes in this particular database. The
output of this cmdlet is used as the input of the second cmdlet, the
request to online move mailboxes to the other database. It's also
possible to use more specific queries. For example, to get a list of all
mailboxes whose name starts with "Chris" you would use the following
command:

You can then use this as the input for a request to move all these mailboxes to another database:

3. Bulk user creation in the Exchange Management Shell
This can be very useful, particularly when you need
to create a lot of mailboxes in a hurry. Suppose you have an
Organizational Unit named "Sales" in Active Directory, where 100 user
objects reside. This command will create a mailbox for each user in this
Organizational Unit:

When there are multiple Organizational Units called "Sales" you have to specify the complete path of the Organizational Unit:

It's also possible to filter the output of the
Get-User command with the –Filter parameter. For example, to
Mailbox-Enable all users whose company attribute is set to "Inframan,"
enter the following command:

If you want to be even more specific, for example to
Mailbox-Enable all users whose company attribute is set to "Inframan"
and whose department attribute is set to "Intern," enter the following
command:

The following operations are available for the –Filter option:
In some cases, you'll find it useful to import a list
of users from a .CSV file. This list can be exported from another
Active Directory or even from an HR (Human Resources) application. It is
actually relatively easy to import a .CSV file using PowerShell; the
only thing that you need to be mindful of is that the –Password option
doesn't accept clear text input. The input to this field has to be
converted to a secure string:
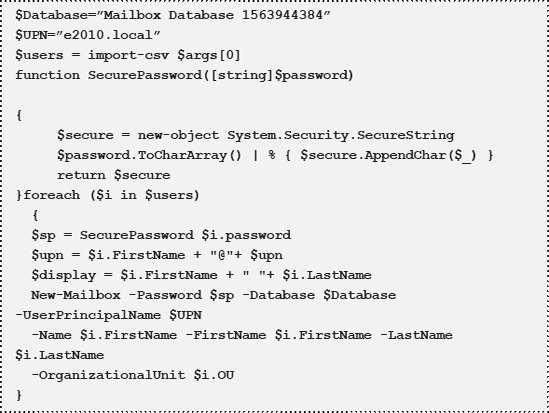
On the first three lines, three parameters are set
that are used during the actual creation of the user and the mailbox.
The file is read in a ForEach loop, and the actual users and the
mailboxes are created as this loop progresses.
The SecurePassword
function reads the password from the output .CSV file and converts it
into a secure string which is used, in turn, as the password input
during the creation of the users. The .CSV file itself is formatted like
this:
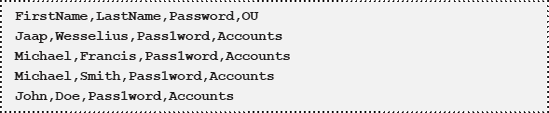
To make this script usable, save the script file as "create.ps1" in a directory like c:\scripts. You'll also need to save the .CSV output file as users.csv
in the same directory. To actually use the script, open a PowerShell
command prompt, navigate to the c:\scripts directory and enter the
following command:
