Overview
Microsoft Lync Server
2010 has several different server roles. These server roles can be
combined in several ways to produce a myriad of architecture options.
Even the collocation of services for a given role can be split for added
flexibility.
The Archiving role in Lync
Server 2010 primarily serves the purposes of legal compliance. That
said, other companies might want to have a centrally searchable archive
for other purposes because the Archive Server role is able to archive
communications across both IM and meetings.
The Archiving role scales
well with a single Archiving Server capable of handling up to 300,000
users. As such, it is common to collocate the Archiving role with the
Monitoring role. The Archiving role supports redundancy and failover, so
if it is a vital role—for example, if you have legal compliance issues
that have prompted the installation of the Archiving role—strongly
consider deploying the Archiving role as a pool.
The Archiving Server role can archive the following content:
Peer-to-peer instant messages
Multiparty instant messages
Web conferences, including uploaded content and events (for example, join, leave, upload, and so on)
Content that cannot be archived includes
Peer-to-peer file transfers
Audio/video for peer-to-peer instant messages and web conferences
Web conferencing annotations and polls
Organizations should
decide prior to the implementation of the Archiving role how archiving
will be configured. Decisions around site- and user-based archiving must
be made. It is also critical to determine how archive data will be
managed. The Archiving database was not meant to be a long
term-retention solution and as such, Lync Server 2010 does not provide
an e-discovery solution for archived data. This data should optimally be
moved to other storage.
Note
Lync Server 2010 provides a
session export tool in the form of the Export-CsArchivingData commandlet
that can be used to export archived data and to create searchable
transcripts of the archived data.
From a perspective
of supported topologies for Archiving Server, the Archiving Server can
support either a single pool or multiple pools. This is to say, you can
choose to create a unique archiving host for each individual Front End
pool or a single Archiving Server can service all Front End pools (or
Standard Edition pools). It is also possible to have multiple Archiving
Servers attach to a single Archiving Database. This can prove helpful if
you plan to pull archive data directly from the database.
The decision about how
to configure the Archiving Server topology in terms of single versus
multiple Archiving Servers is typically determined by the network that
supports Lync Server 2010. If Front End Servers are a large distance
from the Archive Server, there might be too much latency for the Archive
Server to keep up properly, in which case a local Archive Server might
be needed. Similarly, if there is not enough bandwidth to keep up with
an archive across the WAN, it might be preferable to deploy a local
Archive Server.
Tip
When
deciding how to configure the Archiving Server topology, the obvious
question might be, “How much bandwidth does my Archive Server need?” The
answer depends on your archiving configuration, policy, and user load.
The user load should be monitored during your pilot implementation to
get a feel for how much load it will generate.
Installation
This
section outlines the steps for installing the Lync Server 2010
Archiving Server role. The Archiving Server role enables administrators
to archive IM and meeting content. The Archiving Server leverages
Microsoft Message Queuing technology to collect information and deposit
in the archiving database. Then it leverages PowerShell cmdlets to
export and transcribe data.
By
now, the Lync Server Topology Builder should already be installed. The
first step in adding an Archiving Server to your Lync Server deployment
is to add it in the Topology Builder tool, which is discussed in the
following sections.
Installing Microsoft SQL Server 2008
Archiving Server has the
option to either point to a dedicated SQL server or it can be collocated
with the back-end database, the Monitoring Server database, or the
Response Group application database.
Topology Builder for Lync Server 2010 Archiving Role
Lync Server 2010 uses the published topology to process traffic and to maintain overall topology information.
Tip
When deciding how to
configure the Archiving Server topology, the obvious question might be,
“How much bandwidth does my Archive Server need?” The answer depends on
your archiving configuration, policy, and user load. The user load
should be monitored during your pilot implementation to get a feel for
how much load it will generate.
To ensure that the topology is valid, it is recommended that the Topology Builder run before each topological change.
The following example shows the steps necessary to add an Archiving server to your Lync Server deployment.
Caution
Remember, if you change the topology later, it should be republished to ensure consistency.
When you launch Lync Server
2010 Topology Builder, a pop-up message asks whether you want to import
the existing topology. Click Yes to continue.
To add an Archiving server in Topology Builder, perform the following steps:
1. | Expand your site in Topology Builder.
|
2. | Select Archiving Servers, as shown in Figure 1.

|
3. | In the Action pane on the right, click New Archiving Server.
|
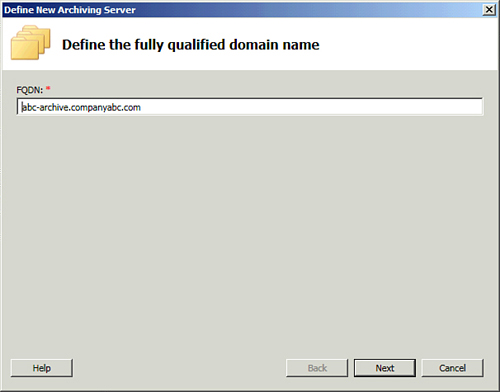
4. | Enter the FQDN for the new Archiving Server, as shown in Figure 2, and click Next.

|
5. | Choose the SQL store or define a new one. Click Next.
|
6. | Choose the file store, either an existing or a new one. Click Next.
|
7. | Associate the archive to a Front End pool by checking the box for the appropriate pool. Click Finish.
|
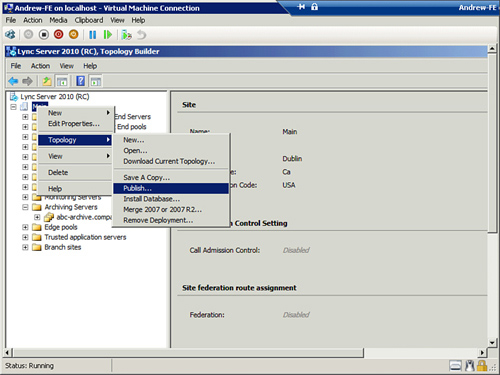
8. | Select the site at the top of the Topology Builder, right-click, choose Topology, and then Publish, as shown in Figure 3.

|
9. | In the screen that displays, select Next.
|
10. | Ensure that the correct Central Management Store is chosen and click Next.
|
11. | Click Next one more time to begin publishing the updated topology to the Central Management Store, as shown in Figure 4.

|
12. | Click Finish to return to the main Topology Builder screen.
|
13. | Expand the appropriate section, either Standard Edition front ends or Enterprise Edition front ends, and then select a pool.
|
14. | Right-click and select Edit Properties.
|
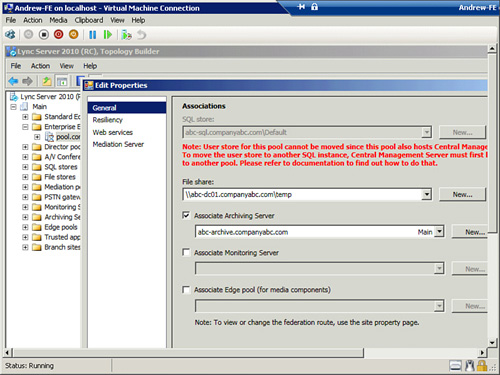
15. | Select the Associate Archiving Server check box and then select the Archiving Server FQDN you previously defined, as shown in Figure 5. Click OK.

|
16. | Finally, republish the topology one more time by right-clicking the site name and choosing Topology, and then choose Publish. Click Next for the next three screens to publish the topology, and then click Finish when the task is completed.
|
Installing the Archiving Server Role
Caution
It is important to note that
if you jumped to this section before completing the previous steps, you
need to go back. Building a valid topology in the Topology Builder tool
is a prerequisite to installing the Archiving Server role.
Installing the Archiving Server
role in Lync Server 2010 is a different process than in Office
Communications Server (OCS) 2007 and 2007 R2—it involves more steps.
Administrators new to Lync Server 2010 are advised to review the new
features, requirements, and prequisites before beginning the
installation process.
The following prerequisites are required to install the Archiving Server Front End role:
After you complete the
previous steps, the server is ready to install the Archiving Server
role. From the main Lync Server 2010 Deployment Wizard screen, click Install or Update Lync Server System from the main pane.
1. | Run Setup from the setup files.
|
2. | Choose an installation path and click Install.
|
3. | Read and accept the license agreement and click OK.
|
4. | From the Deployment Wizard, click Install or Update Lync Server System.
|
5. | Click Run for Install Local Configuration Store.
|
6. | Leave the first option checked to retrieve configuration from the CMS and click Next. The window shows its progress, as shown in Figure 6.

|
7. | For Step 2: Setup or Remove Lync Server Components, click Run.
|
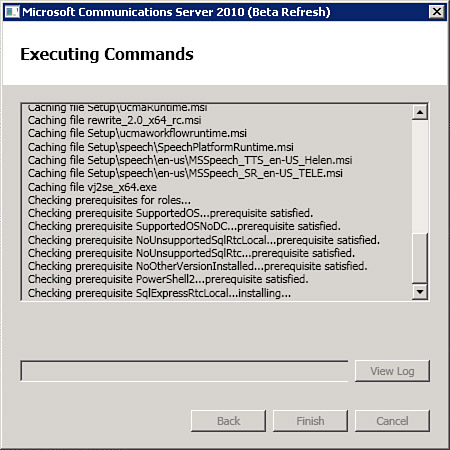
8. | In the pop-up screen, click Next. A window displays, as shown in Figure 7.

|
9. | When the process is complete, click Finish.
|
10. | For Step 4: Start Services, click Run.
|
11. | After the services start successfully, click Exit in the Deployment Wizard.
|