When you finish working on your Photoshop document,
you need to save it before you close the document or exit Photoshop.
While this may seem like a simple task, there are questions that must be
asked before saving a file, like What is the intended final output of the image?
For example, if the document is destined for the Internet, you’ll
probably save the document using the JPEG, GIF, or PNG formats. Each
output device, whether monitor or paper-based, requires a specific
format, and it’s best to know this information at the beginning of the
creation process. Knowing the eventual destination of an image helps you
create the design with the output in mind.
Save a Document
 Click the File menu, and then click Save.
|
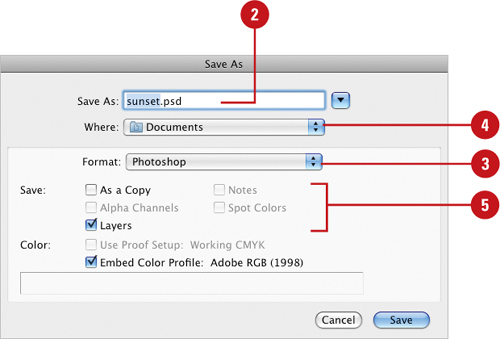
 Enter a name for the file in the File Name (Win) or Save As (Mac) box.

|
 Click the Format list arrow, and then select a format.
|
 Click the Save In (Win) or Where (Mac) list arrow, and then choose where to store the image.
|
 Select from the available Save options:
- As A Copy. Saves a copy of the file while keeping the current file on your desktop.
- Alpha Channels. Saves or removes alpha channel information for the image.
- Layers.
Maintains all layers in the image. If this option is cleared or
unavailable, all visible layers are flattened or merged (depending on
the selected format).
- Notes. Saves notes with the image.
- Spot Colors. Saves or removes spot channel information for the image.
|
When you use the Save
command from the File menu to save an existing document, Photoshop
performs the save without opening a dialog box. That means the original
document file has been replaced with the current state of the image. To
preserve the original document, use the Save As command from the File
menu, and then give the document a new name. For example, a file
originally named landscape.psd could be saved as landscape_1.psd. You
could keep creating new files with new names using the Save As command
as you make changes, or you could use Layer Comps or Adobe Drive to keep
track of different versions of the same file.
|
|
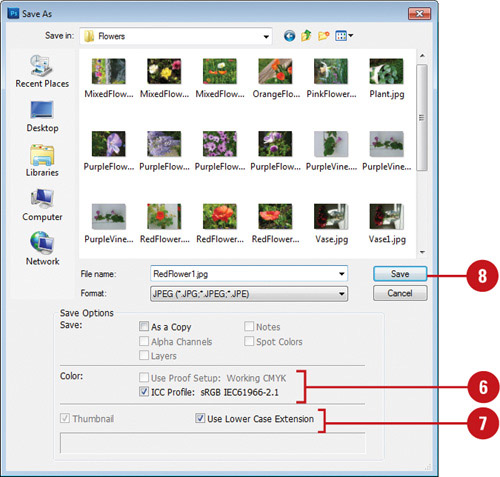
 Select from the available Color options:
- Use Proof Setup. Creates a color-managed document.
- Embed ICC Profile (Win) or Color Profile (Mac). Embeds proof profile information in an untagged document. If the document is tagged, the profile is embedded by default.
 |
 Select from other available options (Win):
|
 Click Save.
|
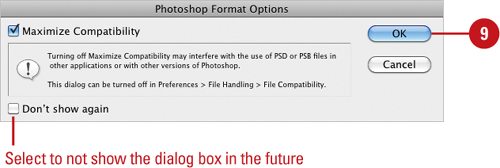
 If prompted, select the Maximize Compatibility check box, and then click OK to maximize the compatibility of the file save.

|
When you save a Photoshop PSD
or PSB file, you can set an option to maximize compatibility for use in
other programs. Click the Edit (Win) or Photoshop (Mac) menu, point to
Preferences, click File Handling, click the Maximize PSD and PSB File
Compatibility list arrow, and then select Always or Ask. This saves a
composite (flattened) image along with the layers of the document, which
also increases the file size. If you select Ask, a dialog box appears
when you save a PSD or PSB file, prompting you for options (which
includes a Don’t show again check box (New!)). If you only work with files in Photoshop or file size is not an issue, you can select Never to not use the option.