IT tutorials
 
Office
 

Microsoft Excel 2010 : Printing in Excel - Adding Headers and Footers, Printing Worksheets

- Free product key for windows 10
- Free Product Key for Microsoft office 365
- Product Key Free : Microsoft Office 2019 – Serial Number
2/16/2012 4:55:27 PM

Adding Headers and Footers

Headers and footers appear at the top and bottom of printed pages of Excel worksheets and can display the filename, the date and time the worksheet was printed, and the worksheet’s name, or you can create your own custom header or footer.


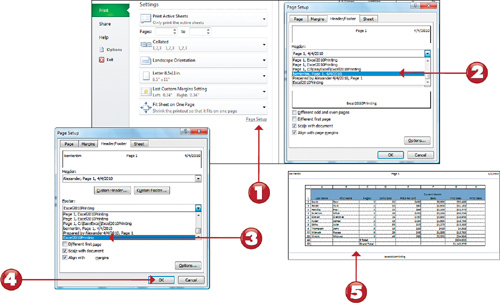
1. Go to the Print pane in the Backstage View and click the Page Setup link.

2. On the Header/Footer tab, click the down arrow next to the Header field, and scroll through the header options. If you see one you like, click it to see what it looks like.

3. Click the down arrow next to the Footer, and scroll through the footer options. If you see one you like, click it to see what it looks like.

4. Click OK.

5. You can view the worksheet in Print Preview mode to get an idea of what your printed worksheet will look like with headers and footers.


Printing Worksheets

Printing a worksheet, workbook, or chart sheet is quite simple, but setting the options for printing can be complex. The number of options that must be set before printing depends on the amount of data stored in the workbook, how it is arranged, how much of it needs to be printed, and how you want the printout to look.


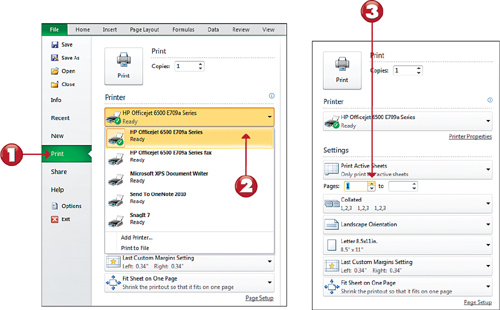
1. Go the File tab and click Print.

2. Click the down arrow next to the Printer Name field to choose the printer or fax you want to use.

3. In the Print range area, click Page(s) From and To, and type the pages you want to include in the range (for example, from 2 to 5) or keep the All (default).

Note: Vertical or Horizontal Page Order

If you work with a large worksheet, you can specify the page order for your worksheet. Go to the Page Layout tab and click the Page Setup dialog launcher. Once the Page Setup dialog box activates, you can click on the Sheet tab. Review the options of Down, then over (default) and Over, and then down in the Page order area of the Page Setup dialog box.


Note: Setting Additional Print Options

To set additional print options, such as the paper size, graphic options, font options, and printer details, click the Printer Properties link in the Print section of Backstage view.


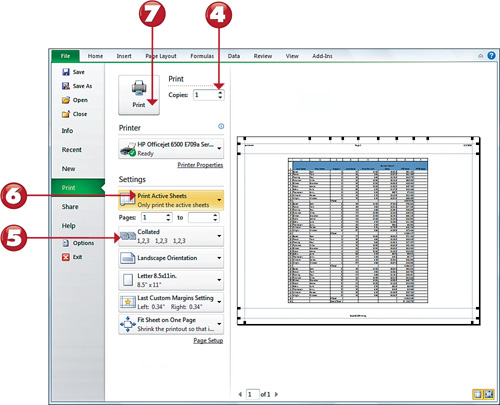
4. Type the number of copies you want to print in the Number of Copies field, which defaults to 1.

5. If you want the printed pages to be collated, click the Collate drop-down to set that option.

6. In the Settings group, click either Selection (only selected cells), Active Sheet(s) (currently sheets), or Entire workbook (all worksheets and chart sheets).

7. Click the Print button to send your printout to the printer.


Tip: Quick Printing

You can add the Quick Print command to your Quick Access Toolbar. This allows you to print your entire worksheet without going to the Backstage View.

 
Others
 
- Microsoft Excel 2010 : Printing in Excel - Printing Cell Comments, Printing Cell Error Indicators & Printing Repeating Row and Column Titles
- Microsoft Outlook 2010 : Creating and Sending Messages (part 2) - Saving and Sending Messages
- Microsoft Outlook 2010 : Creating and Sending Messages (part 1) - Troubleshooting Message Addressing
- Boosting Your Productivity in Word 2010 : Share Building Blocks with Others
- Boosting Your Productivity in Word 2010 : Add a Header or Footer Building Block
- Project 2010 as an Enabling Tool for Project Managers : When to Use Project
- Microsoft Project 2010 : Setting Up Cost Resources & Documenting Resources
- Microsoft Visio 2010 : Working Around the Diagram - Getting Started with a New Drawing
- Microsoft PowerPoint 2010 : Formatting Tables
- Microsoft PowerPoint 2010 : Inserting Tables
 
 
Top 10
 
- Microsoft Visio 2013 : Adding Structure to Your Diagrams - Finding containers and lists in Visio (part 2) - Wireframes,Legends
- Microsoft Visio 2013 : Adding Structure to Your Diagrams - Finding containers and lists in Visio (part 1) - Swimlanes
- Microsoft Visio 2013 : Adding Structure to Your Diagrams - Formatting and sizing lists
- Microsoft Visio 2013 : Adding Structure to Your Diagrams - Adding shapes to lists
- Microsoft Visio 2013 : Adding Structure to Your Diagrams - Sizing containers
- Microsoft Access 2010 : Control Properties and Why to Use Them (part 3) - The Other Properties of a Control
- Microsoft Access 2010 : Control Properties and Why to Use Them (part 2) - The Data Properties of a Control
- Microsoft Access 2010 : Control Properties and Why to Use Them (part 1) - The Format Properties of a Control
- Microsoft Access 2010 : Form Properties and Why Should You Use Them - Working with the Properties Window
- Microsoft Visio 2013 : Using the Organization Chart Wizard with new data
Technology FAQ
- Is possible to just to use a wireless router to extend wireless access to wireless access points?
- Ruby - Insert Struct to MySql
- how to find my Symantec pcAnywhere serial number
- About direct X / Open GL issue
- How to determine eclipse version?
- What SAN cert Exchange 2010 for UM, OA?
- How do I populate a SQL Express table from Excel file?
- code for express check out with Paypal.
- Problem with Templated User Control
- ShellExecute SW_HIDE
programming4us programming4us